Kore.ai’s XO Platform enables you to launch enterprise-grade, AI-enabled conversational Virtual Assistants using Bot Builder; an intuitive graphical interface for building, training, testing, and monitoring virtual assistants.
Whether you are looking to build a complex VA that has to make multiple calls to your backend systems with conditional routing, or a VA that sends contextual notifications to your users, or even a VA that responds to their queries, creating VAs has never been easier.
Accessing a Bot Builder
To access the Kore.ai’s XO Platform, visit https://bots.kore.ai/. You will be directed to the login page.
You can sign up for Kore.ai’s XO Platform in any of the following two ways:
- Create a new account: The Kore.ai’s XO Platform allows any user to sign up for the platform using their email address. You can sign up to create a personal account or even take the lead in setting up your enterprise’s account in Kore.ai. After you sign up for the account, you automatically become the account’s Admin, which allows you to invite other users to the account.
- Join an existing enterprise account: If your enterprise is already on Kore.ai, you can become a part of the account in one of the following ways:
- Your enterprise account’s Bots Admin sends you an invite. If you haven’t already received the invitation email, reach out to your Bots Admin for access.
- You can sign up using your enterprise email account and you are prompted to either join the enterprise network or create your own personal account.
- Single-Sign On Account: You can also sign up using Google, Microsoft Office or LinkedIn profiles.
New Account Sign-up
To sign up for a new account on the Kore.ai’s XO Platform, follow the below steps:
- Go to https://bots.kore.ai/botbuilder/login.
- On the Sign-up page, enter the email ID in the Enter your email field.
Note: If the email address is already registered, the platform initiates the sign-in workflow and prompts for the password.
- Enter all the other details to create the account.
Note: The account you create is identified by the Company/Account name. When you invite other users to the account, the email includes this name.
- Click Sign up. A confirmation email is sent to the email address entered. Confirm the link to sign in to the new account. Once you confirm the link, your account is created.
- Additionally, sign up to the Kore.ai XO Platform using Google, Microsoft Office or LinkedIn profiles.

Note: Kore.ai XO Platform uses SAML-based authentication for completing the sign up and sign in flows.
Landing Page
After you sign in to Kore.ai’s XO Platform, you are directed to the landing page. From this page you can access various offerings:
-
Virtual Assistants – Design, build, test, and deploy AI-powered virtual assistants. This is selected by default. Refer here for more.
- Process Apps – Build multi-step and multi-user workflows for automating internal and external processes, for example, expense reimbursement, leave approval, etc. Refer here for more.
- Data – Define Data Tables, Table Views, and manipulate them from your Virtual Assistants and Process Apps. Thus taking care of your data needs, without having to depend on external services. Refer here for more.
- Explore Store – Explore and import template virtual assistants from Kore.ai’s online marketplace that run on the Kore.ai platform. Refer here for more.

Inviting User – Bot Admin
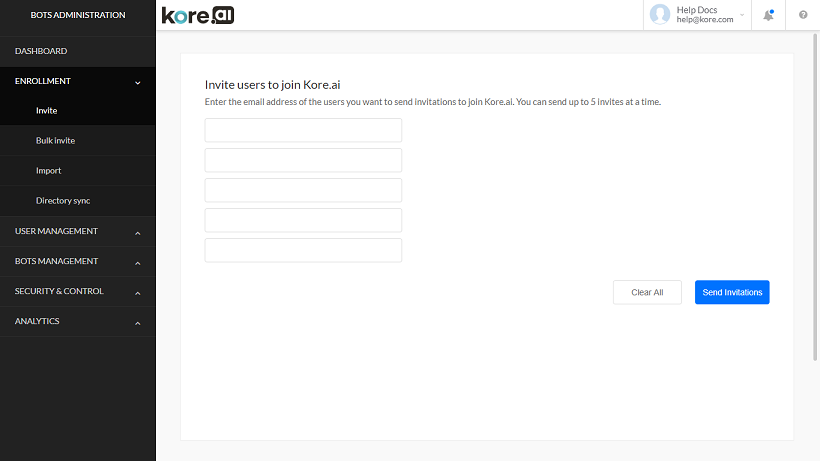
Account administrators can add other enterprise users to the virtual assistant account by inviting them from the Bots Admin portal.
To invite users to your Kore.ai’s XO Platform account, follow the below steps:
- Sign in to the Bots Admin portal.
- On the left pane, select Enrollment > Invite.
- Enter the email IDs of the users you want to invite.
- Click Send Invitation. An invitation email is sent to these users.

- When the invited user accepts the invitation, they are redirected to the Sign-up page.
- If the user is new to the platform, they need to enter the required details shown in step 3 to complete the registration.
- If the user’s email address is already registered on the platform, the user is prompted to enter the password to sign in.
Giving Access to Bot Builder
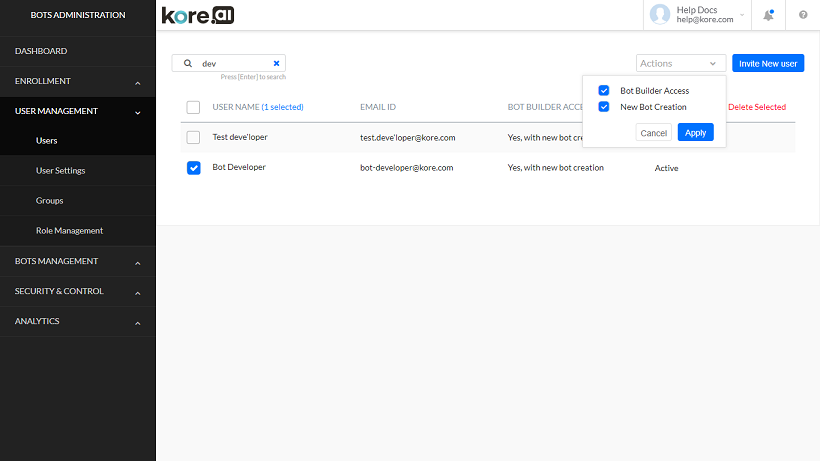
After a user is invited to an account, the administrator can enable Bot Builder access to these users. To give Bot Builder access to an account user, follow the below steps:
- Sign in to the Bots Admin portal.
- On the left pane, select User Management > Users.
- On the Manage Users window, select the users to whom you want to assign the Bot Builder Access.
- From the Actions drop-down list, select Bot Builder Access and click Apply.

