Chatbot Overview
Conversational Bots
Intents & Entities
Intelligent Bots
Kore.ai's Approach
Kore.ai Conversational Platform
Bot Concepts and Terminology
Natural Language Processing (NLP)
Bot Types
Bot Tasks
Starting with Kore.ai Platform
How to Access Bot Builder
Working with Kore.ai Bot Builder
Building your first Bot
Getting Started with Building Bots
Using the Dialog Builder Tool
Creating a Simple Bot
Release Notes
Latest Updates
Older Releases
Deprecations
Bot Builder
Creating a Bot
Design
Develop
Storyboard
Dialog Task
User Intent Node
Dialog Node
Entity Node
Supported Entity Types
Composite Entities
Supported Time Zones
Supported Colors
Supported Company Names
Form Node
Logic Node
Message Nodes
Confirmation Nodes
Service Node
Custom Authentication
2-way SSL for Service nodes
Script Node
Agent Transfer Node
WebHook Node
Grouping Nodes
Connections & Transitions
Managing Dialogs
User Prompts
Alert Tasks
Alert Tasks
Ignore Words and Field Memory
Digital Forms
Digital Views
Knowledge Graph
Terminology
Building
Generation
Importing and Exporting
Analysis
Knowledge Extraction
Small Talk
Action & Information Task
Action Tasks
Information Tasks
Establishing Flows
Natural Language
Overview
Machine Learning
ML Model
Fundamental Meaning
NLP Settings and Guidelines
Knowledge Graph Training
Traits
Ranking and Resolver
NLP Detection
Advanced NLP Configurations
Bot Intelligence
Overview
Context Management
Session and Context Variables
Context Object
Dialog Management
Sub-Intents
Amend Entity
Multi-Intent Detection
Sentiment Management
Tone Analysis
Sentiment Management
Default Conversations
Default Standard Responses
Channel Enablement
Test & Debug
Talk to Bot
Utterance Testing
Batch Testing
Record Conversations
Publishing your Bot
Analyzing your Bot
Overview
Dashboard
Custom Dashboard
Conversation Flows
Bot Metrics
Advanced Topics
Bot Authorization
Language Management
Collaborative Development
IVR Integration
Data Table
Universal Bots
Defining
Creating
Training
Customizing
Enabling Languages
Smart Bots
Defining
Sample Bots
Github
Asana
Travel Planning
Flight Search
Event Based Bot Actions
koreUtil Libraries
Bot Settings
Bot Functions
General Settings
PII Settings
Customizing Error Messages
Manage Sessions
Bot Management
Bot Versioning
Using Bot Variables
API Guide
API Overview
API List
API Collection
SDKs
SDK Overview
SDK Security
SDK App Registration
Web SDK Tutorial
Message Formatting and Templates
Mobile SDK Push Notification
Widget SDK Tutorial
Widget SDK – Message Formatting and Templates
Web Socket Connect & RTM
Using the BotKit SDK
Installing
Configuring
Events
Functions
BotKit SDK Tutorial – Agent Transfer
BotKit SDK Tutorial – Flight Search Sample Bot
Using an External NLP Engine
Bot Administration
Bots Admin Console
Dashboard
User Management
Managing Users
Managing Groups
Managing Role
Bots Management
Enrollment
Inviting Users
Bulk Invites
Importing Users
Synchronizing Users from AD
Security & Compliance
Using Single Sign-On
Security Settings
Cloud Connector
Analytics
Billing
How Tos
Creating a Simple Bot
Creating a Banking Bot
Transfer Funds Task
Update Balance Task
Context Switching
Using Traits
Schedule a Smart Alert
Configure Digital Forms
Add Form Data into Data Tables
Configuring Digital Views
Add Data to Data Tables
Update Data in Data Tables
Custom Dashboard
Custom Tags to filter Bot Metrics
Patterns for Intents & Entities
Build Knowledge Graph
Global Variables
Content Variables
Using Bot Functions
Configure Agent Transfer
  1. Home
  2. Docs
  3. Bots
  4. Channel Enablement
  5. Adding the LivePerson Channel

Adding the LivePerson Channel

To add LivePerson as a channel to your Kore.ai bot, you will need to add a Bot user in LivePerson and setup the integration. Adding the LivePerson channel to your Kore.ai Bot allows end-users for your bot to interact with your bot using their LivePerson account.To add the LivePerson channel to your Bot, you will need to:

  1. Create a Bot Skill– To enable LivePerson as a channel for your Kore.ai bot, you will need to sign into LivePerson portal and create a bot skill. Initially, you must have created and registered for a LivePerson developer account.
  2. Add User- To add a Bot user in LivePerson channel, define Bot User details and other permissions.
  3. Generate API key– Copy the authorization details to enter them in the ‘Configurations’ tab of the LivePerson channel page.
  4. Enable channel- After completing the integration and entering the Configuration details, you will need to enable channel.
To add the LivePerson channel:
  1. In the Bots section of the Bot Builder, click the Bot that you want to add the LivePerson channel to.
  2. On the Channels tab,click the LivePerson icon. The LivePerson Channel page gets displayed.
  3. In a new browser tab, sign in to your LivePerson account as an administrator and then navigate to the Users tab.
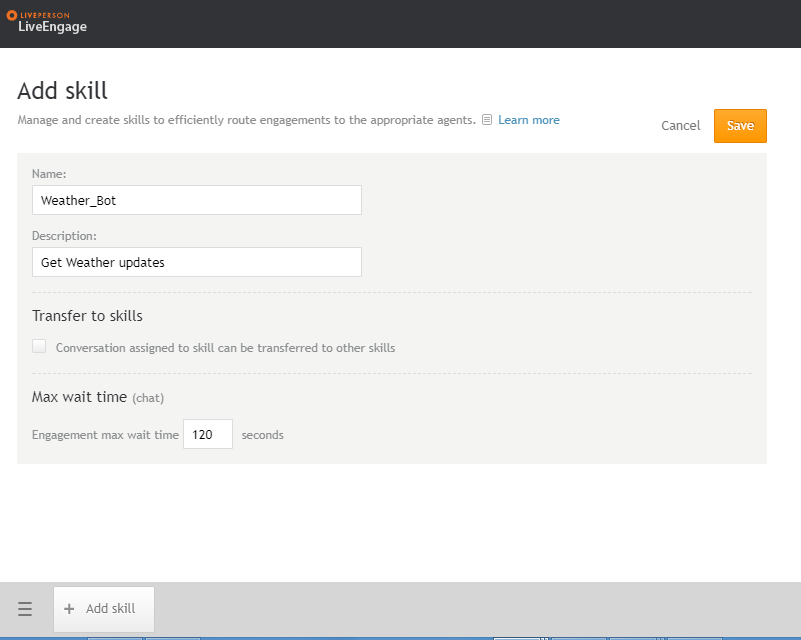
  4. In the Users section, click on the Skill tab and select Add Skill to create a new skill (From the bottom bar)
  5. Add the skill name as <bot_name>. E.g. if your Kore.ai bot name is Weather Bot, then the skill name should be Weather Bot_bot.
  6. Give a Description for your bot, and then un-select the option ‘Conversation assigned to skill can be transferred to other skills’ and click Save to ‘Save’ the skill.
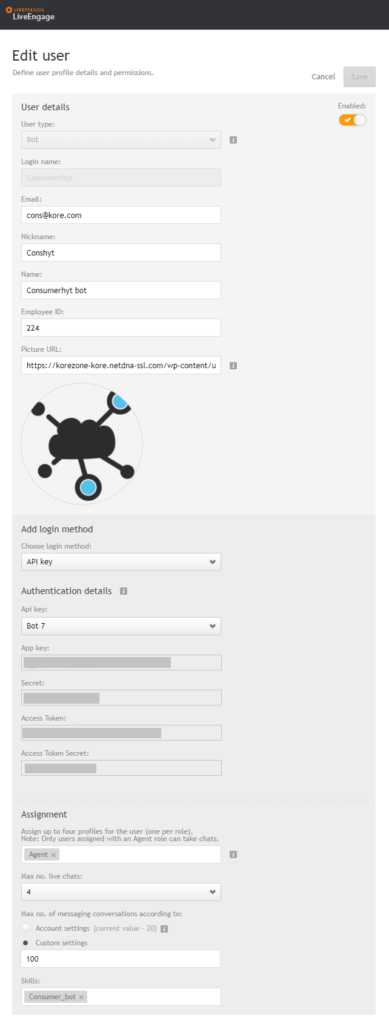
  7. To Add User, in the Add user page, select User Type as Bot and provide all other required details.
  8. Enter a Login name, Email, Nickname, Employee ID and Name. The nickname and name will be displayed on the screen in the user chat.
  9. Provide a URL for the Bot avatar.
  10. Choose the Login method as API Key, and select Generate API Key option from ‘Api key’ dropdown to generate new API key. Make note of the App key, Secret, Access Token and Access Token Secret and provide them in the Configurations tab of the LivePerson Channel page.
  11. Select Agent as the option in Assignment dropdown, set ‘Max no. live chats’ as Unlimited, and select the skill that was created in the previous step in ‘Skills’ dropdown.
  12. Navigate to the Configurations tab, and in the Account ID field, enter your LivePerson account ID.
  13. In the Login Name field, provide your ‘Login Name’ of the Bot user from your LivePerson account.
  14. To enter the API Key Details, Provide details of API KEY associated with your LivePerson user account.
  15. In the Enable Channel section, select Yes to activate the channel, and then click Save to complete user creation process.

Editing the LivePerson Channel

To edit the Live Person channel, hover your mouse over the channel to modify, and then click the Settings icon to display the command menu as shown in the following illustration.

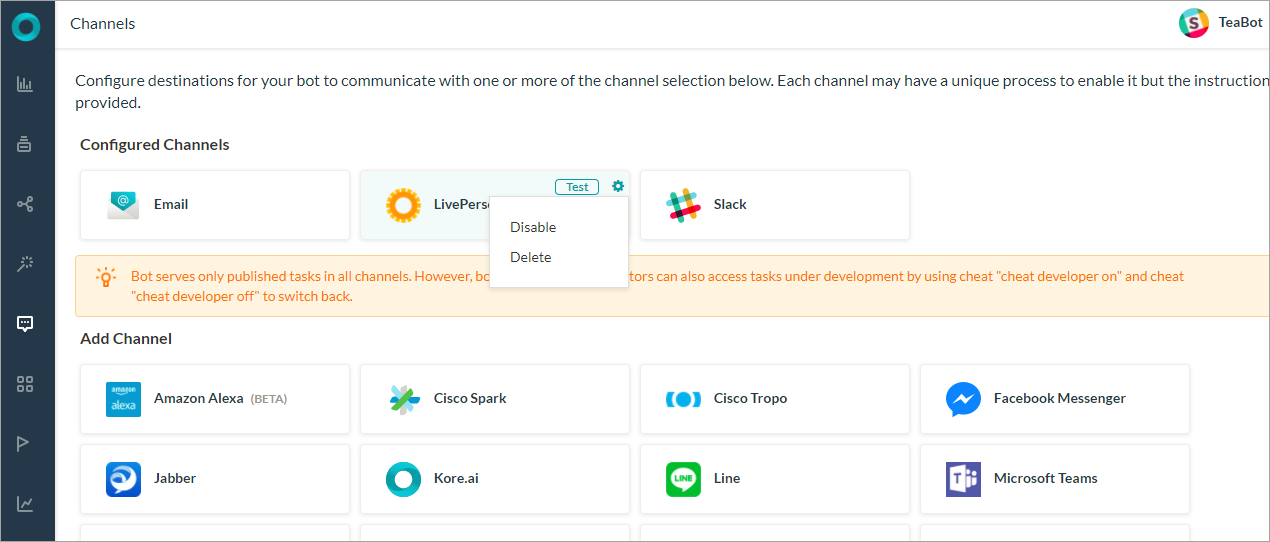
Select one of the following commands to modify the channel:

    • Disable/Enable – Click Disable to temporarily disable use of the LivePerson channel for your Bot.To enable use of the LivePerson channel, Click Enable.
    • Delete – Click Delete, and then click OK in the Delete Confirmation dialog to permanently delete the Bot channel configuration.
Warning: This operation is permanent, and cannot be undone.
Menu