
Training your Bot is not restricted to Machine Learning and Fundamental Meaning engines. You need to train the Knowledge Graph engine, too.
Knowledge Graph engine responds to users’ intents by identifying the appropriate questions from the Knowledge Collection.
Knowledge Graph
From the Knowledge Collection, follow these steps to build and train the corresponding Knowledge Graph:
- Identify terms by grouping the unique words in each FAQ question. Build an ontology based on all such unique words.
- Associate traits with terms to enable filtering FAQs from multiple identified results.
- Define synonyms for each term/node in the ontology. Ensure that all the different ways to call the term are defined.
- Depending on the importance of each term in a path, mark them as either mandatory or regular.
- Define alternative questions for each FAQ to ensure better coverage.
- Manage Context for accurate response.
- Stop Words can be used to filter unwanted utterances.
Training and testing your Knowledge Collection is crucial to building a Knowledge Graph.
Before training, you can improve performance by using tags, synonyms, and traits.
Tags
When you type a question in the User Says field, the Knowledge Graph suggests some tags that you can add to the graph based on the text. To include a suggested term to the path, select the tag from the drop-down list that appears when the cursor is in the Add Term field. You can also add custom tags by typing them in the add term field and hitting the enter key.
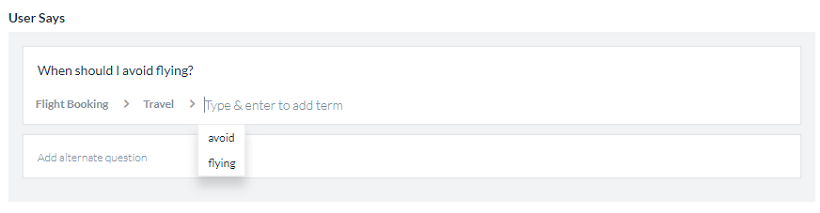
Once you add a tag, it will be visible below the question like a tag everywhere the question appears. Tags work exactly like terms but are not displayed in the Bot Ontology to avoid clutter. You can add synonyms and traits to tags as you do to terms.
Synonyms
You can add multiple synonyms for each term in your Knowledge Graph, making the path discoverable for varied user utterances. You can add synonyms for a term from the Settings window.
When you add a synonym for a term in the Knowledge Graph, you can add them as local (Path Level) or global (Knowledge Graph) synonyms.
Local synonyms apply to the term only in that particular path, whereas global synonyms apply to the term even if it appears on any other path in the ontology.
To add synonyms for a term:
- On the top left side of your Bot Ontology, hover over the node/term for which you want to add synonyms.
- Click the gear icon to open the Settings window.
- To add synonyms, do the following:
- To add local synonyms, type them in the box under Path Level Synonyms.
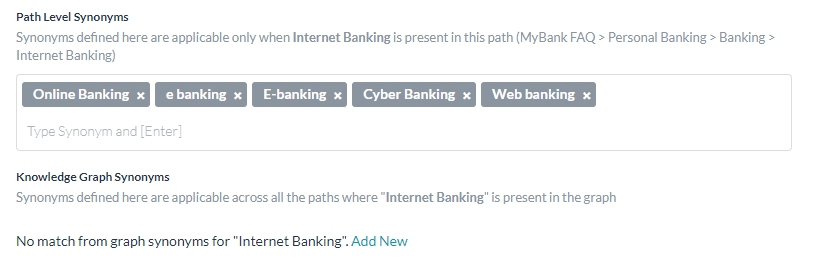
- To add Global synonyms, click Edit or Add New under Knowledge Graph Synonyms and enter them. These Graph Synonyms can also be accessed from the Manage Synonyms option under the more options icon on the top right corner of the Bot Ontology page.
Note: Press Enter after typing each synonym in the Synonyms box. If you type multiple synonyms without pressing enter after each synonym, all the synonyms are considered as a single entity, even if they are separated by spaces.
- To add local synonyms, type them in the box under Path Level Synonyms.
- To add synonyms for a child node, enter them in the Synonyms box next to the Child Terms listed at the bottom of the settings window.
To add synonyms for a tag:
- On the top left side of your Bot Ontology, click the term/node to which you have added the question.
- From the list of questions on the Questions panel, hover over the question.
- Click the edit icon and in the Edit Q&A window, double-click the tag. (You can edit custom tags alone not the default ones)
- On the Tag Settings window that opens, type each synonym and press Enter to add it.
Traits
NOTE: Traits replace Classes from before ver 6.4.
You can create traits with common user utterances and then add them to the relevant terms – nodes and tags, in your Knowledge Collection. To know more about Traits, click here.
To create a trait:
Traits are common across the Bot Builder if you have created Traits from Natural Language section they are available for use here.
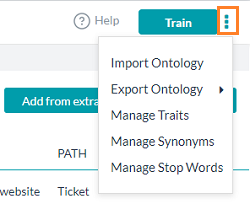
- On the top right side of your Bot Ontology window, click the more options icon and then select Manage Traits.
- In the Manage Traits pop-up window, click New Trait.
- In the Trait Type and Trait Name field, enter a relevant name for the trait, for example, Issues.
- In the Utterances box, enter all the utterances that you want to include in the trait. Examples of the Issues trait: it is not working, not working, is not working, and I cannot see.
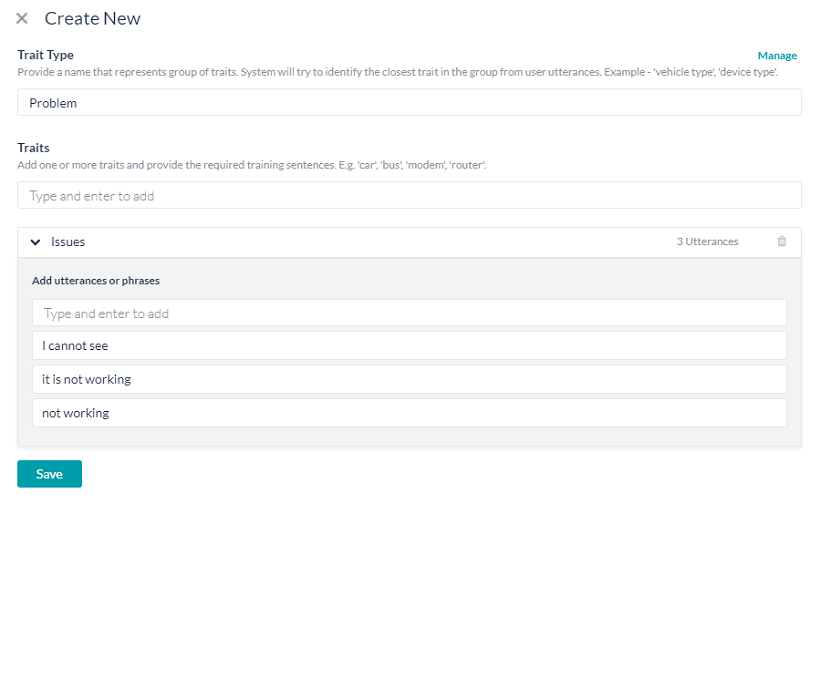
- Click Save.
After you create a trait, you can assign it to multiple nodes and tags in the Bot Ontology.
To add a trait to a node/term:
- On the top left side of your Bot Ontology, hover over the terms to which you want to add the trait.
- Click the gear icon to open the Settings window.
- In the Trait drop-down list, select the name of a trait and then click Save.
- On the top left side of your Bot Ontology, click the term to which you have added the question.
- From the list of questions on the Questions panel, hover over the question.
- Click the edit icon and in the Edit Q&A window, double-click the term. (You can edit custom terms alone not the default ones)
- From the Tag Settings window, in the Traits drop-down list, select the name of a trait and then click Save.
Context
You can Manage Context for the terms and tags by setting:
- the Intent Precondition – the context that should be present as a qualifier for this node or tag
- Context Output – the context that should be populated to signify the execution of this task
See here for more on Context Management.
Manage Usage
Designate the terms and tags in your ontology as Default, or Mandatory, or Organizer depending on their importance in qualifying matching paths:
- Default: Default terms do not have any particular considerations in shortlisting qualified paths.
- Mandatory: When you mark a term as Mandatory, all paths associated with the term are shortlisted for ranking only if the user’s utterance includes the mandatory term or its synonyms.
- Organizer: Term can be marked as being a part of the Knowledge Graph only for organizing questions (this option is available only for terms not tags).
Stop Words
Stop words present in the user utterance are discarded for scoring even if the stop word is used to define a node (or node synonyms).
Knowledge Graph has language specific predefined set of stop words. This list can be customized to suit your requirements.
To edit stop words list:
- From the Bot Ontology page, click on the more options icon and select Manage Stop Words
- From the Manage Stop Words window, delete or add stop words.
Train & Test
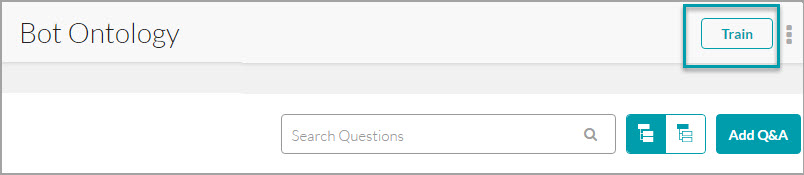
After you complete creating/editing the Bot Ontology, click the Train button on the top right-hand side of your Bot Ontology window. When you do so, all the paths, synonyms, and question-answer sets are sent to the Graph DB engine.
Test the Knowledge Graph
When you complete creating the Bot Ontology and training it, we recommend you to interact with the bot and ask questions connected to the Knowledge Collection. Test the bot responses by using a variety of utterances so that you can identify missing terms, questions, alternative questions, synonyms, and traits.
FAQ Detection Steps
The following FAQ Detection steps give you an overview of the process in which the KG engine shortlists the questions from a Knowledge Collection:
- Extract Nodes: The KG engine processes the user utterance to extract the term (ontology nodes) present in the collection. It also takes into consideration the synonyms, traits, and tags associated with the terms.
- Query Graph: The KG engine fetches all the paths that consist of the extracted nodes.
- Shortlist Paths: All the paths consisting of 50% or more matching terms with the user utterance are shortlisted for further processing. For example, the engine shortlists a path with four nodes such as Personal Banking → Joint Account → Add → Account Holder if at least two of these terms occur in the user utterance.
Note: Path coverage computation doesn’t consider the root node. - Filter with Traits: If you define any traits in the Knowledge Graph, paths shortlisted in the above step are further filtered based on the confidence score of a classification algorithm in user utterance.
- Send to Ranker: The KG engine then sends the shortlisted paths to the Ranker Program.
- Score based on Cosine Similarity: Ranker makes use of user-defined synonyms, lemma forms of word, n-grams, stop words, to compute the cosine similarity between user utterance and the shortlisted questions. Paths are ranked in non-increasing order of cosine similarity score.
- Qualify Matches: The ranker then qualifies the paths as follows:
- Paths with score >= upper_threshold are qualified as an answer (definitive match).
- Paths with lower_threshold < score < upper_threshold are marked as suggestion (probable match).
- Paths with score < lower_threshold are ignored.
Threshold & Configurations
To train and improve the performance, Threshold and Configurations can be specified for all three NLP engines – FM, KG, and ML. You can access these settings from Natural Language > Training > Thresholds & Configurations.
NOTE: If your Bot is multilingual, you can set the Thresholds differently for different languages. If not set, the Default Settings will be used for all languages. This feature is available from ver 7.0 onwards.
The settings for KG engine is discussed in detail in the following sections.
Navigating to Threshold and Configurations
- Open the bot for which you want to configure KG settings.
- Hover over the side navigation panel and then click Natural Language -> Training.
- Click the Thresholds & Configurations tab.
- Below is a detailed discussion about the Knowledge Collection section on this page.
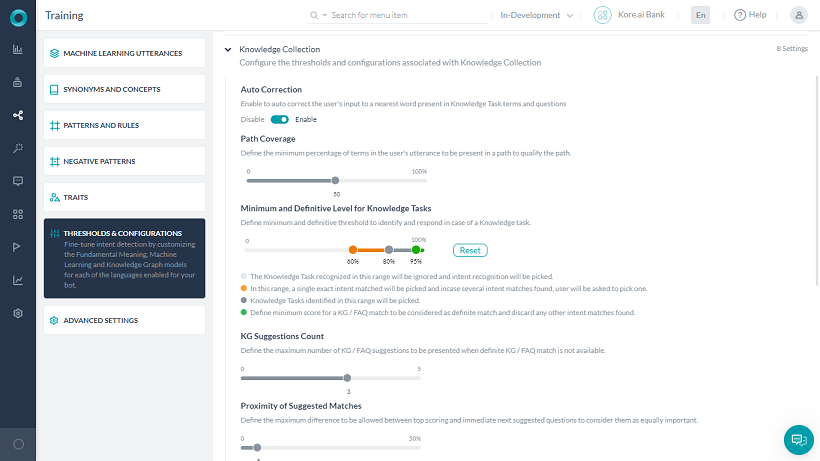
Auto Correction will spell correct the words in the user input to the closest matching word from the Bot’s KG domain dictionary. KG domain dictionary comprises of the words extracted from KG’s questions, alternate questions, nodes, and synonyms.
Path Coverage can be used to define the minimum percentage of terms in the user’s utterance to be present in a path to qualify it for further scoring.
Minimum and Definitive Level for Knowledge Tasks allows you to set the confidence levels for a Knowledge Task. You can view and adjust the confidence level percentages for the task in one of three ranges as:
- Definitive range – Matches in this range (green area) are picked and any other probable matches are discarded
- Probable range – Matches in this range (dark gray area) are considered for rescoring and ranking
- Low confidence range – If no other intents have matched, low confidence matches (orange area) are presented to end user for intent confirmation
- Not matching a task – The light gray area represents the knowledge task NLP interpreter confidence levels as too low to match the task intent.
KG Suggestions Count: Define the maximum number of KG / FAQ suggestions to be presented when a definite KG / FAQ match is not available.
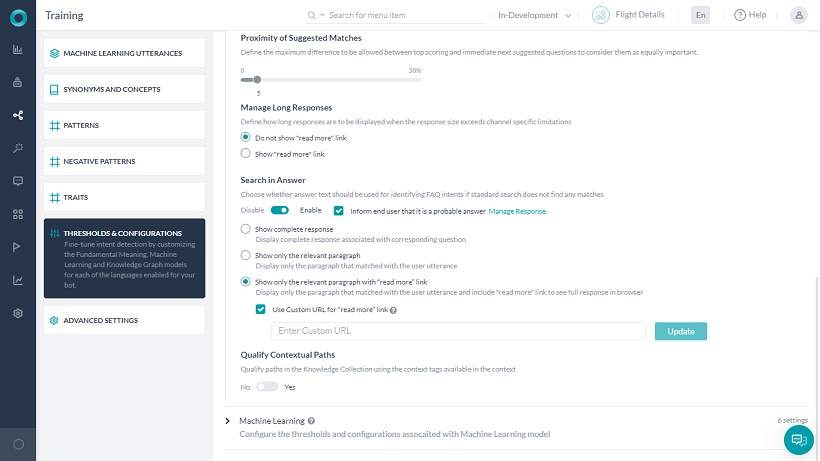
Proximity of Suggested Matches: Define the maximum difference to be allowed between top scoring and immediate next suggested questions to consider them as equally important. This applies to the matches in the Probable range.
Manage Long Responses when the response size exceeds channel specific limitations. You can choose to truncate the response or display the full response with a read more link. ‘Read More’ link will be included at the end of the message. On selecting this link, the full response will be opened as an answer in the browser. The URL to open the long response in a web browser is set by default by the platform. But you can provide a custom URL, too.
Search in Answer for the qualifying FAQs (see below for more)
Qualify Contextual Paths in the Knowledge Collection using the context tags available in the context.
Search in Answer
This feature will enable identifying FAQs by searching the user input against the answer section, instead of only matching with questions. This will be a fallback mechanism only i.e. search in the answer section will be done only if no FAQs are identified from questions.
When the ‘Search in Answer‘ flag is enabled, the KG engine will consider the answer text for identifying the intents also.
NOTE: Currently, this feature is supported only for the English language.
Once this option is enabled, you can specify whether to Inform the end user that the answer is a probable answer. If selected a Standard Message to the effect will be displayed, which can be customized using the Manage Response link. Know more.
There are three ways in which you can render the response:
- Show complete response: Full response will be sent as the answer to the user.
- Show only the relevant paragraph: Only the relevant paragraph from which the question was identified will be sent as the response.
- Show only the relevant paragraph with ‘Read More’ link: Only the relevant paragraph from which the question was identified will be sent as the response.
An additional ‘Read More’ link will be included at the end of the message. On selecting this link, the full response will be opened as an answer in the browser. The URL to open the long response in a web browser is set by default by the platform. But you can provide a custom URL (see below for details).
Custom URL Configuration:
By default, the URL to open the long response in the web browser is set by the platform. You have an option to provide a custom URL for rendering the FAQ answers.
The platform will call the provided URL with details of the relevant message template (template id) and other necessary information.
The following API gives the full information of the FAQ:
URL:
https://{{host-name}}/api/1.1/public/users/{{userId}}/faqs/resolvedResponse/{{respId}}
Method: get
Headers: {auth : JWT}
Sample Response:
{

"response": "You can contact our Branch officials wherein you have submitted your documents. If the documents are in order, the account will be opened within 2 working days.",

"primaryQuestion": "How to check the status of my account opening?"

}