
After you define a custom bot, you can add delivery channels to your bot that end-users can use to access and interact with your bot when it is deployed. For example, you can enable your bot for use in the Kore.ai Messaging application, or allow interaction with your bot through an email address or through a Twilio SMS account. You can also enable your bot in third-party applications such as Facebook or Slack. This topic describes how to add one or more delivery channels to your bot.
By default, a bot and any defined notification or action tasks are not available to users in any channel unless you define one or more channels for your bot. For enterprise bots, even if the bot has a channel defined, the Bots Admin must approve and deploy the bot to make it available to users in the enterprise.
You can add channels to your bot from the Channels tab. Channels supported by Kore.ai Bots platform are categorized based upon their functionality and usage.

Steps in Enabling a Channel
To enable one or more channels for your bot, follow these steps:
- Open the bot for which you want to add the channels.
- Hover your move over the side navigation panel, and then click Channels tab.
- Click the name of the channel you want to add to the page. It opens the instructions page to install the channel.

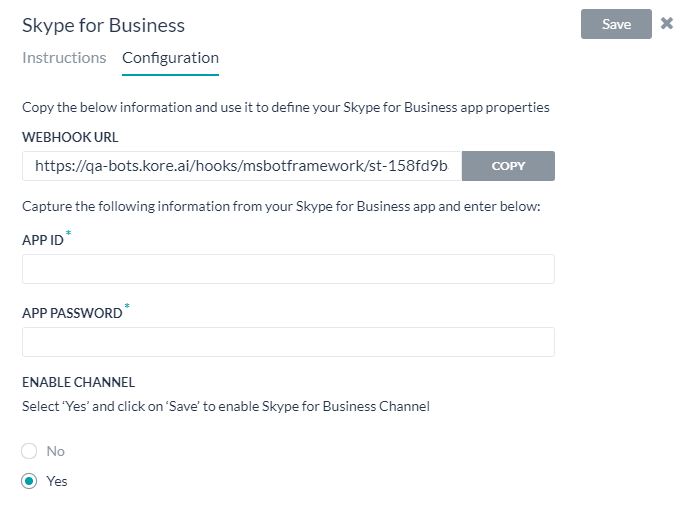
- Click Next or the Configuration tab to open the configuration page for the channel. This image shows the configuration page for the Skype for Business channel.
Note – After adding the channel to the bot, the bot needs to be published for approval and the bot Admin needs to approve the bot (with new channels). The new channel is not available to users until the Bots Admin explicitly approves that channel for your bot.
Available Channels
Click the Expand ![]() icon for the channel you want to add, and then configure the channel to work with your Kore.ai bot.
icon for the channel you want to add, and then configure the channel to work with your Kore.ai bot.
- Email – Generates an email address that end-users can send messages to interact with your bot. For more information, see Adding the Email Channel.
- Twilio – Displays the Twilio Channel page used to define settings for the Twilio messaging gateway to allow end-users to interact with your bot using SMS text messages. For more information, see Adding the Twilio Channel.
- Kore.ai – The bot users can access your bot using the Kore.ai Messaging application. By default, the Kore.ai channel is always enabled. For more information, see Adding the Kore.ai Channel.
- Facebook Messenger – Displays the Facebook Messenger Channel page used to define settings to allow end-users to interact with your bot using the Facebook Messenger application. This is a six-step configuration process. For more information, see Adding the Facebook Messenger Channel.
- Slack – Displays the Slack Channel page used to define settings to allow end-users to interact with your bot using Slack. This is a four-step process. For more information, see Adding the Slack Channel.
- Web / Mobile Client – Displays the Web / Mobile Client Channel page that you can use to register your company application and generate authentication tokens to allow end-users to interact with your bot using your company application. Only one company application can be registered to your bot, and only one set of authentication tokens are generated per bot for applications using the Kore.ai SDKs. For more information, see Adding the Web/Mobile Client Channel.
- Cisco Spark – Opens the Cisco Spark Channel page used to define the Cisco app registration, generate security tokens, and then integration with Spark for Kore.ai bots. For more information, see Adding the Cisco Spark Channel.
- Twitter – Displays the Twitter Channel page used to register with Twitter for the App Management Console to define an app to integrate your bot with the end-user Twitter account. For more information, see Adding the Twitter Channel.
- Skype – Displays the Skype Channel page where you register your bot on the Microsoft Bot Framework for Skype using a webhook. For more information, see Adding the Skype Channel.
- Skype for Business – Displays the Skype for Business Channel page where you register your bot on the Microsoft Bot Framework for Skype using a webhook. For more information, see Adding the Skype for Business Channel.
- Microsoft Teams – Displays the Microsoft Teams Channel page used to register your bot on the Microsoft Bot Framework developer portal, and then enable your bot in the Microsoft Teams messaging channel. For more information, see Adding the Microsoft Teams Channel.
- Cisco Tropo – On the Cisco Tropo Channel page, you can follow the steps to create a Cisco Tropo app, get an API key, and then enable the channel for messaging in the Cisco Tropo messaging application. For more information, see Adding the Cisco Tropo Channel.
- Workplace By Facebook – Click to display the Workplace by Facebook page to configure the settings to create a custom integration and enable a webhook in the Facebook Developer portal. For more information, see Adding the Workplace by Facebook Channel.
- LINE- Displays the LINE channel page that you can use to register your bot and generate authentication token for channel configuration using a webhook. For more information, see Adding the LINE Channel
- Telegram- Clicking on Telegram, navigates you to the Telegram Channel page to setup configuration details to enable Telegram channel to your Kore.ai bot.For more information, see Adding the Telegram Channel
- Yammer- Displays the Yammer Channel page that you can use to setup configurations and authorize association of Yammer app with your Kore.ai bot.For more information, see Adding the Yammer Channel.
- LivePerson- Displays the LivePerson Channel that can be used to register your bot and to define configuration settings to enable association of your Kore.ai bot with LivePerson. For more information, see Adding the LivePerson Channel
- Jabber- Opens the Jabber Channel page that you can use to register your bot on the Jabber Application by setting up a webhook integration. For more information, see Adding the Jabber Channel.
- Twilio Voice- Displays the Twilio Channel page where you can define channel configurations and add the Twilio number to be associated with your Kore.ai bot. For more information, see Adding the Twilio Voice Channel
- Amazon Alexa- Click to open the Amazon Alexa channel page that you can use to setup configuration for your Kore.ai bot using a webhook. For more information, see Adding the Amazon Alexa Channel
- Webhook – Click to open the Webhook channel page that you can use to setup configuration for your Kore.ai bot using a webhook. For more information, see Adding the Webhook Channel