
When it comes to automating customer interactions, IVR systems have proven to be among the top choices for organizations. But if you are using an Interactive Voice Response (IVR) system for your customer service, odds are you might have encountered these two issues quite often:
- Non-Intuitive Interface: IVR systems do not simply let the customers state their need. They make the users go through a plethora of menu options from which to select before finding their intent. Even if they allow users to express their intent at first go, the backend programs can only understand a limited number of phrases.
- Static Flows: IVR systems use static call flows that do not align with the nonlinear and contextual nature of human interactions. Take the following example of a customer trying to Book Flight tickets:
User: Book me a ticket to NYC
IVR: Sure, for which date?
User: Wait, will it rain there this Sunday?
IVR: Sorry, I don’t understand the input.
Conventional IVR system leaves limited room for the users to articulate their requests beyond the rigid program flows.
Kore.ai IVR Integration Support
Kore.ai allows you to give a conversational makeover to your IVR system. It lets you build chatbots with human-like conversation capabilities and integrate them with your existing IVR system, thus taking your organization’s customer service experience to a whole new level.
The following features enable the seamless integration of your Kore.ai Bots with your existing IVR:
- Native VXML Support: Built-in support to parse and generate W3C compliant VXML files.
- Hybrid integration: Flexibility to build use cases or dialogs on the Bots Platform, which can work in-sync with the IVR dialogs.
- Discourse Analyzer: Kore.ai’s discourse analyzer helps enterprises generate conversation flows using historical chat or call transcripts. Chat and call transcripts are analyzed using neural network-based machine learning models to identify intents and discourse patterns to fulfill a specific intent.
- Granular Call Flow Support: Ability to define all the call flow elements such as grammar, prompts, retry and time-out periods. Kore.ai supports call termination handlers, allowing you to end calls or invoke dialogs in case of exceptions.
Setting Up
Setting up IVR integration involves the following three steps:
- Configure Bot Settings: Define IVR settings such as transcription options, welcome messages, standard responses and VXML properties
- Dialog Definition: Define Dialog by configuring node-specific grammar, prompts, and call flow behavior like time-out, retries.
- Channel Setup: Set up authentication, configure WebHook in your IVR system and enable channel
Bot Settings
Step 1: IVR Settings for a Bot
As the first step of the integration, you first need to enable the IVR settings for the bot and define the Transcription options and VXML properties. These settings act as the default for the bot. You may override VXML properties defined at the bot level by defining custom values at the node level of the Dialog tasks.
To configure IVR settings for the bot
- Open the Bot for which you want to integrate the IVR.
- Hover over the Left navigation panel and select Channels
- Locate and click IVR Settings. The IVR Panel with Instructions opens.
- From the Configuration tab, either create or select the App to associate with the IVR channel.
- From the Settings tab set the configurations.
Note: The IVR Settings options on Dialog task nodes, Standard Responses, and Welcome Message become visible only when you enable IVR Settings for the bot.

- (Optional) To enable an external transcription engine, under Enable Transcription, select Yes.
- Enter the source of the transcription engine in the textbox that appears below.
Note: Bots Platform supports all UNIMRCP-encoded voice-to-text services. Only if you select the Enable Transcription option for the bot, the platform allows you to do away with defining grammar during configuring IVR settings for any node (described in Step 2).
- Enter the source of the transcription engine in the textbox that appears below.
- Enter the following details to complete the setup:
Field Description IVR Data Extraction Key Specify the syntax to extract the filled data Call Termination Handler Select the name of the Dialog task that you want to use as the call termination handler. VXML Properties Click Add Property. Enter property names and values to use in defining the VXML definition. Note: You should these properties and values in the VXML files for all call flows in the IVR system.Timeout Prompt Enter the default prompt text to play when the user doesn’t provide the input within the timeout period. If you do not specify a Timeout Prompt for any node, this prompt take its place. No Match Prompt Enter the default prompt text to play when user input is not present in the defined grammar. If you do not specify a No Match Prompt for any node, this prompt take its place. Barge-In Select whether you want to allow a user input while a prompt is in progress. If you select no, the user cannot provide input until IVR completes the prompt. Timeout Select the maximum wait time to receive user input from the drop-down list, from 1 second up to 60 seconds. No. of Retries Select the maximum number of retries to allow. You can select from just 1 retry up to 10 retries. Log Select Yes if you want to send the chat log to the IVR system.
Customize Standard Responses
After configuring the IVR settings for the bot, you can optionally customize the standard responses. Follow these steps to do so:
- Hover over the left navigation panel of the bot and click Natural Language -> Default Conversation.
- Click the Standard Responses tab.
- Click any sub-tab on the Standard Responses window, and hover over the desired field.
- Click Add IVR settings and enter the required values.
Refer to the next section for field references of each IVR setting.
Dialog Settings
Step 2: Setting Up IVR Settings for Dialog Nodes
The IVR Properties panel appears for a node when one of these conditions is met when the Enable IVR Settings in the IVR Settings page for the bot is enabled. On the IVR Properties panel for a node, you can enter node-specific prompts, grammar, as well as parameters for call-flow behavior such as time-out and retries.
IVR settings apply only for the following nodes and message types:
- Entity Node
- Message Node
- Confirmation Node
- Standard Responses
- Welcome Message
Configuring IVR Settings for a Node
To configure IVR settings for a node, hover over the node in the Dialog task and click the Settings icon. On the Properties panel, click the IVR icon.
IVR Settings Field Reference
The following sections provide detailed descriptions of each IVR setting, including descriptions, applicability to nodes, default values and other key information.
- Prompts:
- You can enter prompts in one of these formats: Plain text, Script, File location of an audio file. If you want to define JavaScript or attach an audio file, click the icon before the prompt text message box and select a mode. By default, it is set to Text mode.
- You can enter more than one prompt messages of different types. You can define their order of sequence by dragging and dropping them.
- Multiple prompts are useful in scenarios where the prompt has to be played more than once, to avoid repetition, since the prompts are played in order.
- Initial Prompts
Apply to: Entity, Confirmation, Message nodes; Standard Responses and Welcome Message
Prompts that are played when the IVR first executes the node. If you do not enter a prompt for a node, the default user prompt for the node plays by default. If you do not enter a prompt for Standard Responses and Welcome Message, the default Standard Response and Welcome Message are played by default. - Timeout Prompts
Apply to: Entity, Confirmation; Standard Responses and Welcome Message
Prompts that are played on the IVR channel when the user has not given any input within the specified time. If you do not enter a prompt for a node, the default Error Prompt of the node is played. Standard Responses and Welcomes have a default Timeout Prompt that plays if you don’t define No Match Prompts. - No Match Prompts
Apply to: Entity, Confirmation; Standard Responses and Welcome Message
Prompts that are played on the IVR channel when the user’s input has not matched any value in the defined grammar. If you do not enter a prompt here or select No Grammar option for an Entity or Confirmation node, the default Error Prompt of the node is played. Standard Responses and Welcomes have a default No Match Prompt that plays if you do not enter it. - Error Prompts
Apply to: Entity, Confirmation;
Prompts that are played on the IVR channel when user input is invalid Entity type. If you do not enter a prompt here, the default Error Prompt of the node is played. - Grammar
Applies to: Confirmation; Standard Responses and Welcome Message
Define the grammar that should be used to detect user’s utterance. You can define one or more grammars for a node.Note: If the Enable Transcription option is enabled for the bot along with specifying the source of the transcription engine, defining grammar isn’t mandatory.To define the grammar
- Select Speech or DTMF as the input type.
- Source of grammar can be Custom or Link from the drop-down list
- For Custom, write VXML grammar in the textbox below.
- For Link, enter the URL of the grammar. Ideally, the URL should be accessible to the IVR system so that the resource can be accessed while executing the calls at runtime.
- Advanced Options
These properties override the properties set in the Bot IVR Settings page.Field Description Timeout Select the maximum wait time to receive user input from the drop-down list, from 1 second up to 60 seconds. The default value is the same as defined in the Bot IVR Settings page. No. of Retries Select the maximum number of retries to allow. You can select from just 1 retry up to 10 retries.
The default value is the same as defined in the Bot IVR Settings page.Behavior on Exceeding Retries
(applies only to entity node)Define behavior when either the timeout or number of retry attempts exceed the specified limit. Options include: - Invoke CallTermination Handler
- Initiate Dialog: Select a Dialog task from the list of bot tasks.
- Jump to specific node in current task: Select a node from the list of nodes in the current Dialog task.
Barge-In Select whether you want to allow a user input while a prompt is in progress. If you select no, the user input is not considered until the prompt is completed. The default value is No. VXML Properties Click Add Property. Enter property names and values to use in defining the VXML definition. These values defined for a node or a standard response override the global VXML properties defined in the Bot IVR settings page. Log Select Yes if you want to send the chat log to the IVR system. The default value is No. Recording Define the state of recording to be initiated. The default value is Stop.
Channel Override
You can write JavaScript code for the prompts in Entity nodes, Standard Messages, and Welcome Message to take full control of the call behavior. In such cases, you should write channel override JavaScript that generates the entire VXML code as the Bots Platform doesn’t append the IVR VXML snippet, but substitutes it with the code you write.
Follow these steps to write channel override for an Entity node:
- Hover over the Entity node and click the icon.
- UnderUser Prompts or Error Prompts section, click Manage Prompts or Manage Errors respectively.
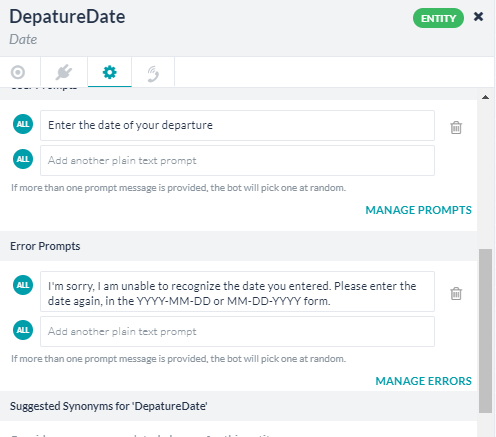
- Click Add Prompt Message.
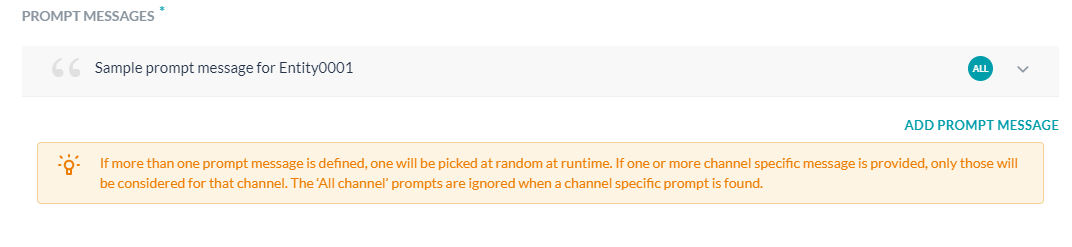
- From the Channels drop-down list, select IVR.
- On the Message editor, click JavaScript.

- Define JavaScript that generates the entire VXML code, and click Save.
Follow these steps to write channel override for a Standard Response:
- Hover over the select Standard Response and select Add Channel Response > IVR.
- On the Add Channel Overrides window, select the following:
- Channel: IVR
- Task and node for which to write the override.
- Under the Response editor, click Advanced Mode and type the code.
Channel Settings
Step 3: Setting Up IVR Channel for the Bot
After configuring IVR Settings at both the Bot and the Dialog levels, you should configure IVR Channel for the bot. IVR channel provides a generic integration to connect bots with IVR systems. Kore.ai platform generates required VXML files to be exchanged as part of bot interaction with the end user via the IVR systems.
Enabling IVR Channel and Associating an APP
Kore.ai Bots require a JWT token to authenticate the incoming requests from IVR. For generating JWT token, you should associate an app with the bot. You can select any of the existing Apps available in your Kore.ai account or create a new app.
- Hover over the side navigation panel of the bot and click Channels.
- On the Channels page, click IVR. The IVR Channel Instructions page opens.
- Click the Configuration tab.
- From the Select App drop-down list, select an existing App. If you do not have any app to associate the bot with, click Add.
- Copy the following:
- WebHook URL: For calling the bot from IVR.
- Client Secret: To generate JWT token that must be appended to the WebHook URL.
- Select Yes for Enable Channel.
Generating JWT Token
- Go to https://jwt.io/ nd scroll down the page to the Decoded section.
- Replace the contents in the Payload box with
- sub – set to user name or call Id; and
- appId – set to Client ID of the app copied in the previous section
- Scroll to Verify Signature section. In the Your-256-bit secret placeholder field, enter the copied Client Secret.
- Click Share JWT. The JWT token gets copied.
- JWT has to be passed in the IVR hook URL as value for the query parameter “token”:
https://bots.kore.ai/ivr/hooks/{{botId}}?token={{JWT}}
Calling Bot from IVR Call flow
You can pass data to the bot from the IVR call flow using VXML <subdialog> as shown in the picture below. The subdialog src should be Webhook URL with JWT Token which takes the following parameters as Input
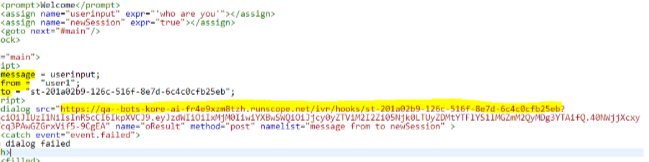
- message : Message from User
- from: Unique User’s Identity Ex: Phone Number
- to: Bot Stream Id
The endOfConversation variable should be processed from the data returned from the sub-dialog. If the value is set to true, it indicates that the dialog execution (conversation) is complete. It can be a triggering point to end the call with the user.