Chatbot Overview
Conversational Bots
Intents & Entities
Intelligent Bots
Kore.ai's Approach
Kore.ai Conversational Platform
Bot Concepts and Terminology
Natural Language Processing (NLP)
Bot Types
Bot Tasks
Starting with Kore.ai Platform
How to Access Bot Builder
Working with Kore.ai Bot Builder
Building your first Bot
Getting Started with Building Bots
Using the Dialog Builder Tool
Creating a Simple Bot
Release Notes
Latest Updates
Older Releases
Bot Builder
Creating a Bot
Design
Develop
Dialog Task
Working with User Intent Node
Working with the Dialog Node
Working with Entity Node
Supported Entity Types
Working with Composite Entities
Supported Time Zones
Supported Colors
Supported Company Names
Working with Message Nodes
Working with the Confirmation Nodes
Working with Service Node
Implementing Custom Authentication
Enabling 2-way SSL for Service nodes
Working with Script Node
Working with Agent Transfer Node
Working with WebHook Node
Defining Connections & Transitions
Managing Dialogs
Prompt Editor
Action & Information Task
Working with Action Tasks
Working with Information Tasks
Establishing Flows
Alert Tasks
Working with Alert Tasks
Managing Ignore Words and Field Memory
Knowledge Tasks
Knowledge Ontology
Building Knowledge Graph
Importing and Exporting Bot Ontology
Knowledge Extraction
Natural Language
Overview
Machine Learning
ML Model
Fundamental Meaning
Knowledge Graph Training
Traits
Ranking and Resolver
NLP Detection
NLP Settings and Guidelines
Bot Intelligence
Overview
Context Management
Session and Context Variables
Context Object
Dialog Management
Sub-Intents
Amend Entity
Multi-Intent Detection
Sentiment Management
Tone Analysis
Sentiment Management
Default Conversations
Default Standard Responses
Channel Enablement
Test & Debug
Talking to Bot
Utterance Testing
Batch Testing
Recording Conversations
Publishing your Bot
Analyzing your Bot
Overview
Dashboard
Conversation Flows
Bot Metrics
Advanced Topics
Bot Authorization
Language Management
Collaborative Development
IVR Integration
Universal Bots
Defining
Creating
Customizing
Enabling Languages
Smart Bots
Defining
Sample Bots
Github
Asana
Travel Planning
Flight Search
Event Based Bot Actions
Bot Settings
Bot Functions
General Settings
PII Settings
Customizing Error Messages
Bot Management
Using Bot Variables
API Guide
API Overview
API List
API Collection
SDKs
SDK Overview
SDK Security
SDK App Registration
Kore.ai Web SDK Tutorial
Message Formatting and Templates
Mobile SDK Push Notification
Web Socket Connect & RTM
Using the BotKit SDK
Installing the BotKit SDK
BotKit SDK Configuration
Events for the BotKit SDK
Functions for the BotKit SDK
BotKit SDK Tutorial – Agent Transfer
BotKit SDK Tutorial – Flight Search Sample Bot
Using an External NLP Engine
Bot Administration
Bots Admin Console
User Management
Managing Users
Managing Groups
Managing Role
Bots Management
Enrollment
Inviting Users
Sending Bulk Invites to Enroll Users
Importing Users and User Data
Synchronizing Users from Active Directory
Security & Compliance
Overview
Using Single Sign-On
Cloud Connector
Analytics
Billing
How Tos
Context Switching
Using Traits
Live Agent Transfer
Schedule a Smart Alert
Configure Agent Transfer
  1. Home
  2. Docs
  3. Bots
  4. Bot Settings
  5. General Settings

General Settings

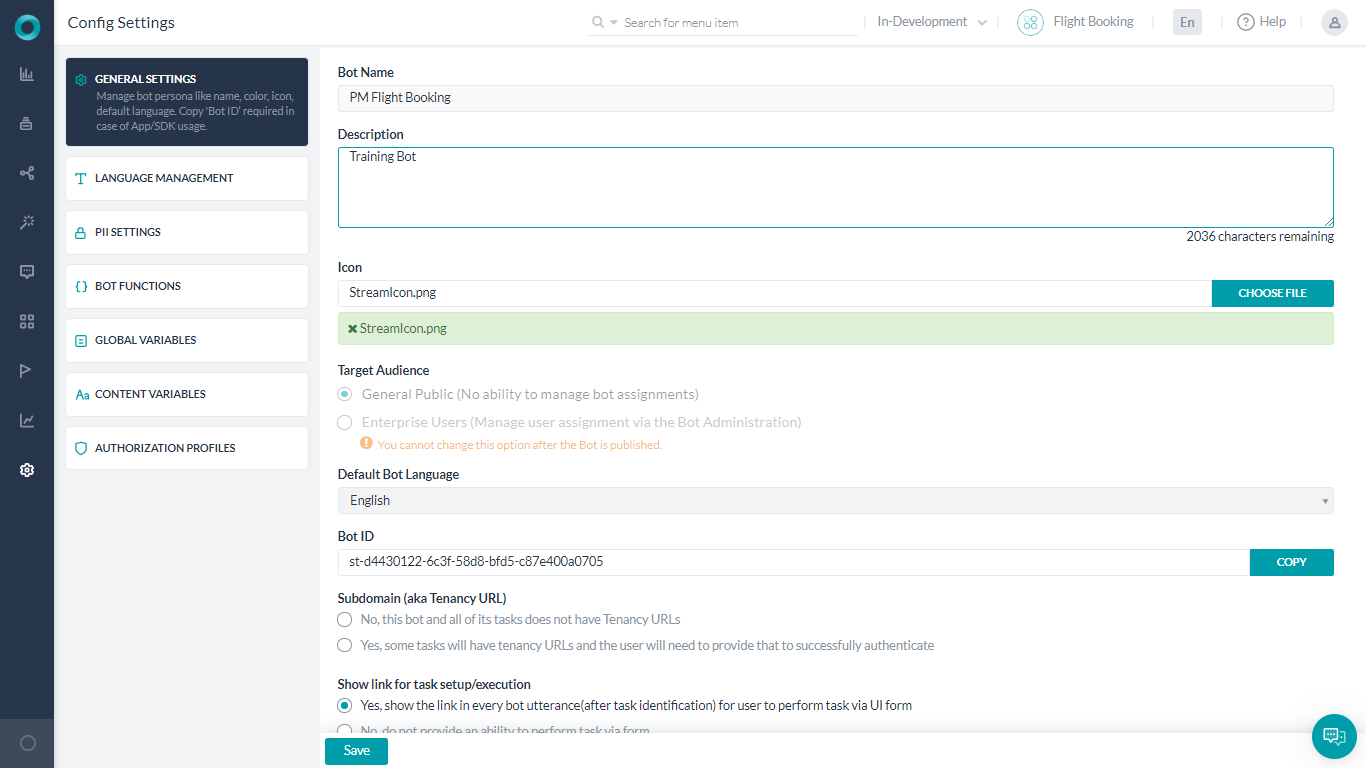
To modify the general settings of a bot, hover over the side navigation panel of the bot and click Settings -> Config Settings. The General Settings tab opens by default.

General Bot Settings

Modify one or more of the settings described in the following table.

Field Description
Bot Name The name of the Bot displayed in the Bot Store, for example, My Web Service Bot, as the name of a Bot shown in the title bar in the following illustration. While a Bot is published, the Name cannot be changed. This field is required.
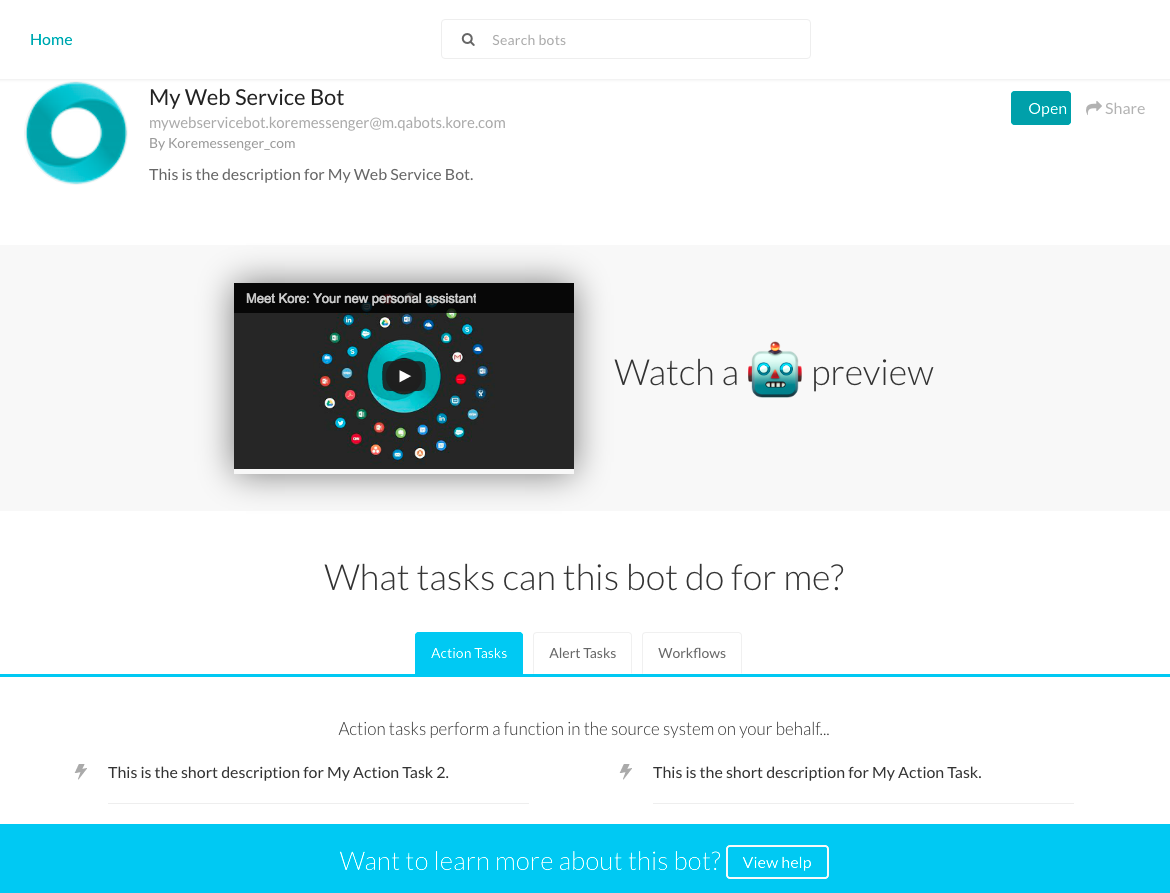
A Bot from the Bot Store
Description The description of the Bot, for example, This is the description for My Web Service Bot., displayed in Bot Builder and the Bot Store as shown in the previous illustration. This field is required.
Icon The icon image for the Bot displayed in Bot Builder, Bots Marketplace, and the end-user interface as shown in the previous illustration. The image format must be .png and best results are obtained using a 200 x 200-pixel image. This field is required.
Target Audience
  • Select General Public if the bot is for public use for both managed and unmanaged users in your domain. Bot assignments are not required and when the Bots Admin deploys the bot, it is available for use by all domain users. Use this option to make a bot widely available for all user types.
  • Select Enterprise Users if the bot is for managed users only in a domain, for example, for your employees or paid customers. After the Bots Admin approves and deploys this bot, it is not available to any managed users unless explicitly assigned by the Bots Admin. Use this option when you want to control which managed users in your domain can access and set up this bot on their devices.

Once Target Audience is defined and saved, you cannot change them.

Default Bot Language This is uneditable and is set at the time of Bot creation.
Bot Id Non-editable, assigned by the platform. Can be copied for use in API calls etc..
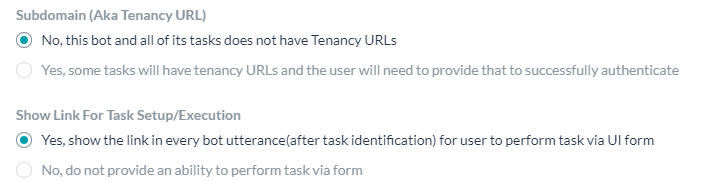
Subdomain (Tenancy) Click Yes to enable the use of tenancy. When the tenancy is defined, the end-user is prompted to enter a tenant name as part of the URL for the Bot, for example, kore, for the www.kore.someWebService.com tenant-specific URL.
When enabled define the following properties:

  • Help Hint – The text displayed to the end-user to prompt the user to enter a tenant-specific URL for the Bot.
  • Base URL – The base URL for the Bot that the end-user must specify their company to complete the tenant-specific URL using the following syntax:
    https://{tenant}.someWebService.com where {tenant}, including the braces, represents the tenant name.
     The following illustration is an example of a configured subdomain.
    Tenancy for Bots
Show link for task setup/execution
  • Select Yes to display a link to enable the choice for a user to input information used to execute a task in a user interface form or input the data directly into the message input field, for example, Enter the title for new Asana task. To make edits, click here. where here is a link to a form with fields.
  • When No is selected, the user can only input information for the task in the message input field. For example, Enter the title for new Asana task.
Error Message(s) Edit or add custom HTTP Status Codes and error messages for your Bot. For more information, see Customizing Error Messages.

To save the Bot settings, click Save. The < Bot Name > updated successfully message is displayed.

On this Page

Menu