
You can build a Bot Ontology in a CSV or JSON file and upload it to a bot to create your Knowledge Graph. Similarly, you can export existing Bot Ontology to CSV or JSON. Exporting an ontology helps you edit it in a spreadsheet or import it to another Bot.
Importing Ontology
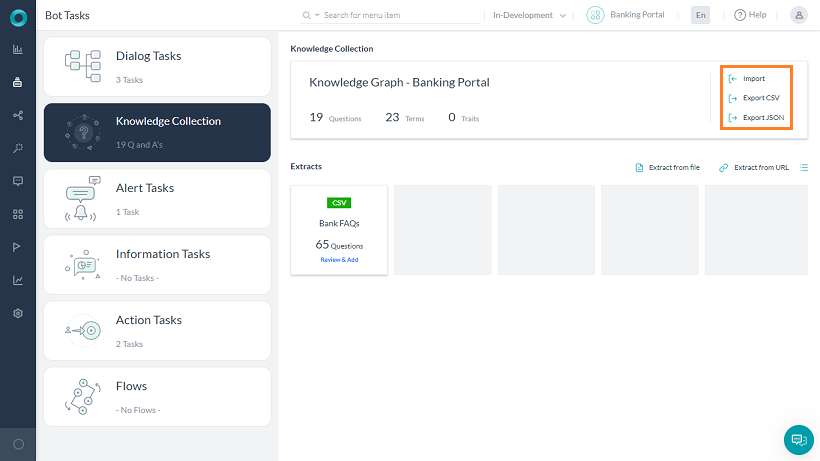
- Open Knowledge Collection.
- You will find the Import option against the Bot Ontology
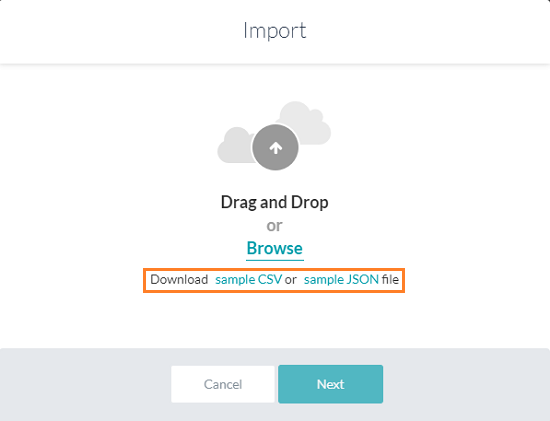
- Click Import.
- Do one of the following:
- If you are creating the Bot Ontology from scratch, click Proceed.
-or- - If you have an existing ontology, make sure to take a backup of the existing ontology to a CSV or JSON file, and then Proceed.
Note: Importing an ontology does not just update it but replaces the entire existing ontology.
- If you are creating the Bot Ontology from scratch, click Proceed.
- Drag and drop the file in the Import window or click Browse to navigate to the file.
- Click Next to begin the import.
- After the importing is completed, the success message appears in a dialog. Click Done.
- The ontology will be displayed in the Knowledge Collection and you can edit and train the same.
Exporting Ontology
To export an ontology:
- Open Knowledge Collection.
- You will find the Export option against the Bot Ontology
- Based on the preferred format: click Export JSON or Export CSV.
- The Ontology file will be downloaded to your machine.
Creating Bot Ontology
Instead of creating the Bot Ontology from the platform UI, you might want to work in your preferred editor like Spreadsheet or as a JSON file. The platform gives you the option to create a Bot Ontology in spreadsheet or JSON and use the same to Import it into the Bot.
This involves these steps:
- Download sample CSV or a JSON file. You can download these sample files from a blank Knowledge Collection too.
- Edit the file by adding rows corresponding to the questions, responses, synonyms, etc..
- Import the file to your Bot.
From a CSV File
You can create the bot ontology using a sample spreadsheet that can be downloaded from the bot. If you anticipate frequent changes to the Knowledge Graph, we recommend you to create it in a spreadsheet as it would easier to make bulk updates compared to the application UI.
Follow the instructions below to build your bot ontology in a spreadsheet.
Downloading the Sample CSV file
- Open the Knowledge Graph.
- Click Import from the left section.
- You will be prompted to back up the Knowledge Collection before proceeding. Choose the CSV or JSON format for the backup.
- After backup, click Proceed.
- On the next dialog, click Sample CSV. The CSV file is downloaded to your local computer.
Building the Bot Ontology in a CSV
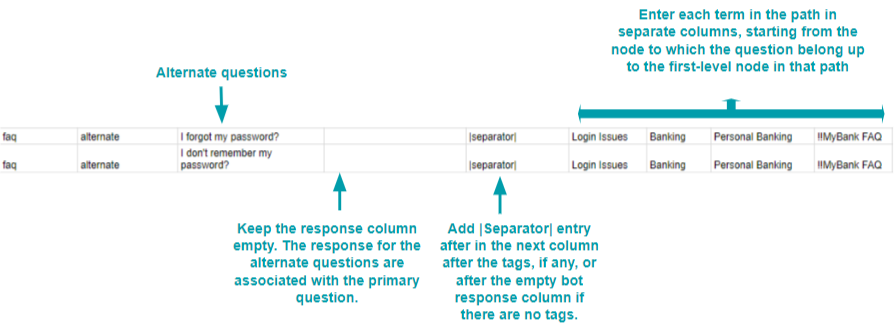
Open the downloaded Sample CSV file. If you have downloaded the sample from a blank Knowledge Collection, you will see some sample questions and responses.
The details that you need to enter in each row of the CSV file differ based on the type of information. For example, the details you need to enter for an FAQ (Question, Answer, Nodes, Alternate Questions) differ from the details you need to enter for Synonyms (Term, Synonyms).
The bot interprets the data present in each row of the CSV file, depending on the information type specified in Column # 1 of the row. Below are the valid entries for Column#1 of the CSV file, which represent the different information types:
- faq: Represents a primary or Alternate question in the Knowlege Graph.
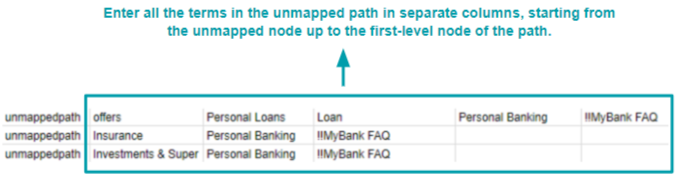
- unmappedpath: Represents nodes with no questions associated with it.
- synonyms: Represents global synonyms for terms.
- classes: Represents the trait names and their associated utterances.
Important notes
You cannot import or export the following bot elements using a CSV or spreadsheet
- Alternative Responses: While the spreadsheet support entering alternative questions for an FAQ, you cannot enter alternative responses in the spreadsheet and import them into the bot.
- Split Responses: You cannot enter or import FAQ responses that are split into multiple consecutive messages.
- Advanced Responses: The CSV import doesn’t support responses written in the advanced mode using JavaScript.
The following sections provide the remaining details that you must fill for each information type:
FAQ
Primary Question
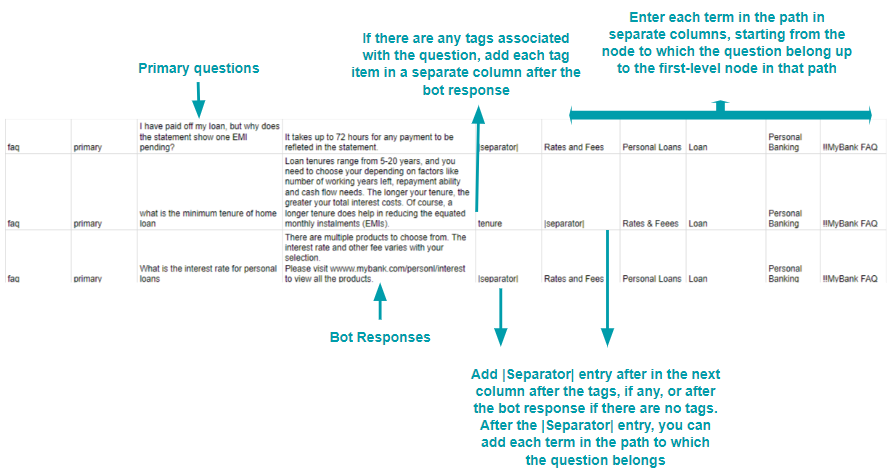
Note: Enter the names of all the parent nodes in separate columns until you reach the First-level node in the path.
Alternate Questions
Terms/Tags
- Mandatory tags and terms can be prefixed with **
- Organizer tags and terms can be prefixed with !!
Unmappedpath
Unmappedpath refers to nodes for which no question is added.
Global Synonyms

Path Synonyms

Traits
<tag/term-name>:<class-name>>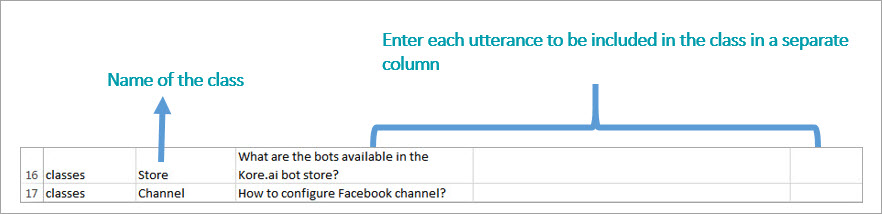
From a JSON file
Kore.ai allows you to create the Bot Ontology in JSON and upload it to the Knowledge Graph. You can download a sample JSON from the bot to understand its structure.
Follow the instructions below to build your Bot Ontology using JSON:
Downloading the JSON sample
- Open the Knowledge Graph.
- Click Import from the left section.
- You will be prompted to backup the Knowledge Collection before proceeding. Choose the CSV or JSON format for the backup.
- After backup, click Proceed.
- On the next dialog, click Sample JSON. The JSON file is downloaded to your local computer.
JSON Reference
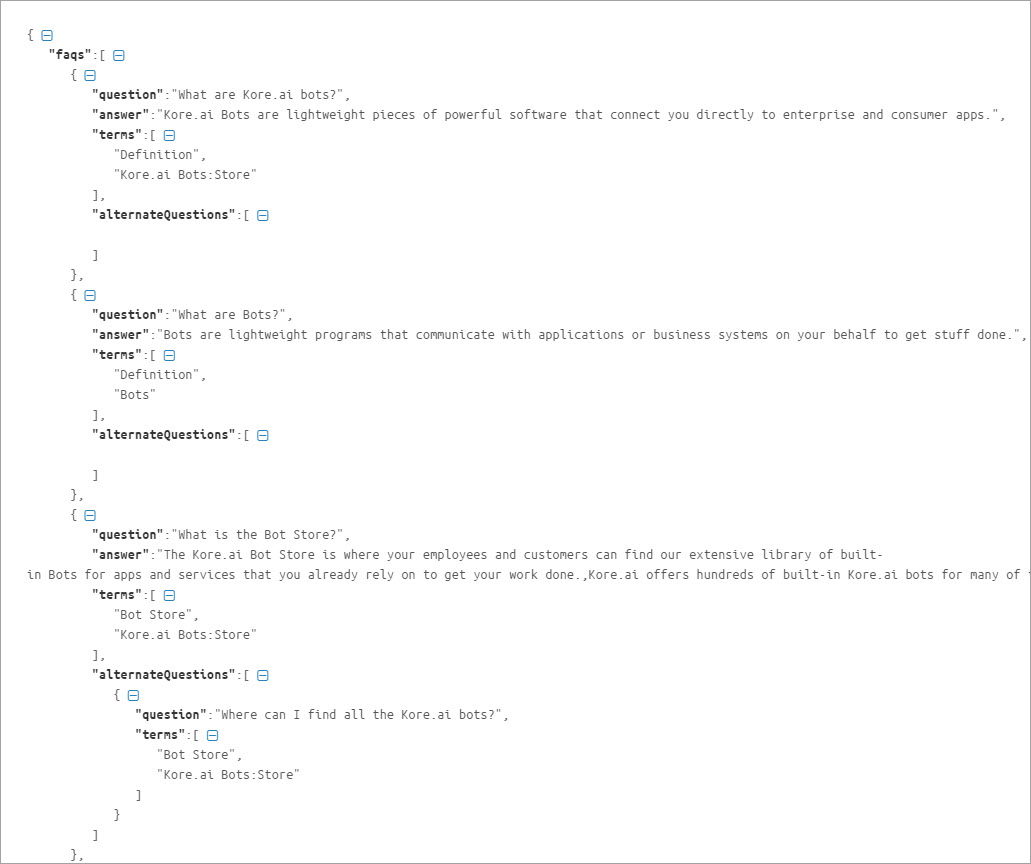
| Property Name | Type | Description |
| FAQ | Array | Consists of the following:
|
| Question | String | Primary question; included in the FAQ array. |
| Answer | String | Bot response; included in the FAQ array. |
| Terms | Array | Includes the leaf node to which the question is added, and its parents up to the First-level node. |
| Alternate Questions | Array | Consists of alternative question and terms. Include terms from leaf to the First-level node. |
| Synonyms | Object | Consists arrays of terms and their synonyms. |
| Unmappedpath | Array | Consists arrays of nodes that do not have any questions, and all their parents up to the First-level node. |
| Traits | Object | Consists of trait names as keys and array of the utterances as values. |