
The topics dealt with in this section include Importing and Exporting Bots, Deleting Bots, and viewing Bot change logs.
You might want to refer to Bot Variables and how these can be managed. Refer here for more.
Importing and Exporting Bots
Kore.ai allows you to export and import a bot’s tasks and associated configurations into another bot. This feature helps you in the migration of bot definition, cloning of bots, or for maintaining a periodic backup of bot definitions. It is particularly helpful to test various versions of your bot at different stages of the development process before it is released for end users. The articles in this section help you understand how the Export and Import features work and how to perform them.
Exporting a Bot
You can export a bot’s definition and configuration using the Export option. When you export a bot, it downloads a zipped file with the following:
- botDefinition.json: Includes bot metadata, tasks, bot and task-level synonyms, utterances, patterns, knowledge graph, standard responses, flows, and IDPs. You can select specific items to export from bot tasks, NLP data – NLP settings, utterances, standard responses – and Settings – bot settings, variables, IVR settings- while exporting the bot.
- config.json: Includes bot settings, bot variables, and IVR settings.
- Icon.png: Includes the bot icon.
- <Custom ScriptFile Name.js> (if available): Includes a script file with JavaScript functions. When you upload this file to a bot, you can access the functions in the file from anywhere in the bot.
Export Modes
You can export bots in two modes: Published and Latest. Depending on the mode that is selected, the corresponding versions of the bot tasks are exported. You can select specific bot components to export from the bot tasks, NLP data, and bot settings in both the modes.
Published Mode
When you export a bot in the Published mode, only the published versions of the bot tasks are exported, regardless of any other existing versions. For example, if a bot consists of a published version of a task and also version in Upgrade in Progress, only the published version gets exported.
Refer to the table below to understand which versions of the tasks are exported in the Published mode:
| Task | Status |
|---|---|
| In Progress | Not exported If a task is in progress for development, it isn’t exported in the Published mode. |
| Configured | Not exported If the task configuration is complete but not published for use, it doesn’t get exported in the Published mode. |
| Published | Exported All published bot tasks get exported |
| Upgrade in Progress | Not exported Task upgrade configurations that are in progress do not get exported. Only the published configurations get exported. |
| Rejected | Not exported Task configurations rejected by admins do not get exported. |
| Suspended | Not exported Suspended tasks do not get exported. |
Latest Mode
When you export a bot in the Latest mode, the latest versions of the bot tasks get exported, regardless of their publishing status. For example, if a bot consists of a published version of a task and also the version in Upgrade in Progress, the Upgrade in Progress version gets exported, whereas if it just has a Configured version, the configured version is exported.
Refer to the table below to understand which versions of the tasks are exported in the Latest mode:
| Task | Status |
|---|---|
| In Progress | Exported if it is the only available version Not Exported if a later version exists |
| Configured | Exported if it is the only available version Not Exported if a later version exists |
| Published | Exported if it is the only available version Not Exported if a later version exists |
| Upgrade in Progress | Exported regardless of any other task version in the bot |
| Rejected | Not exported Task configurations rejected by admins do not get exported |
| Suspended | Not exported Suspended tasks do not get exported |
Steps in Exporting the Bot
- Open the bot you want to export and on left navigation menu select Settings > Bot Management.
- Click Export Bot.
- In the Export Bot window, select either Published or Latest exporting mode.
- By default, all the bot items are selected for export. Deselect the items that you do not want to export.
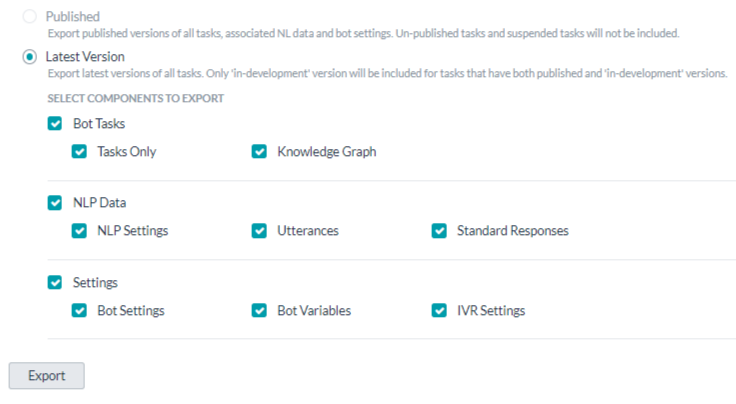
- Click Export. The export happens in the background and the Download button gets activated after it is complete. Click Download to download the file to your local computer.
Exported Bot Components
When you export a bot, the following bot components get exported, depending on your Latest or Published Mode selection:
| Bot Tasks | |
|---|---|
| Tasks Only |
|
| Knowledge Graph | Knowledge Graph definition along with the associated synonyms and classes. |
| NLP Data | |
| NLP Settings | The Advanced NLP Settings and Ignore words and Field memory. The Advanced NLP Settings ( Natural Language > Advanced Settings) include the following:
|
| Utterances | All the bot utterances of all the enabled languages |
| Standard Responses | All the standard responses of the bot in all enabled languages |
| Settings | |
| Bot Settings | The following information from Bot Settings page:
|
| Bot Variables | All the global and content variables present in the bot along with their values. |
| IVR settings | All the IVR settings for the bot (Bot Settings > IVR settings). |
Importing a Bot
You can import tasks and configurations of a bot into a new or existing bot using one of these import types:
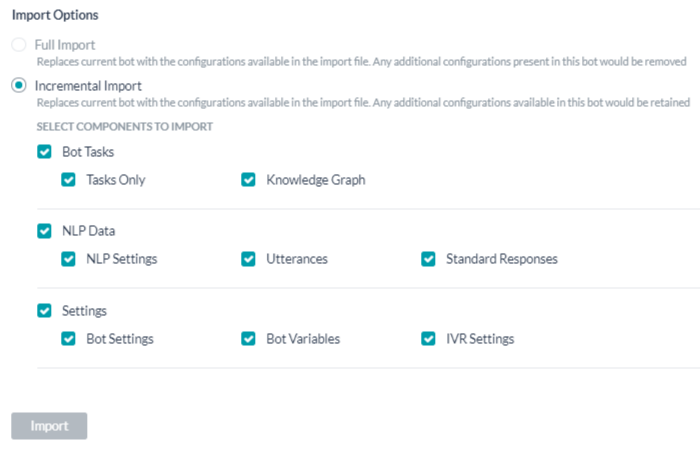
- Full import: Replaces the existing bot with the imported bot configurations. Any additional configurations in the target bot will get deleted.
Note: We strongly recommend you to exercise caution and take a backup of the target bot before importing a bot using this option.
- Incremental import: Upgrades the current bot with the configurations available in the import file. Any additional configurations available in the target or imported bot are retained. You can select specific bot components to import from the bot tasks, NLP data, and bot settings. Refer to the Bot Items in Incremental Import table at the end of the article to learn how the imported bot items replace the target bot’s items in incremental import.
Before you Begin
The config.json file consists of bot variables that need values for the target bot. Share the file with the relevant developers or enter suitable values yourself for the variables before importing the bot definition into a new bot.
Steps in Importing to an Existing Bot
To import a bot, follow these steps:
- Open the bot you want to export and on left navigation menu select Settings > Bot Management.
- Click Import Bot.
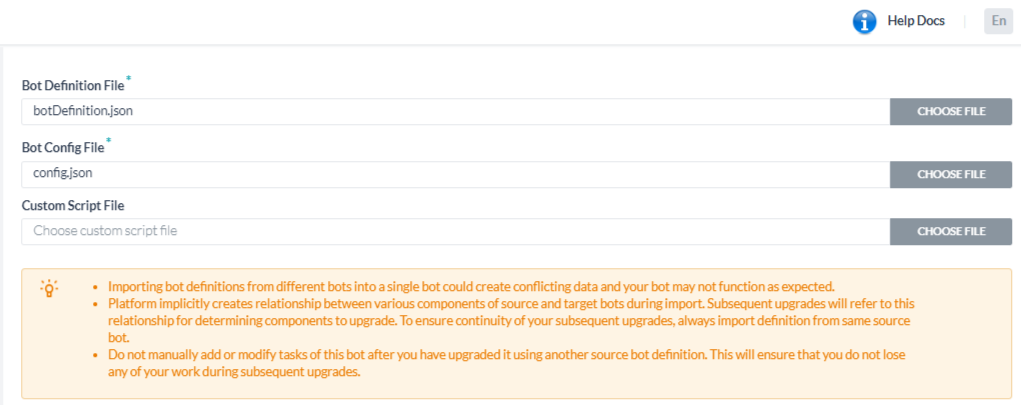
- Click the CHOOSE FILE buttons next to the BOT DEFINITION FILE field and BOT CONFIG FILE field, and upload the botDefinition.json and config.json files respectively.
- Optionally, upload the custom script file from the imported bot if any.
- Select one of these import options: Full Import or Incremental Import. If you select Incremental import, you can also choose which bot items to import.
- On the confirmation dialog that opens, click Backup to download the existing bot configuration.
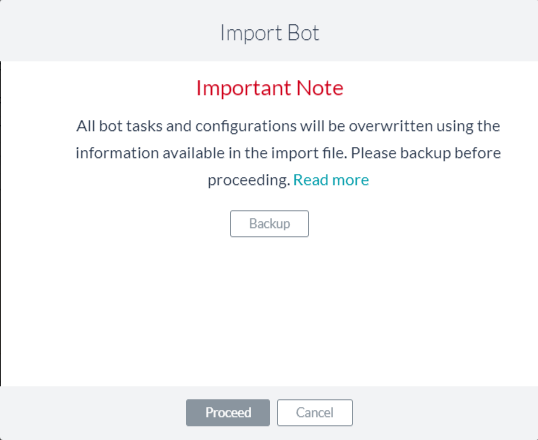 Note: While backing up is an optional choice, we strongly recommend you to do so, especially when choosing Full Import, as you cannot recover the bot configurations after the imported bot replaces them.
 - Click Proceed to start the import.
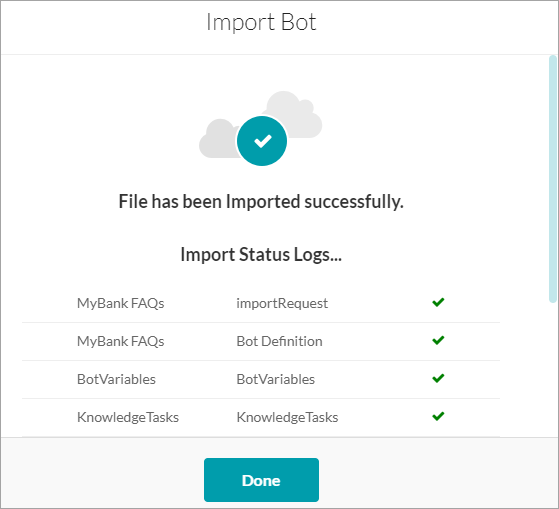
- After the import is completed, the following success message appears. Click Done.
Creating a New Bot Using the Import Option
To import a bot while creating it, follow these steps:
- On the top-right side of the Bot Builder homepage, click New Bot > Import a Bot.
- Enter a Name, Target Audience, and Color for the Bot. Refer to Create a New Bot to learn more.
- Click the CHOOSE FILE buttons next to the BOT DEFINITION FILE field and BOT CONFIG FILE field and upload the botDefinition.json and config.json files respectively.
- Optionally, upload a Custom Script file from the source bot if any and click Import.

- On the success message after the end of importing, click Done to proceed to the Bot Tasks page.
Bot Items in Incremental Import
| COMPONENT | DESCRIPTION |
|---|---|
| Tasks with the same Reference ID | Imported tasks replace the tasks in the target bot and their status changes to Configured, regardless of their current status (including Suspended and Rejected tasks). |
| Tasks in the source bot with a different Reference ID | These tasks are created in the target bot with the same Reference ID. |
| Tasks in the target bot with a different Reference ID | These tasks stay intact. |
| Utterances, Patterns, and Task-level Synonyms | Imported utterances, patterns, and task-level synonyms replace the ones in the target bot and apply to the imported tasks. Published models in the target bot stay intact. |
| Knowledge Graph, Bot Synonyms and Standard Responses | Existing knowledge graph, bot synonyms, and standard responses in the target bot are replaced with the imported ones. |
Deleting a Bot
You cannot delete a bot if any of the bot tasks are Published. Once you publish a task, the Bots Admin must approve and assign it to users. The developer cannot delete assigned tasks. To delete a published task, the Bots Admin needs to suspend the task.
Also, you cannot delete a bot if it is part of a published flow. You must delete the flow or remove the bot from the flow before attempting to delete it.
Steps to Delete a Bot
- Hover over the left-hand navigation panel of the bot you want to delete, and then on the Settings tab, click Delete Bot.
Viewing the Bot Change Log
After creating a bot, you may need to edit it for various reasons such as changing its settings, adding tasks, enabling channels, and add flows.
To track all the changes made to a bot, you can view the Change Logs, which shows a chronological list of modifications to your bot. It consists of all the changes from the initial save of your bot to the last update.
To view the change log for a bot, follow these steps:
- Hover over the left navigation panel of the bot whose Change Logs you want to see.
- Select Settings > Bot Management
- Click Change Logs.
It consists of the list of changes in reverse chronological order. Each page displays the ten most recent changes and the name of the user that made the change, followed by the changed synopsis, and the timestamp of the applied change.