Bots need to extract relevant information from the user utterance to fulfill the user intent.
Take a look at this sample utterance: Book me a flight from LA to NYC on Sunday. To act on this user intent, which is to book a flight ticket, the bot should extract the entities such as the source city (LA), destination city (NYC), and the departure date (Sunday).
So, in a Dialog Task, for every critical data you want to get from a user utterance, you should create a corresponding Entity node. You can add Prompt messages to these nodes for users to input the required values.
Kore.ai supports more than 30 entity types such as Address, Airport, Quantity, TimeZone. You can also define the entities as a selection from a list, free-form entry, file or image attachment from a user, or as regex expressions.
Setting up an Entity Node
Setting up an Entity node in a Dialog task involves the following steps:
Step 1: Adding an Entity Node to the Dialog Task
- Open the Dialog Task where you want to add the Entity node.
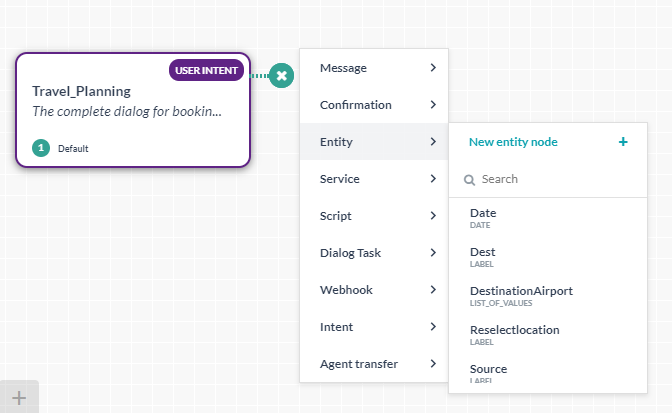
- Hover over a node next to which you want to add the entity node, and click the plus icon on it.
- Select Entity > New entity node (you can also use an existing entity node, by selecting from the list).

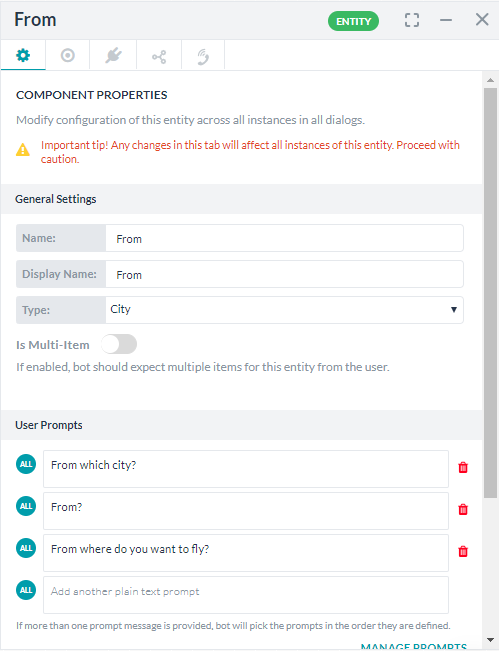
- The Component Properties panel for the Entity Node opens.
Step 2: Configuring the Component Properties
The Entity Component Properties allow you to configure the General Settings, User and Error Prompts.
- Enter a Name and Display Name for the Entity node. Entity names cannot have spaces.
- From the Type drop-down select an entity type depending on the expected user input. For example, if you want the user to type the departure date, select Date from the drop-down. The platform will do the basic validation based upon the Type selected.
The Entity Type provides the NLP Interpreter with the expected type of data from a user utterance to enhance recognition and system performance. For more information, see the Entity Types - Based on the Type selected, you might have an option to set the Entity as Multi-Item thereby allowing the user multiple selections.
- In the User Prompt text box, enter the prompt message that you want the user to see for this entity. For example, Enter the Departure Date. You can enter channel-specific messages for user prompts. For more information, see Using the Prompt Editor.
- In the Error Prompts box, review the default error message, and if required, click Edit Errors to modify it. For more information, see Using the Prompt Editor.
Step 3: Configuring the Instance Properties
Use the Instance Properties to determine whether to make the Entity value mandatory as well as to choose if you want to consider values from previous user utterances to capture entities.
- Click the Instance Properties icon on the Entity node.
- Under the User Input section, select an option:
- Mandatory: This entity is required, and users must provide a valid entry before proceeding with the dialog flow.
- Optional: User is prompted only once for this entity and system proceeds with any input provided by the user.
- Hidden: If enabled, the bot will not prompt for the entity value unless explicitly provided by the user.
- Under the Entity Extraction section, select one of these options:
- Evaluate the un-used text from the previous utterance: When this option is selected, the entity uses the text that was not used by any other entity in the dialog so far. This is the default option.
- Evaluate un-used text and text used for extracting entities from previous utterances: Select this option if you would like to reuse an entity value extracted by another Entity node in the dialog.
- Do not evaluate previous utterances and explicitly prompt the user: Select this option if you want the bot to ignore the previous user utterances and explicitly prompt the user to provide value for the entity.
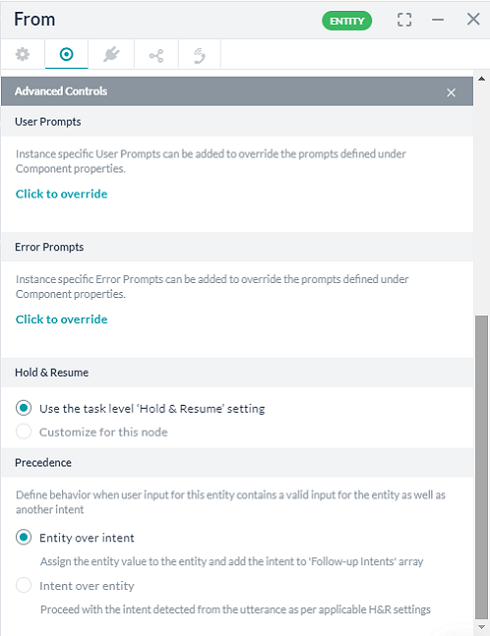
- Click the Advanced controls to set up these options:
- User Prompts: Use the Click to Override button to write custom user prompts for this particular instance of the Entity node. Once you override, the User Prompts section in the Component Properties panel is disabled. Also, these user prompts do not apply to any other instances of the node.
- Error Prompts: Use the Click to Override button to write custom error prompts for this particular instance of the Entity node. Once you override, the Error Prompts section in the Component Properties panel is disabled. Also, these error prompts do not apply to any other instances of the node.
- Intent Detection (Applies only to String and Description entities): Select one of these options to determine the course of action if the bot encounters an entity as a part of the user entry for the String or Description entities:
- Accept input as entity value and discard intent detected: The bot captures the user entry as a string or description and ignores the intent.
- Prefer user input as intent and proceed with Hold & Resume settings: The user input is considered for intent detection and proceed according to the Hold & Resume settings.
- Ask the user how to proceed: Allow the user to specify if they meant intent or entity.
- Hold & Resume to define the interruption handling at this node, choose from:
- Use the task level ‘Hold & Resume’ setting: The bot refers to the Hold & Resume settings set at the dialog task level.
- Customize for this node option: You can customize the Hold & Resume settings for this node by selecting this option and configuring the same. Read the Interruption Handling and Context Switching article for more information.
- Precedence (Applies to all Entity types except String and Description nodes): When user’s input for an entity consists of a valid value for the entity and another intent, you can control the experience by choosing between “Intent over Entity” or “Entity over Intent” options. For example, if a Flight Booking bot prompts for the destination and the user enters, “Bangalore, how’s the weather there?” you get to define how the bot responds in such cases – pick the entity and add the intent to the Follow-up Intents stack or go ahead with the intent first based upon the Hold & Resume settings.

- Custom Tags defines tags to build custom profiles of your bot conversations. See here for more.
Step 4: Configuring the Connections Properties
From the node’s Connections panel you can determine which node in the dialog task to execute next. You can write the conditional statements based on the values of any Entity or Context Objects in the dialog task, or you can use intents for transitions.
To setup Component Transitions, follow these steps:
- You can select from the available nodes under the Default connections.
- To configure a conditional flow, click Add IF.
- Configure the conditional expression based on one of the following criteria:
- Entity: Compare an Entity node in the dialog with a specific value using one of these operators: Exists, equals to, greater than equals to, less than equals to, not equal to, greater than, and less than. Select the entity, operator using the respective drop-down lists, and type the number in the Value box. Example: PassengerCount (entity) greater than (operator) 5 (specified value)
- Context: Compare a context object in the dialog with a specific value using one of these operators: Exists, equals to, greater than equals to, less than equals to, not equal to, greater than, and less than. Example: Context.entity.PassengerCount (Context object) greater than (operator) 5 (specified value)
- Intent: Select an intent that should match the next user utterance.
- In the Then go to the drop-down list, select the next node to execute in the dialog flow if the conditional expression succeeds. For example, if the PassengerCount (entity) greater than (operator) 5 (specified value), Then go to Offers (sub-dialog).
- In the Else drop-down list, select the node to execute if the condition fails.
Step 5: Configuring the NLP Properties
- In the Suggested Synonyms for the < Entity Name > box, enter synonyms for the name of your Entity. Press enter after each entry to save it. For more information, see Managing Synonyms.
- In the Suggested Patterns for < Entity Name >, click +Add Pattern to add new patterns for your Entity. The Patterns field is displayed. For more information, see Managing Patterns.
- Manage Context
- Define the context tags to be set in the context when this entity is populated using the Context Output field
- Auto emit the entity values captured as part of the Context Object.
(See here for Context Management)
Step 6: Configuring the IVR Properties
You can use this tab for defining at the Node level the input mode, grammar, prompts and call behavior parameters for this node to be used in IVR Channel. Refer here for details.


