To use any of the Kore.ai Bot SDKs, you must first register your app to get the authentication credentials to communicate between the Kore.ai bot and your application hosting the bot. The Kore.ai bot SDKs can be used to add a chat widget into your company application that enables your application users to chat with the application using natural language input. The Kore.ai bots platform interprets the user input, processes the request, and responds back to the user.
The bots Platform will only accept requests from authorized clients to connect to, and exchange messages. To authorize the connection, you must register your app and get required client credentials. The credentials authorize the client app and provide for user assertion.
This topic describes how to register your application and generate credentials for your clients that are required to exchange messages between your application and the Kore.ai bots Platform, and then configure and add the Web/Mobile Client Channel to your bot.
To add the Web/Mobile Client Channel to your bot, you must first register, or create an app in Bot Builder. When you create an app, you are provisioning credentials for you application to communicate securely with Kore.ai servers. After you create an app, you can use that app registration in the configuration to add the Web/Mobile Client Channel to your bot.
Add Web/Mobile Client Channel
The Web/Mobile Client channel can be configured using the following options:
Associate an App
- When you choose to enable Web/Mobile client, an app is automatically created for you
- You can choose to replace this app with any other app that you may want to use
To create your own app, follow these steps:
- Open the bot on which you want to add the Web/Mobile Client channel.
- On the bots menu, click Channel > Web/Mobile Client.
- In the Select App drop-down list, select your existing app registration or click Create App to create a new app.
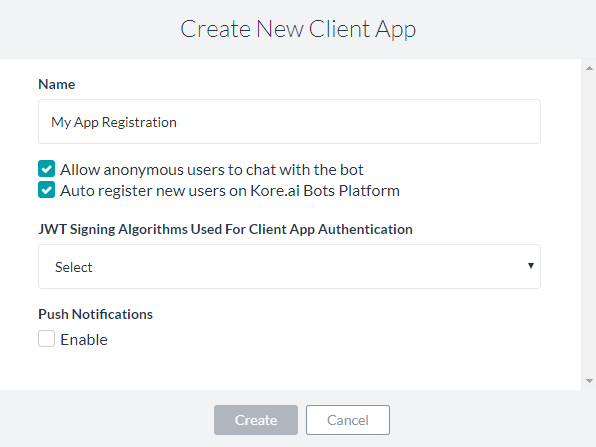
- In the Name field, enter the name for the app registration used in Bot Builder. For example, My App Registration.
- Select one of these scopes for the app:
- Allow anonymous users to chat with the bot: Enables anonymous users to interact with the bot.
- Auto register new users on Kore.ai Bots Platform: Select to control the auto-user registration in Kore.ai if the user assertion is unknown.
- In the JWT Signing Algorithms Used For Client App Authentication drop-down list, select one of the following security algorithms:
- RS256: Select to enable the Public Key field. The Public Key is used by the Kore.ai bots platform to authenticate the client application.
- HS256: Select to generate a Secret Key and a Client ID. The Client ID is required for SDK initialization, and the Secret Key used by the Kore.ai bots platform to authenticate the client application.
- Optionally, In the Push Notifications section, click Enable and then specify a URL to send the notifications.
- Click Create. The app registration details appear.

- To copy the app registration details to the clipboard for your application, you can click Copy for Bot Name, Bot ID, and Client ID. For Client Secret, click View, and then click Copy.
- In the Allow Alert Task Setup section, select Yes to enable your application users to set up their own alert tasks using the web client. By default, this setting is disabled for web client users, but mobile client users can always setup their own alerts.
- In the Enable Channel section, select Yes to enable the channel immediately after saving.
- Click Save to save the settings and close the Web/Mobile Client Channel page.
The Channel Information updated successfully message is displayed on the top-right of the page.
Once enabled click here for steps to integrate your bot into your web application.
Choose Deployment Options
There are two different ways of deploying the Web/mobile client. You can either use the Kore.ai hosted Client or set up your own client and host it.
If you are using the Kore.ai hosted client, then there are two different approaches:
- Share the URL with users
- Embed code in your website
To choose deployment options, follow these steps:
- In the Web Client Details section, copy the URL to share this URL with users to interact with your virtual assistant.

- In the Embed Code section, copy the code to embed this Channel in your application pages where you want to display this virtual assistant widget.

- In the Whitelist Domains section, click +Add Domain to add URLs which want to include in the whitelist for your assistant
- Click the Download SDK link to download, setup and configure the Web/Mobile SDK using the prebuilt SDK libraries.
- Select an appropriate option to Allow Alert Task setup. You can choose either Yes or No to let users to set up Alerts using Web Client.
- Click Save to save the settings and close the Web/Mobile Client Channel page

Edit Web/Mobile Channel
To edit the Web/Mobile Client channel, follow the below steps:
- Hover over the channel to modify, and then click the Settings
 icon displayed to show the command menu displayed in the following illustration.
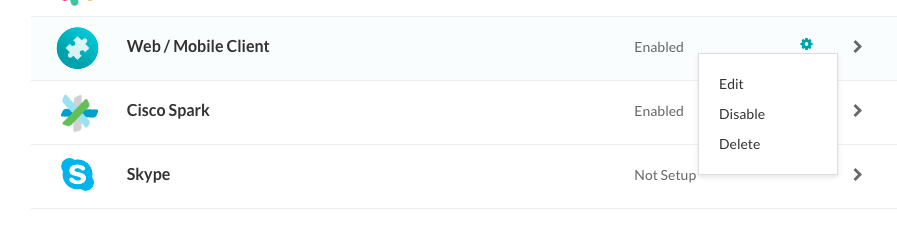
Select one of the following commands to modify the channel:
- Edit – Click to open the Web/Mobile Client channel setup page.
- Disable/Enable – Click Disable to temporarily disable the use of the Web/Mobile Client channel for your bot. When the channel is disabled, click Enable to enable the use of the Web/Mobile Client channel.
- Delete – Click Delete, and then click OK in the Delete Confirmation dialog to permanently delete the bot channel configuration.
Warning: This operation is permanent, and cannot be undone.