Human conversations are dynamic in that they tend to switch between intents and entities, often combining multiple things into one.
Kore.ai bots platform offers Sub Intents that are defined at the task level, and are the easiest way to shape dialog without having to manage context manually. This enable conversations to seamlessly branch into related intents as part of the primary intent, and work only within this context. An output context is added to the parent intent and an input context of the same name is added to the newly created child intent. Thus, the child intent can only be matched when the parent intent was matched during a previous portion of the conversation.
Follow-up Intents come in handy during the course of a dialog, a user utterance or intent cannot be attended to immediately. You can access such intents that come up during the execution of a different task, but that was never acted upon. These are stored in the FollowupIntents array. You can then opt to ask users at the end of the dialog flow to select and perform tasks from a list of identified follow-up intents. You can also access this list to further train and refine their dialog flows.
Sub Intents
There are three ways to define Sub Intents:
- Add an Intent Node within the Dialog Task – This intent is not available for any other dialog and since it is within the dialog, it is within its context. (more…)
- Use an existing Dialog Task – This intent can be used over multiple dialogs. You can define the dialog as Sub Intent-only dialog and it can not be invoked by user utterance nor will it appear in the list of available tasks when the user says help. (more…)
- As linked Tasks – The above two options are used when the sub intent is part of the dialog flow. For cases where the sub intent can be invoked by the user anywhere within the dialog, use the Manage Sub Intents and Exceptions option.
Linked Task Exceptions
To facilitate exceptions in switching between specific tasks, you can utilize the Linked Tasks Exceptions in dialog tasks. When you link a dialog task to another, you can define customized Hold and Resume properties to transition to that particular task. Additionally, you can write one or more conditional expressions using any entity values or context to ensure the Hold and Resume rules come in effect only if those conditions are met.
As a part of defining the exceptions, you can also define entity pre-assignments and post-assignments.
- Using pre-assignments, you can map the parameters in the current context that need to be pre-populated in the next intent. You can pass the current context values to the entities present in the linked task or define custom variables to pass the current context values.
- Using post-assignments, you can map the context values in the linked task back to the main task from where the linked task was invoked. You can pass the linked task context values to the entities present in the main task or define custom variables to pass the linked task context values.
Note: Post-assignment are applicable only when the main task is resumed.
Adding Exceptions
To add exceptions to transition to a specific task, follow the steps:
- Open the dialog task whose settings you want to customize.
- On the top-right of the Dialog Builder, click the more options icon and select Manage Interruption Behavior.
- On the Manage Interruption Behavior page, click the Add sub-intents or exceptions link.
- On the Add sub-intents or exceptions page, from the Tasks drop-down list, select a task to link. You can select multiple tasks.
- Define the Hold and Resume settings from the list of options below and click Save.
- The Manage Interruption Behavior page opens with the selected tasks listed under Exceptions.
You can optionally add conditional expressions within which the transition should take place and map parameters for the selected task.
Adding Conditional Expressions
To add conditional expressions, follow the below steps:
- Click the name of the task under Exceptions.
- Under Interruption Precondition, click Add If Condition.
- Select the Entity or Context option based on which you want to define the condition.
- Select an Entity or enter a Context as per your selection.
- Select a connector from the list of options: Exists, equals to, greater than equals to, less than equals to, not equal to, greater than, or less than.
- Under the value column, enter a comparative value.
- To add more conditions, click Add If, and repeat steps 1-6. You can add any number of conditions. When you write multiple conditions, all the specified conditions must be met for the Hold and Resume settings to take effect.
Important Notes:
- Using exceptions, you can link the same target task to a source task multiple times by defining different pre-conditions. When you do so, the platform executes the exceptions in the order they are defined.
- When none of the pre-conditions meet an exception, the platform adds the intent to the Follow-up Intents array.
- The platform evaluates the pre-conditions only when it encounters a user intent and tries to determine whether to execute it or not. It does not evaluate the pre-conditions when developers initiate the linked task through transitions or when the end-user chooses to run the task at the end of the dialog.
Parameter Mapping
To add entity pre-assignments, follow these steps after you enter conditional expressions for an exception:
- On the Exception Task window, under the Parameter Mapping section, Entity pre-assignment lists the entities needed for the on-hold task.
- Enter a direct value or a context reference next to an entity for which you want to pass a value.
- To pass values through a variable, click Add Key/Value and enter a variable name a value.
To add entity post-assignments, follow these steps after you enter conditional expressions for an exception:
- On the Exception Task window, under the Entity post-assignment section, you can see the list of entities in the current task.
- Enter a direct value or a context reference next to an entity for which you want to pass a value.
- To pass values to a variable, click Add Key/Value and enter a variable name a value.
Note: Post-assignment is applicable only when the main task is resumed.
If you want to reset the values, you need to use the keyword “null”, spaces would be ignored by the platform.
Follow-up Intents
Follow-up intents refer to intents that came up in user conversations during the execution of another task, but the bot has not attended to. As a part of dialog task execution, the bot captures all unattended interruptions and makes them accessible to the bot in the FollowupIntents array.
However, the bot does not capture Follow-up Intent if you select the Do not Hold and Resume option at the node, task, or bot level, whichever is applicable to the task flow.
You can enable the dialog task to present all the Follow-up tasks to the user at the end of the dialog so they can choose to execute any of them. To do so, follow these steps:
- Open the dialog task whose settings you want to customize.
- On the top-right of the Dialog Builder, click the more options icon and then click Dialog Settings.
- The Follow-up Task sections shows the following options:
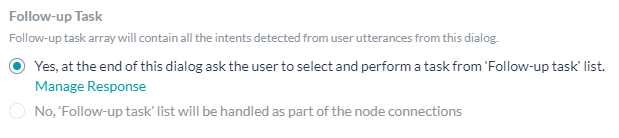
- Yes, at the end of this dialog ask the user to select and perform a task from the Follow-up task list: Select this option to show all the unattended intents to the user at the end of the dialog. To customize the message sent to the user, click Manager Response next to the option.
- No, the Follow-up task list is handled as part of the node connections: This is the default option. If this option is active, the bot does not present the Follow-up intents to the users at the end of the dialog. However, a developer can access this using the FollowupIntents array.