GETTING STARTED
Kore.ai XO Platform
Virtual Assistants Overview
Natural Language Processing (NLP)
Concepts and Terminology
Quick Start Guide
Accessing the Platform
Working with the Builder
Building a Virtual Assistant
Using Workspaces
Release Notes
Current Version
Previous Versions
Deprecations

CONCEPTS
Design
Storyboard
Dialog Tasks
Overview
Dialog Builder
Node Types
Intent Node
Dialog Node
Entity Node
Form Node
Confirmation Node
Message Nodes
Logic Node
Bot Action Node
Service Node
Webhook Node
Script Node
Group Node
Agent Transfer
User Prompts
Voice Call Properties
Dialog Task Management
Connections & Transitions
Component Transition
Context Object
Event Handlers
Knowledge Graph
Introduction
Knowledge Extraction
Build Knowledge Graph
Add Knowledge Graph to Bot
Create the Graph
Build Knowledge Graph
Add FAQs
Run a Task
Build FAQs from an Existing Source
Traits, Synonyms, and Stop Words
Manage Variable Namespaces
Update
Move Question and Answers Between Nodes
Edit and Delete Terms
Edit Questions and Responses
Knowledge Graph Training
Knowledge Graph Analysis
Knowledge Graph Import and Export
Importing Knowledge Graph
Exporting Knowledge Graph
Creating a Knowledge Graph
From a CSV File
From a JSON file
Auto-Generate Knowledge Graph
Alert Tasks
Small Talk
Digital Skills
Digital Forms
Views
Introduction
Panels
Widgets
Feedback Survey
Train
Introduction
ML Engine
Introduction
Model Validation
FM Engine
KG Engine
Traits Engine
Ranking and Resolver
NLP Configurations
NLP Guidelines
Intelligence
Introduction
Contextual Memory
Contextual Intents
Interruption Management
Multi-intent Detection
Amending Entities
Default Conversations
Sentinment Management
Tone Analysis
Test & Debug
Talk to Bot
Utterence Testing
Batch Testing
Conversation Testing
Deploy
Channels
Publish
Analyze
Introduction
Conversations Dashboard
Performance Dashboard
Custom Dashboards
Introduction
Meta Tags
Dashboards and Widgets
Conversations History
Conversation Flows
Feedback Analytics
NLP Metrics
Containment Metrics
Usage Metrics
Smart Bots
Universal Bots
Introduction
Universal Bot Definition
Universal Bot Creation
Training a Universal Bot
Universal Bot Customizations
Enabling Languages
Store
Manage Assistant
Plan & Usage
Overview
Usage Plans
Support Plans
Invoices
Authorization
Multilingual Virtual Assistants
Masking PII Details
Variables
IVR Settings
General Settings
Assistant Management
Data Table
Table Views
App Definitions
Sharing Data Tables or Views

HOW TOs
Build a Flight Status Assistant
Design Conversation Skills
Create a Sample Banking Assistant
Create a Transfer Funds Task
Create a Update Balance Task
Create a Knowledge Graph
Set Up a Smart Alert
Design Digital Skills
Configure Digital Forms
Configure Digital Views
Add Data to Data Tables
Update Data in Data Tables
Add Data from Digital Forms
Train the Assistant
Use Traits
Use Patterns for Intents & Entities
Manage Context Switching
Deploy the Assistant
Configure an Agent Transfer
Use Assistant Functions
Use Content Variables
Use Global Variables
Web SDK Tutorial
Widget SDK Tutorial
Analyze the Assistant
Create a Custom Dashboard
Use Custom Meta Tags in Filters

APIs & SDKs
API Reference
API Introduction
API List
API Collection
koreUtil Libraries
SDK Reference
SDK Introduction
SDK Security
SDK Registration
Web Socket Connect and RTM
Using the BotKit SDK
BotKit SDK Tutorial - Blue Prism

ADMINISTRATION
Introduction
Assistant Admin Console
Administration Dashboard
User Management
Add Users
Manage Groups
Manage Roles
Assistant Management
Enrollment
Invite Users
Send Bulk Invites
Import User Data
Synchronize Users from AD
Security & Compliance
Using Single-Sign On
Security Settings
Cloud Connector
Analytics
Billing
  1. Home
  2. Docs
  3. Virtual Assistants
  4. Builder
  5. Alert Task
  6. Alert Task – Defining Filters8 min read

Alert Task – Defining Filters8 min read

As we have seen here, you can define filters for end-users to limits the results of an alert task to the results an end-user needs. For example, you can define a filter for the name, or account, or business. When the alert is set up by the end-user, and the filter applied, only alert messages that meet the filter specifications are displayed to the end-user.

Defining Filters

To get started with defining filters for a task, on the Settings tab, click the Expand icon in the Filters section, and then click Add as shown in the following illustration.
Alert Task - Settings Tab - Filters Section
When you click Add, the Alert Task Filter dialog is displayed as shown in the following illustration.
Alert Task Filter Dialog
The Filter defined in the previous illustration is displayed to the end-user as a filter labeled Owner, with the Field Type set to Dynamic Dropdown to enable the end-user to select a name from a dynamically populated list of owners defined in the response payload.
Define the fields described in the following table to create a new filter for a task.

PARAMETER NAME DESCRIPTION
Name Specify the name of the Filter displayed to the end-user in the Filters section when configuring the task, for example, Notify me only when the below user tweets.
Field Name Enter the name of the field to filter the task on, or click Select Field to display a drop-down list of field names parsed from the Response Sample defined on the task API Request tab.
Field Type Select the type of input field to collect the user input.

  • Textbox – Displays a text box to the user. In the Placeholder field, enter a description for the field, for example, Type in the name you want to embroider.
  • Textarea – Displays a text area box to the user, typically allowing to enter several sentences. In the Placeholder field, enter a description for the text area.
  • Static Dropdown – Displays a drop-down list of choices to the user. Click Add Option to begin adding the list of items, with the following parameters:
    • Option Name – The name of the option displayed to the user.
    • Option Value – The value associated with the option.
    • Default Value – Select the default value for the list when more than one option is defined.
    • Searchable – Select to enable type-ahead suggestions from the list matching the user’s typing.

    Click Save. To add additional items, click Add Option again. Edit or remove options in the Actions column for options.

  • Dynamic Dropdown – Displays a drop-down list dynamically populated at runtime based on the response from a URL for your Bot, for example, a list of projects for a JIRA task notification. Define the following properties for a dynamically populated drop-down.
    • Endpoint URL – The Bot endpoint URL, for example, https://app.asana.com/api/1.0/workspaces.
    • Endpoint Content Type – One of these content types expected from the specified endpoint URL: JSON, RSS, XML, Encoded JSON, CSV, or Text.
    • Endpoint Method – Select one of the following:
      • GET – Specifies an HTTP Request GET method for the task field.
      • POST – Specifies an HTTP Request POST method for the task field.
    • Response Path – The path in the response that contains the desired drop-down list values, for example, data.
    • Label Key – The key for the label of the drop-down option, for example, name.
    • Optional Value Key – The key for the value of the drop-down option, for example, id.
    • Add Payload Field – Click to add one or more fields from the response payload as options for the type-ahead field. For each type ahead field option, enter the Payload field key and the Payload field value, and then click Save. Edit or delete payload fields in the Actions column.
  • Check Box – Displays a list of choices that the user can select from – one or more. Click Add Option to begin adding the list of items to display, with the following parameters:
    • Option Name – The name of the option displayed to the end-user.
    • Option Value – The corresponding value for the option name.
  • Type Ahead – Displays a dynamically populated drop-down list of choices to the user at runtime when the user enters three or more characters that match the search results based on the response from the URL defined for the task. For example, a list of projects for a JIRA task notification message. Define the following properties for a dynamically populated drop-down.
    • Endpoint URL – The Bot endpoint URL, for example, https://app.asana.com/api/1.0/workspaces.
    • Endpoint Content Type – The content type expected from the specified endpoint URL. One of: JSON, RSS, XML, URL Encoded JSON, CCV, Text, Twitter Encoded JSON, Multipart/Form-data, or Multipart/Related.
    • Endpoint Method – Select one of the following:
      • GET – Specifies an HTTP Request GET method for the task field.
      • POST – Specifies an HTTP Request POST method for the task field.
    • Response Path – The path in the response that contains the desired drop-down list values, for example, data.
    • Label Key – The key for the label of the drop-down option, for example, name.
    • Option Value Key – The key for the value of the drop-down option, for example, id.
    • Add Payload Field – Click to add one or more fields from the response payload as options for the type-ahead field. For each type ahead field option, enter the Payload field key and the Payload field value, and then click Save. Edit or delete payload fields in the Actions column.
    • Editable – Enables the end-user to enter text free-from in the field as an option when type-ahead search results do not match.
  • Dynamic Check Box – Displays a list of choices that the end-user can select one or more from, which are dynamically populated at runtime based on the response from a URL for your Bot, for example, a list of projects for a JIRA task notification. Define the following properties for a dynamically populated list of choices as checkboxes.
    • Endpoint URL – The Bot endpoint URL, for example, https://app.asana.com/api/1.0/workspaces.
    • Endpoint Content Type – The content type expected from the specified endpoint URL. One of: JSON, RSS, XML, Encoded JSON, CSV, or Text.
    • Endpoint Method – Select one of the following:
      • GET – Specifies an HTTP Request GET method for the task field.
      • POST – Specifies an HTTP Request POST method for the task field.
    • Response Path – The path in the response that contains the desired drop-down list values, for example, data.
    • Label Key – The key for the label of the drop-down option, for example, name.
    • Box Value Key – The key for the value of the drop-down option, for example, id.
Data Type The data type for the content received from the endpoint URL. One of:

  • Text – The user input for this filter is expected as text.
  • Number – The user input for this filter is expected as an integer.
  • Date – The user input for this filter is a date.
  • List – The user input for this filter is a comma-separated list.
Operators Select one or more filter operations that the end-user can select to apply to the filter. Depending on the Data Type selected, one or more of the following options are available to select to display to the end-user in the filter.

  • Contains – The response object filtered text contains all of the specified values.
  • Doesn’t Contain – The response object filtered text does not contain all of the specified values.
  • Exact Match – The response object filtered text only contains the specified values.
  • Not an exact match – The response filtered text object does not contain the specified value.
  • Included – The response object filtered text contains any of the specified values.
  • Not Included – The response object filtered text does not contain any of the specified values.
  • Starts with – The response object filtered text begins with the specified value.
  • Doesn’t start with – The response object filtered text does not begin with the specified value.
  • Ends with – The response object filtered text ends with the specified value.
  • Doesn’t end with – The response object filtered text does not end with the specified value.
  • Equal to – The response object filtered numbers or dates are equal to the specified value.
  • Greater than – The response object filtered numbers or dates are greater than the specified value.
  • Less than – The response object filtered numbers or dates are less than the specified value.
  • Exists – The response object filtered list contains the specified value.
  • Doesn’t exist – The response object filter list does not contain the specified value.

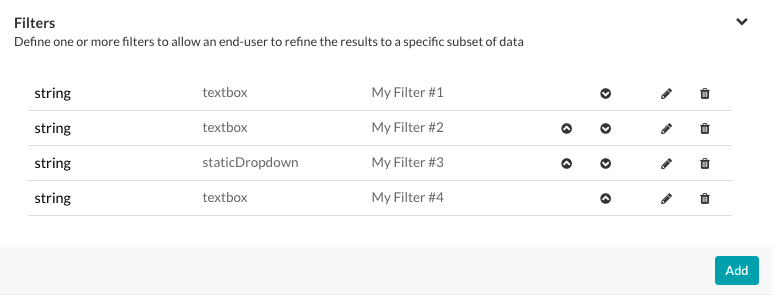
For multiple filters, you can order the filters in an order the end-user expects, shown in numerical order in the following illustration.
Alert Task - Settings Tab - Filters Section
Use the Move Up  icon and the Move Down  icon in the Actions column in the Filters section to reorder the filters if needed.
Click the Edit  icon to modify the settings for an existing filter.
Click the Delete  icon to delete an existing filter.
Warning: This operation is permanent and cannot be undone.

On this Page

Menu