GETTING STARTED
Kore.ai XO Platform
Virtual Assistants Overview
Natural Language Processing (NLP)
Concepts and Terminology
Quick Start Guide
Accessing the Platform
Working with the Builder
Building a Virtual Assistant
Using Workspaces
Release Notes
Current Version
Previous Versions
Deprecations

CONCEPTS
Design
Storyboard
Dialog Tasks
Overview
Dialog Builder
Node Types
Intent Node
Dialog Node
Entity Node
Form Node
Confirmation Node
Message Nodes
Logic Node
Bot Action Node
Service Node
Webhook Node
Script Node
Group Node
Agent Transfer
User Prompts
Voice Call Properties
Dialog Task Management
Connections & Transitions
Component Transition
Context Object
Event Handlers
Knowledge Graph
Introduction
Knowledge Extraction
Build Knowledge Graph
Add Knowledge Graph to Bot
Create the Graph
Build Knowledge Graph
Add FAQs
Run a Task
Build FAQs from an Existing Source
Traits, Synonyms, and Stop Words
Manage Variable Namespaces
Update
Move Question and Answers Between Nodes
Edit and Delete Terms
Edit Questions and Responses
Knowledge Graph Training
Knowledge Graph Analysis
Knowledge Graph Import and Export
Importing Knowledge Graph
Exporting Knowledge Graph
Creating a Knowledge Graph
From a CSV File
From a JSON file
Auto-Generate Knowledge Graph
Alert Tasks
Small Talk
Digital Skills
Digital Forms
Views
Introduction
Panels
Widgets
Feedback Survey
Train
Introduction
ML Engine
Introduction
Model Validation
FM Engine
KG Engine
Traits Engine
Ranking and Resolver
NLP Configurations
NLP Guidelines
Intelligence
Introduction
Contextual Memory
Contextual Intents
Interruption Management
Multi-intent Detection
Amending Entities
Default Conversations
Sentinment Management
Tone Analysis
Test & Debug
Talk to Bot
Utterence Testing
Batch Testing
Conversation Testing
Deploy
Channels
Publish
Analyze
Introduction
Conversations Dashboard
Performance Dashboard
Custom Dashboards
Introduction
Meta Tags
Dashboards and Widgets
Conversations History
Conversation Flows
Feedback Analytics
NLP Metrics
Containment Metrics
Usage Metrics
Smart Bots
Universal Bots
Introduction
Universal Bot Definition
Universal Bot Creation
Training a Universal Bot
Universal Bot Customizations
Enabling Languages
Store
Manage Assistant
Plan & Usage
Overview
Usage Plans
Support Plans
Invoices
Authorization
Multilingual Virtual Assistants
Masking PII Details
Variables
IVR Settings
General Settings
Assistant Management
Data Table
Table Views
App Definitions
Sharing Data Tables or Views

HOW TOs
Build a Flight Status Assistant
Design Conversation Skills
Create a Sample Banking Assistant
Create a Transfer Funds Task
Create a Update Balance Task
Create a Knowledge Graph
Set Up a Smart Alert
Design Digital Skills
Configure Digital Forms
Configure Digital Views
Add Data to Data Tables
Update Data in Data Tables
Add Data from Digital Forms
Train the Assistant
Use Traits
Use Patterns for Intents & Entities
Manage Context Switching
Deploy the Assistant
Configure an Agent Transfer
Use Assistant Functions
Use Content Variables
Use Global Variables
Web SDK Tutorial
Widget SDK Tutorial
Analyze the Assistant
Create a Custom Dashboard
Use Custom Meta Tags in Filters

APIs & SDKs
API Reference
API Introduction
API List
API Collection
koreUtil Libraries
SDK Reference
SDK Introduction
SDK Security
SDK Registration
Web Socket Connect and RTM
Using the BotKit SDK
BotKit SDK Tutorial - Blue Prism

ADMINISTRATION
Introduction
Assistant Admin Console
Administration Dashboard
User Management
Add Users
Manage Groups
Manage Roles
Assistant Management
Enrollment
Invite Users
Send Bulk Invites
Import User Data
Synchronize Users from AD
Security & Compliance
Using Single-Sign On
Security Settings
Cloud Connector
Analytics
Billing
  1. Home
  2. Docs
  3. Virtual Assistants
  4. Builder
  5. Alert Task
  6. Alert Task – Configuring the Schedule2 min read

Alert Task – Configuring the Schedule2 min read

As seen here, alert tasks only reach out to a web service for data when the Bot makes a request. For each task, you need to define when, and how often the web service is queried for data for an alert message. You can define the scheduling options presented to the end-user when the task is set up, as well as the default schedule for the task.

Configuring the Schedule for a Task

You need to configure the default settings for how often the task runs to request data from your web service. This topic describes how to configure the recurrence for a task.
To get started with defining the schedule to run a task, on the Settings tab, click the Expand icon in the Schedule section as shown in the following illustration.
Alert Task - Settings Tab - Schedule Section
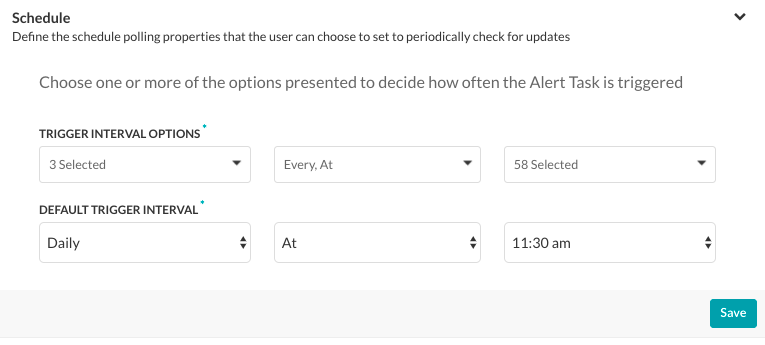
To configure the schedule for your task, you must define the Trigger Interval Options, and then the Default Trigger Interval. The Default Trigger Interval is the elapsed time between the last task request and the next automated task request.
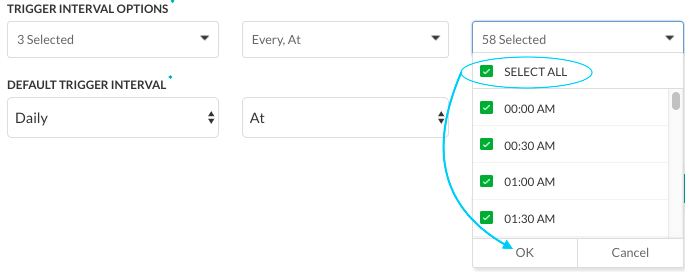
To set the options displayed to the end-user, in the Trigger Interval Options section:

  • In the first field, select one or more of Daily, Weekday, Weekend, individual days of the week or Select All, and then click OK.
  • In the second field, select one or more of Every, At, or Select All, and then click OK.
  • In the third field, select one or more of the available 5-minute intervals or 30-minute time slots (based on whether the second field is Every or At), or Select All, and then click OK.

In the following illustration, the Default Trigger Interval settings of  Daily At < any 30-minute interval >.
Alert Task - Settings Tab - Schedule Section - Trigger Interval

Menu