
Webhook channel provides a generic webhook integration to connect your bot with any external communication systems. Kore.ai platform provides standard request and response APIs to be used to send and receive text messages. End user’s input through a voice, keypad or any other means needs to be converted to plain text before it is sent to Kore.ai platform using the request API.
NOTE: From ver 7.0 you can enable multiple WebHook channels to your Bot, once added the WebHook channel will not be disabled from the Channel list and you can use the same process to enable another WebHook channel with a different name. The webhook channels with name and type mentioned (webhook ) will be available at channels filter at the dashboard and analyze section to views the metrics on the applied channel. You will be able to apply channel specific overrides for each of the webhook channels created/enabled – channel selection drop will show all the webhook channels created. Further, all the channels will be available for selection during the Bot deployment.
Pre-requisites
To enable Webhook channel for your Kore.ai bot, you need to:
- Associate App--To enable Webhook channel for your Kore.ai bot, you need to associate the channel with either an existing app in your Kore.ai account or create a new app.
- Select Integration Mode- You will need to enable an integration mode that is supported by the channel based on your business requirement. You can copy the Webhook URL from the configurations tab of the channel.
- Review Payload Formats- Review Payload formats for verifying the integration.
To access Bot Platform’s public APIs, the application making the API request requires authentication. Kore.ai uses the JWT (JSON Web Token) technology to handle the authentication. For a quick overview of the JWT token, read Introduction to JWT tokens.
Configuring Webhook as a channel
- In the Bots section of the Bot Builder, click the Bot to which you want to add the Webhook channel.
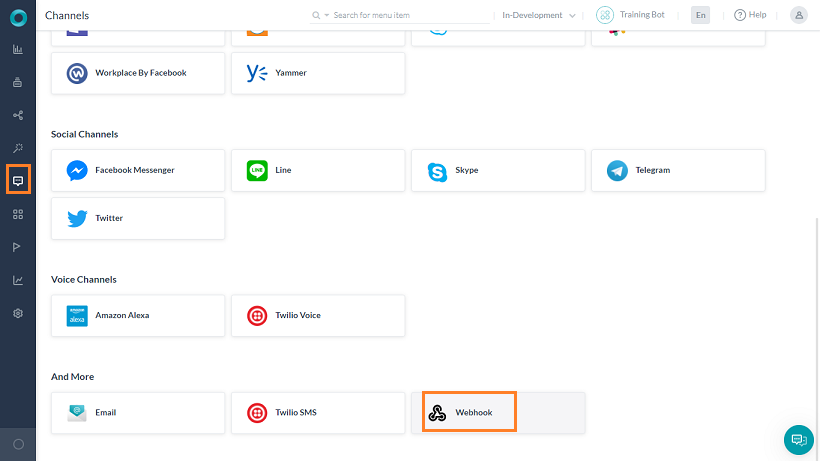
- On the Channels tab, click the Webhook icon. The Webhook page gets displayed.
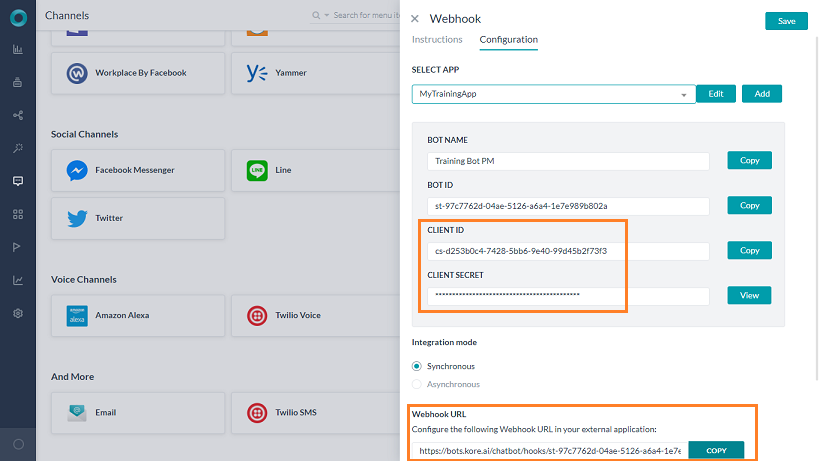
- Navigate to Configurations tab of this page and associate this channel with an app.
- Give a Name to the Channel.
- You may select any of the existing Apps available in your Kore.ai account or create a new app.
- Enter a name for the app and click Create. The app gets created and Client ID and Client Secret is generated. Copy the Client ID and Client Secret details.
- Webhook channel supports both synchronous and asynchronous modes and depending on your business needs, you can enable one of these modes in the Configurations tab.
- Synchronous mode delivers full response directly to the incoming requests.
- Asynchronous mode defines the POST_URL of your external system and Access Token to be used for delivering partial or full responses. When hit, the WebHook URL will receive an empty message with 200 status code, the response message will be sent to the POST_URL defined.
- Select Yes to Enable Channel.
- Save the configuration. The Webhook URL at this channel instance will be created dynamically.
- Use the Webhook URL to establish integration with external communication systems. This URL will be available only after enabling the channel.
After completion of these steps, a success message appears on the screen, and a channel request is sent to your Bots Admin for approval.
Notes:
- The channel remains non-functional until the Bots Admin approves it.
- In the case of Bot Import, WebHook channels will also be imported. You would need to configure the channels which are created with the import and associate the channels with an application.
- In the case of Smart Bots, if the parent has webhook channels configured, these channels will be inherited to the child bots. The channel is inheritance happens to child bot every time a new webhook channel is added at the parent and published.
WebHook API Reference
Receives plain text messages from external communication systems
- in case of single webhook configuration and in case of multi-webhook configuration for the first instance
POST {{host_url}}/chatbot/hooks/{{bot id}} - in case of multi-webhook configuration for the second instance onwards:
POST {{host_url}}/chatbot/hooks/{{bot id}}/hookInstance/{{webHookId}}
Query Parameters
| Parameter | Description |
| host_url | Your Kore.ai Bots Platform URL. |
| bot id | The ID of the bot to which you want to post messages. You can access it from the General Settings page of the bot. |
Authorization
Invoke the API with JWT in the header with the following syntax:
Authorization: bearer {{JWT}}
Generate JWT using the following header and payload
JWT Header
{
  "alg": "HS256",
  "typ": "JWT"
 }
JWT Payload
{
  "appId": "{{clientId of the bot}}",
  "sub" : "{{random number}}"
  }
Note: JWT should be generated and signed by the secret key from the server(backend). JWT should not be generated in the browser. Secret Key should be kept in server
Response content type
application/json
Sample Payload Reference
payload : {
           "message":{
             "text" : "Hi",
             "attachments" : [<array of attachment links>]
            },
           "from" :{
             "id": <unique-id-of-sender(mandatory)>
            },
          "to" :{
            "id": <unique-id-of-recipient(mandatory)>
            }
         "customData" : {
            "key":"<value>"
            }
          }
customData can be used to send additional information. This data, customData, can be accessed from the Bot User Session. For instance, if userToken is sent as part of request payload to webhook using customData, it can be accessed from : context.session.BotUserSession.lastMessage.customData.userToken.
Sample cURL
curl -X POST
{{host}}/chatbot/hooks/{{bot-id}}
//{{host_url}}/chatbot/hooks/{{bot id}}/hookInstance/{{webHookId}} in case of multi-webhook configuration
 -H 'authorization: bearer {{JWT Token}}'
 -H 'content-type: application/json'
 -d '{ "message": {
          "text": "hi" },
       "from": {
          "id": "kore@support.com" },
       "to" : {
          "id": "st-xxxx" },
       "customData" : {
          "userToken":"xxxx" }
     }'
Synchronous Response
{
  "text" : "message"
  }
If the response that needs to sent back is of a template, then the template JSON object will be included in the text array object. Refer here for more on message templates.
Asynchronous Response
When the client app sends the request to Webhook URL configured in Asynchronous mode, the platform responds back with an empty message and a status code 200.

Further, the platform sends the response to the POST_URL configured at the channel based on the request received from the client app.
Following is the format of the response sent to the POST_URL. If the response that needs to sent back is of a template, then the template JSON object will be included in the text array object. Refer here for more on message templates.
{
 "text" : "message",
 "to" : "to_id",
 "from" : "from_id"
 }