
To add the Workplace by Facebook channel to your bot, you will need a developer portal Facebook account to configure the connection between Facebook Workplace and Kore.ai. Adding the Workplace by Facebook channel to your Kore.ai bot is a 3-step process to allow end-users for your bot to interact with your bot using their Facebook Workplace accounts. To add the Workplace by Facebook channel to your bot, you will need to:
- Create a Custom Integration – In your Facebook Workplace admin account, you will need to create an app to provide authorization for communication between Facebook Workplace and your Kore.ai bot. To create a Facebook app, you must have an admin account.
- Define Permissions – Select which permissions the bot can use to interact with your bot in the Workplace by Facebook channel.
- Get App Secret and Token – To use Facebook Workplace, you must generate an access token, and copy the app secret from Facebook Workplace into bot Builder to provide authentication for communications.
To add the Workplace by Facebook channel
To complete the following procedure, you must have, or register for a new admin account in the Facebook Workplace Developers Portal at https://< Your Domain >.workplace.com/work/admin.
- In Bot Builder, in the Bots section, click the bot that you want to add the Workplace by Facebook channel to.
- On the Channels tab, click the Expand
 icon for the Workplace by Facebook section. The Workplace by Facebook Channel page is displayed.
 - Log in to your Facebook Workplace admin account, and then click Integrations on the left-hand navigation menu. The Integrations page is displayed.
- In the Available to install section, click Create your own custom integration. The Create Custom Integration dialog is displayed.
- In the Name field, enter the name of the integration displayed to your end-users, for example, My Kore AI Custom Integration.
- In the Description field, enter a description for your application, and then click Create. The new integration is displayed in the Installed section.
- Click the Settings
 icon for your integration. The Edit Custom Integration dialog is displayed.
 - To add an icon to your integration, click Update, select an image, and then click Crop and Save. You should use the same icon as your bot icon.
- In the Permissions section, select the following permissions:
- Read content
- Post to groups
- Message any member
- In the App Secret field, click Show, copy the App Secret and then paste into the App Secret field on the Configuration tab in Bot Builder.
- In Facebook Workplace, on the Edit Custom Integration dialog, in the Access Token section, click Create Access Token. The New Token Create dialog is displayed.
- Click Copy and then paste into the Access Token field on the Configuration tab in Bot Builder.
Note: You should also save this token in a secure location for future reference as it can never be displayed again in Facebook Workplace.
- In Facebook Workplace, on the New Token Created dialog, click I understand, and then click Done. The Edit Custom Integration dialog is displayed.
- Click Save. The custom integration is saved and the Integrations page is displayed.
- In Bot Builder, on the Configuration tab, in the Communication Mode section, select one or both of the following:
- Allow communication with a Bot in a Workplace Group
- Allow communication with a Bot through a Work Chat
- Click Yes in the Enable Channel section, and then click Save.
The bot may require your Bots Admin approval and assignment before it is available to any users.
Editing the Workplace by Facebook Channel
To edit the Workplace by Facebook channel, hover your mouse over the channel to modify, and then click the Settings ![]() icon displayed to show the command menu displayed in the following illustration.
icon displayed to show the command menu displayed in the following illustration.
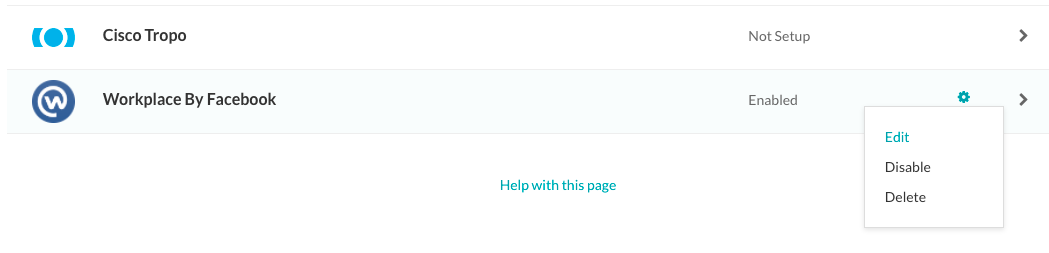
Select one of the following commands to modify the channel:
- Edit – Click to open the Workplace by Facebook channel setup page.
- Disable/Enable – Click Disable to temporarily disable use of the Workplace by Facebook channel for your bot. When the channel is disabled, click Enable to enable use of the Workplace by Facebook channel.
- Delete – Click Delete, and then click OK in the Delete Confirmation dialog to permanently delete the bot channel configuration.
Warning: This operation is permanent, and cannot be undone.