このハウツーでは、Bot関数を使用して機能の一部を再利用できるバンキングBotのシナリオについてご説明します。支出レポートを関数としてプログラムし、普通預金口座とクレジットカードの両方に使用する方法を説明していきます。Bot関数とは何か、またKore.aiのBotプラットフォームにどのように実装されているかについての詳細は、こちらを参照してください。
例題
バンキングBotには、レポートタスクがあります。
- 月次報告書は、特定の口座番号の毎月の残高を表示します。
- クレジットカード明細書には、特定のクレジットカードの費用の概要が記載されています。
- どちらのレポートも円グラフとして表示され、入力は月と金額の値を持つ配列となっています。
このドキュメントでは、Bot関数を使用してコーディング作業の重複を回避し、均一な表示を確保する方法を説明します。
Pre-requisites
- Botビルドナレッジ
- 動作可能なBot。ここでは、こちらのバンキングBotを使用します。
- 以下は、メッセージテンプレートを使用してデータを表示する2つの関数を含むスクリプトファイルです(メッセージテンプレートの詳細については、こちらを参照してください)。
- tableTemplate-2次元の配列を取り、コンテンツを表形式で表示します
- pieTemplate–2次元の配列を取り、コンテンツを円形式で表示します
次の内容をコピーして、.jsファイル(たとえばfunctionEX.jsなど)として保存します。
function tableTemplate(data){ var message = { "type": "template", "payload": { "template_type": "mini_table", "layout": "vertical", "text":"Monthly Balance Statement", "elements": [] } }; for (i=0; i < data.length; i++) { var j=0; var element = { "primary":[[data[i][j]],[data[i][j+1],"right"]], "additional":[[data[i][j+2],data[i][j+3]],[data[i][j+4],data[i][j+5]]] }; message.payload.elements.push(element); } return JSON.stringify(message); }; function pieTemplate(data){ var message = { "type": "template", "payload": { "template_type": "piechart", "pie_type": "regular", "text": "Monthly Expense Report", "elements": [] } }; for (i=0; i < data.length; i++) { var element = { "title": data[i][0], "value": data[i][1] }; message.payload.elements.push(element); } return JSON.stringify(message); };
導入
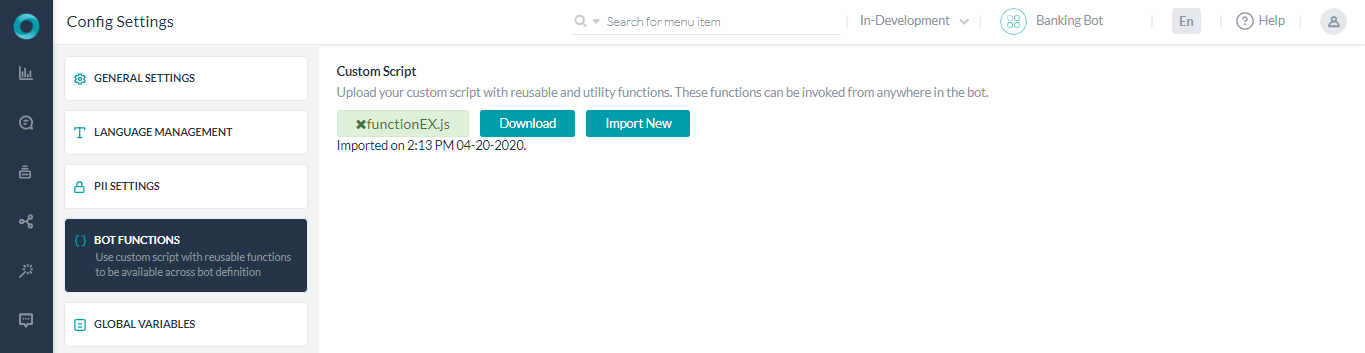
- バンキングBotを開く
- 設定 -> 構成設定からBot関数セクションを選択します。
- インポートをクリックすると、「カスタムスクリプトのインポート」ウィンドウが開きます。
- 「前提条件」セクションから保存したスクリプトファイルをドラッグアンドドロップするか参照して、インポートをクリックします。
- 成功メッセージが表示されたら、完了をクリックします。
- スクリプトファイルを使用する準備が整いました。
- Botタスクページを開き、月次報告書という名前の新しいダイアログタスクを作成します。
- 口座番号と口座タイプを取得するエンティティを追加します。
- 理想的には、毎月の残高の詳細を取得するためのサービスコールが必要です。ここでは、デモンストレーションの目的で静的な値を使用します。
- スクリプトノードを追加し、次の内容を入力します(1月、2月、3月の残高を格納する配列を宣言しています)。
context.monthlyBal = [["Jan",100],["Feb",200],["Mar", 300]]; - メッセージノードを追加して、以前に宣言したBot関数にこのデータを送信し、レポートを取得します。
- Botの応答セクションから応答の管理をクリックします。
- Bot応答を追加し、ウェブ/モバイルクライアントをチャネルとして選択し、JavaScriptタブに切り替えて、次のコードを入力して値を表形式で表示します。
var info = context.monthlyBal; print(tableTemplate(info));
- 別のメッセージノードを追加して、以前に宣言したBot関数にこのデータを送信し、レポートを取得します。
- Botの応答セクションから応答の管理をクリックします。
- Bot応答を追加し、ウェブ/モバイルクライアントをチャネルとして選択し、JavaScriptタブに切り替えて、次のコードを入力して値を円グラフで表示します。
var info = context.monthlyBal; print(pieTemplate(info));
- ダイアログタスクを閉じて、Botタスクページに戻ります。
- 「クレジットカード明細書」という名前の新規ダイアログタスクを作成します。
- 口座番号を取得するエンティティを追加します。
- 理想的には、毎月の支出の値を取得するためのサービスコールが必要です。ここでは、デモンストレーションの目的で静的な値を使用します。
- スクリプトノードを追加し、次の内容を入力します(すべての月の支出値を繰り越す配列を宣言しています)。
context.monthlyExpenses = [["Jan",100],["Feb",200],["Mar", 300],["Apr",100],["May",400],["June", 500],["Jul",100],["Aug",200],["Sept", 300],["Oct",100],["Nov",100],["Dec", 300]]; - メッセージノードを追加して、以前に宣言したBot関数にこのデータを送信し、レポートを取得します。
- Botの応答セクションから応答の管理をクリックします。
- Bot応答を追加し、ウェブ/モバイルクライアントをチャネルとして選択し、JavaScriptタブに切り替えて、次のコードを入力して値を円グラフで表示します。ご覧のとおり、前のダイアログタスクで呼び出されたものと同じ関数を使用しています。
var info = context.monthlyExpenses; print(pieTemplate(info));
- ダイアログタスクを終了します。
- Botに話しかけ、両方のダイアログを試してみましょう。このように、同じ関数を使用して複数の場所にレポートを表示できます。

