このハウツーでは、さまざまな測定を使用してBotパフォーマンスを分析、およびビジネスニーズのトレンドを追跡するバンキングBotのシナリオを調査します。カスタムダッシュボードとは何か、およびKore.ai Botプラットフォームへの実装方法の詳細については、こちらを参照してください。
例題
バンキングBot顧客が、以下の測定の追跡をしたいと考えています。
- 顧客タイプに基づく使用統計
- 取引額分割
- 日ごとのタスクの成功対失敗のトレンド
- チャネルごとの使用詳細
- 失敗する上位タスク
この文書では、カスタムダッシュボードを使用して上記のすべてのシナリオを達成するステップバイステップの詳細を説明します。これが構築するダッシュボードです。 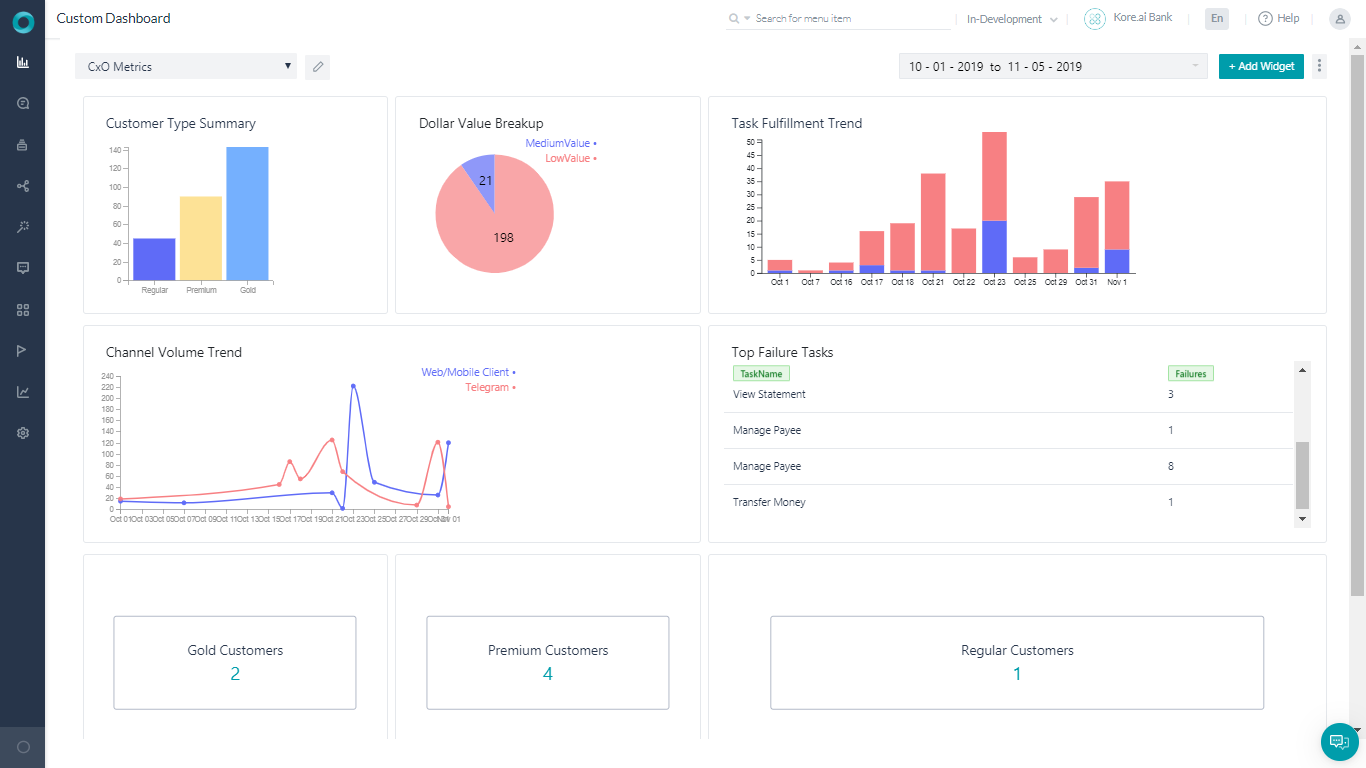
Pre-requisites
- Botビルドナレッジ。
- カスタムメタタグの使用についての、 詳細はこちらを参照してください。
- 以下で述べるダイアログ付きバンキングBot。
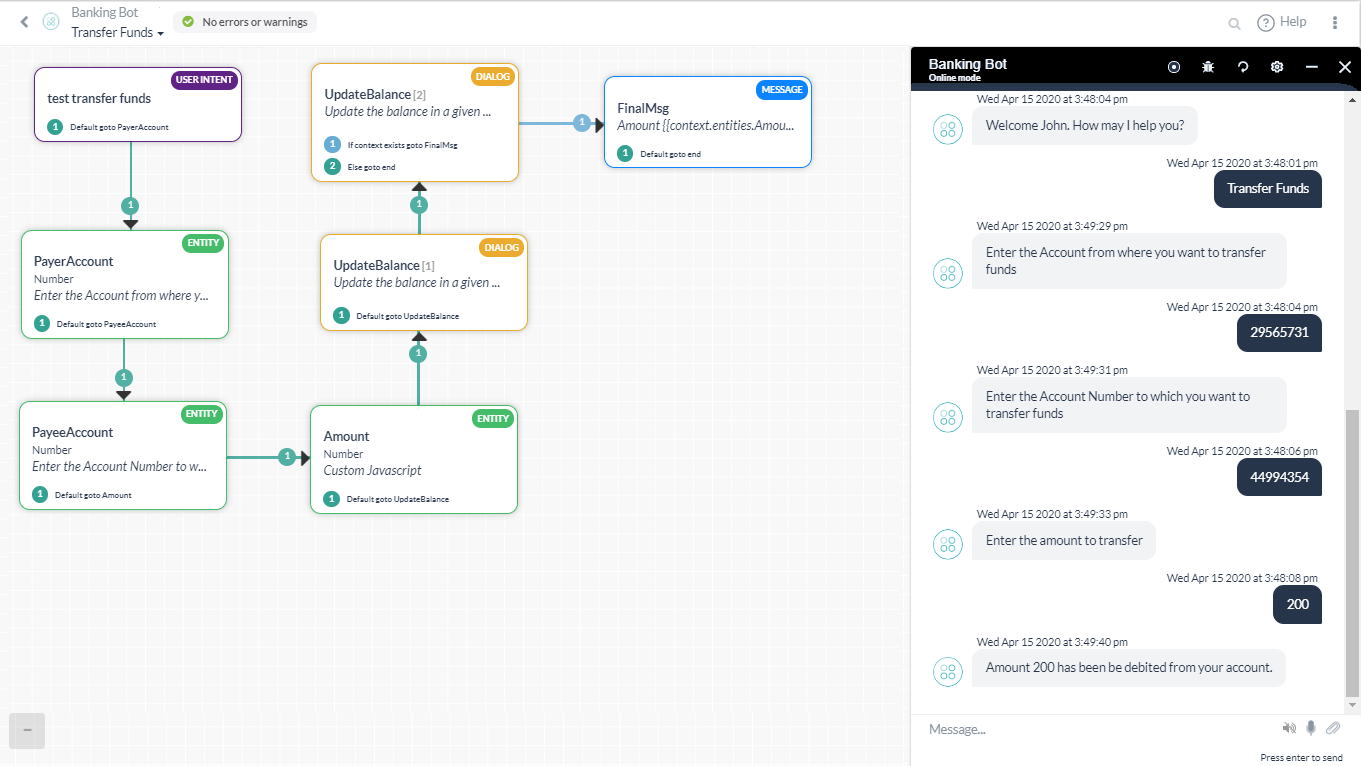
- 資金の移動 – ユーザーに資金移動ステップを一通り説明するダイアログタスク。
 このダイアログには、振替額に基づきカスタムメタタグ、TransferValueを追加するスクリプトノードを含めました。以下のスクリプトが使用されました。
if(context.entities.TransferAmount[0].amount > 50000){ tags.addSessionLevelTag("TransferValue","HighValue"); } if(context.entities.TransferAmount[0].amount > 10000) tags.addSessionLevelTag("TransferValue","MediumValue"); if(context.entities.TransferAmount[0].amount > 0) tags.addSessionLevelTag("TransferValue","LowValue");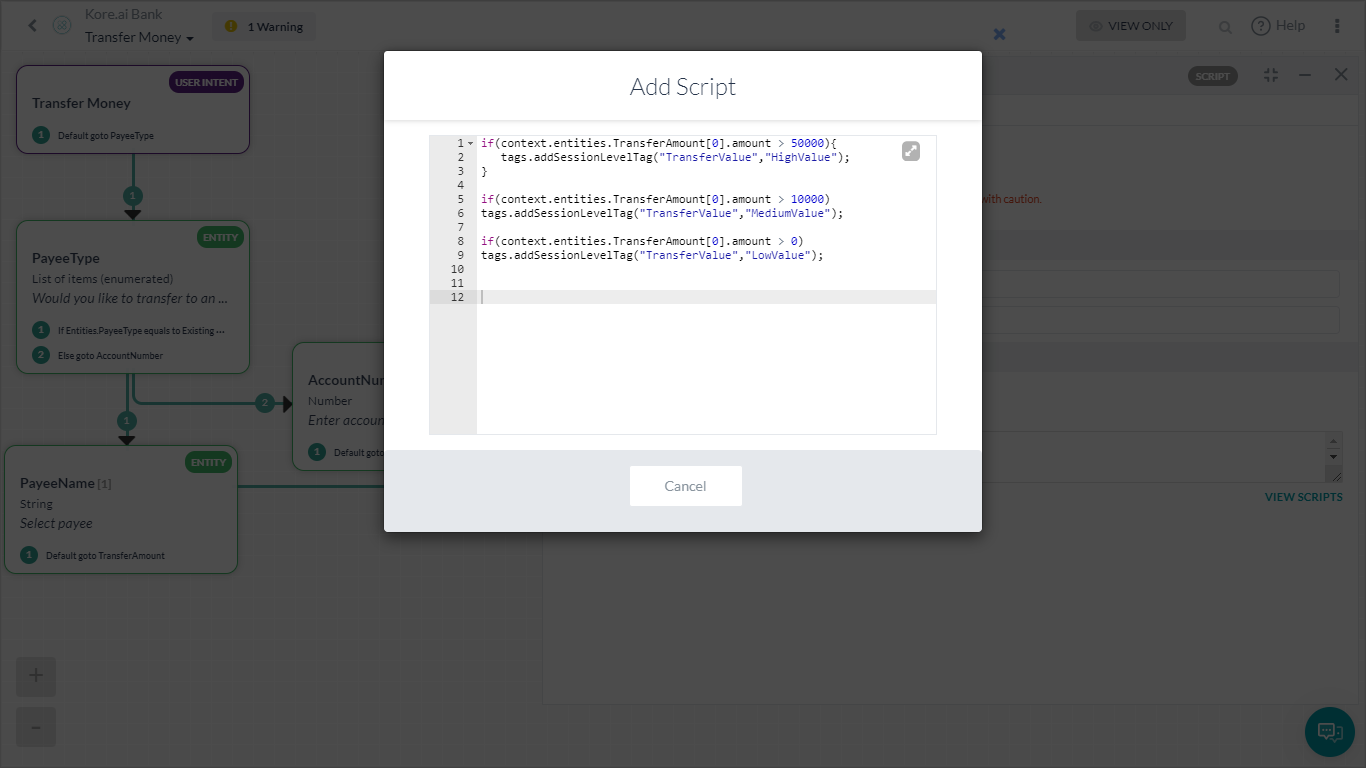
- 支払先管理 – 支払先リストを管理するユーザー用。
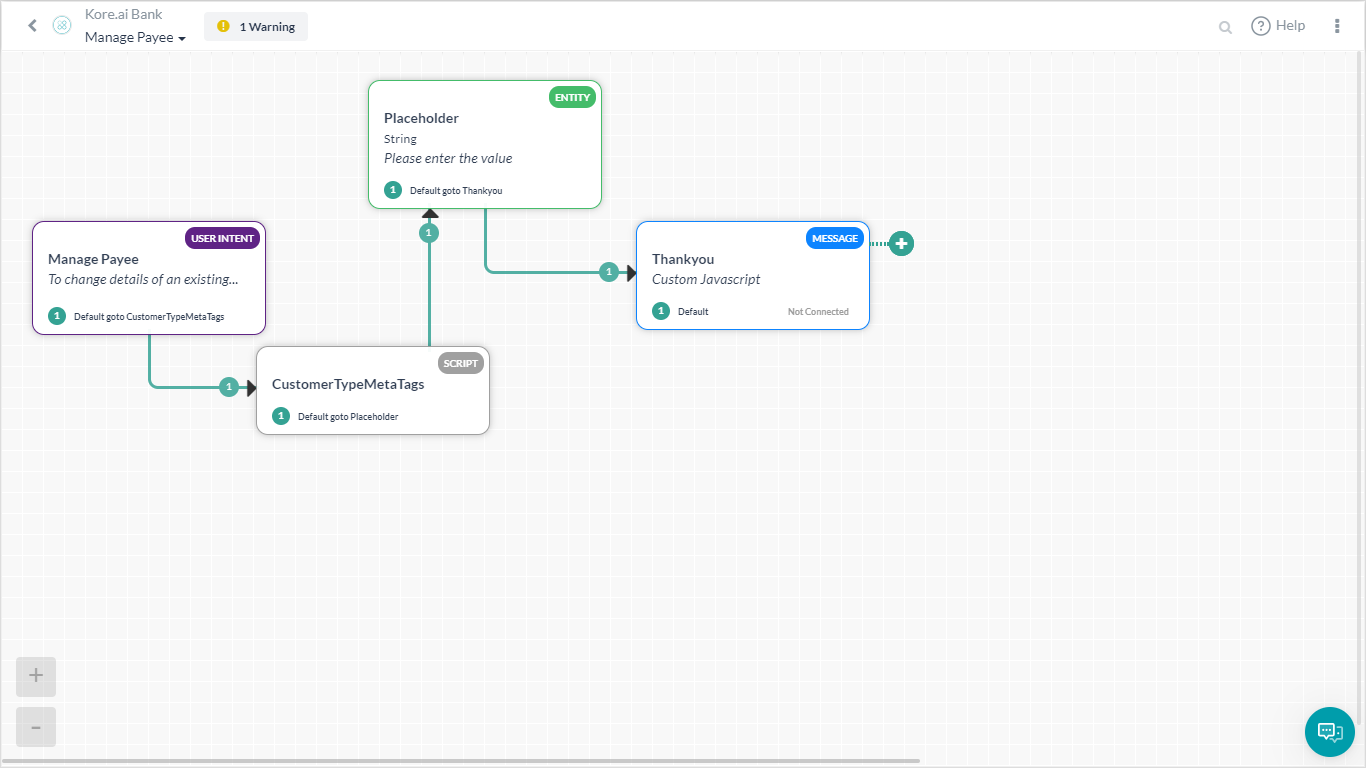 以下は、customerTypeメタ タグを割り当てるスクリプトです。
if(context.custType == 3){ tags.addUserLevelTag("CustomerType","Premium"); } if(context.custType == 2){ tags.addUserLevelTag("CustomerType","Gold"); }; if(context.custType == 1){ tags.addUserLevelTag("CustomerType","Regular"); };
- 資金の移動 – ユーザーに資金移動ステップを一通り説明するダイアログタスク。
導入
例題で述べた各測定を、カスタムダッシュボードからのウィジェットを使用して実装できる方法を考えてみましょう。
- 左のナビゲーション パネルから、ダッシュボードの カスタムダッシュボードをクリックします。
- 新しいダッシュボードを作成します。
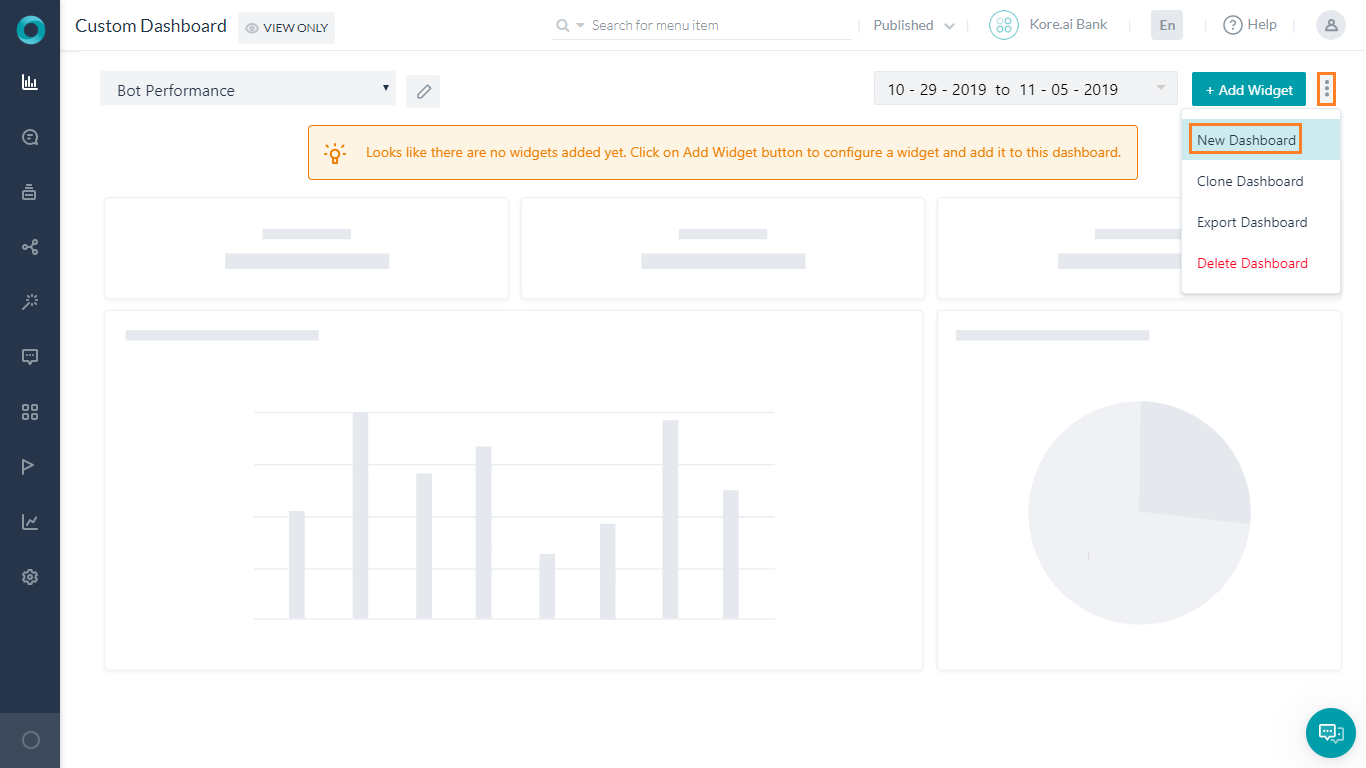
- ウィジェットを追加ボタンを使用して、上記の各シナリオのウィジェットを追加します。
- 以下のセクションでは、各ウィジェットの詳細を説明します。
ドル価値分割
- ウィジェットを追加
- クエリのセットアップ:
- データセット – Analytics
- 選択 – sessionTag.TransferValue as TransferValue,count(taskName)これでプラットフォームにフェッチするデータを知らせます。ここでは、実行したタスクの合計数に対して送金金額タスクに追加したセッションタグ値を使用しています。
- グループ別 – sessionTag.TransferValue
- 実行して、上のクエリから結果を表示します。
- ウィジェットのセットアップ
- 円グラフを選択
- ディメンジョンをTransferValueに設定
- 測定 をcount(taskName)に設定
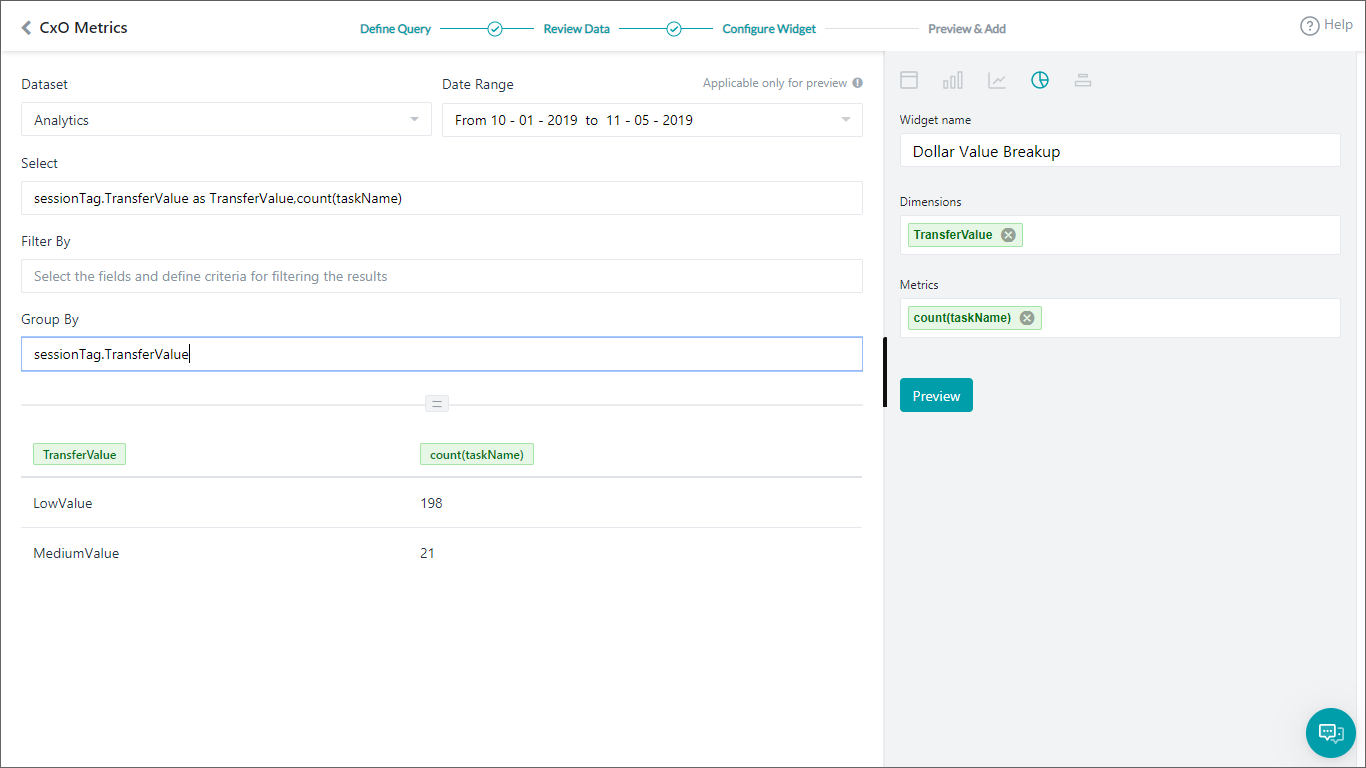
- プレビューおよびダッシュボードを更新を参照してください。

顧客タイプのサマリ
上記のステップを、以下の詳細で繰り返します。
- ウィジェットを追加
- クエリのセットアップ:
- データセット – Analytics
- 選択 – userTag.CustomerType as CustomerCategory, count(taskName)
- グループ別 – userTag.CustomerType
- 実行して、上のクエリから結果を表示します。
- ウィジェットのセットアップ
- 棒グラフを選択
- ディメンジョンを CustomerCategory に設定
- 測定を count(taskName) に設定
- プレビューおよびダッシュボードの更新を参照してください。
タスク履行トレンド
上記のステップを、以下の詳細で繰り返します。
- ウィジェットを追加
- クエリのセットアップ:
- データセット – Analytics
- 選択 – date,metricType, count(metricType) as TotalTasks
- フィルタ別 – metricType = 'successtasks' or metricType = 'failedtasks' 成功または失敗タスクのみを表示
- グループ別 – date、metricType
- 実行して、上のクエリから結果を表示します。
- ウィジェットのセットアップ
- 棒グラフを選択
- ディメンジョンをdateに設定
- 測定を TotalTasks に設定
- オーバーレイを metricType に設定

- プレビューおよびダッシュボードの更新を参照してください。
上位失敗タスク
上記のステップを、以下の詳細で繰り返します。
- ウィジェットを追加
- クエリのセットアップ:
- データセット – Analytics
- 選択 – taskName as TaskName,count(taskName) as Failures
- フィルタ別 – metricType = 'failedtasks’ 失敗タスクのみを表示
- グループ別 – taskName
- 実行して、上のクエリから結果を表示します。
- ウィジェットのセットアップ
- テーブルチャートを選択
- ディメンジョンをTaskNameおよびFailuresに設定
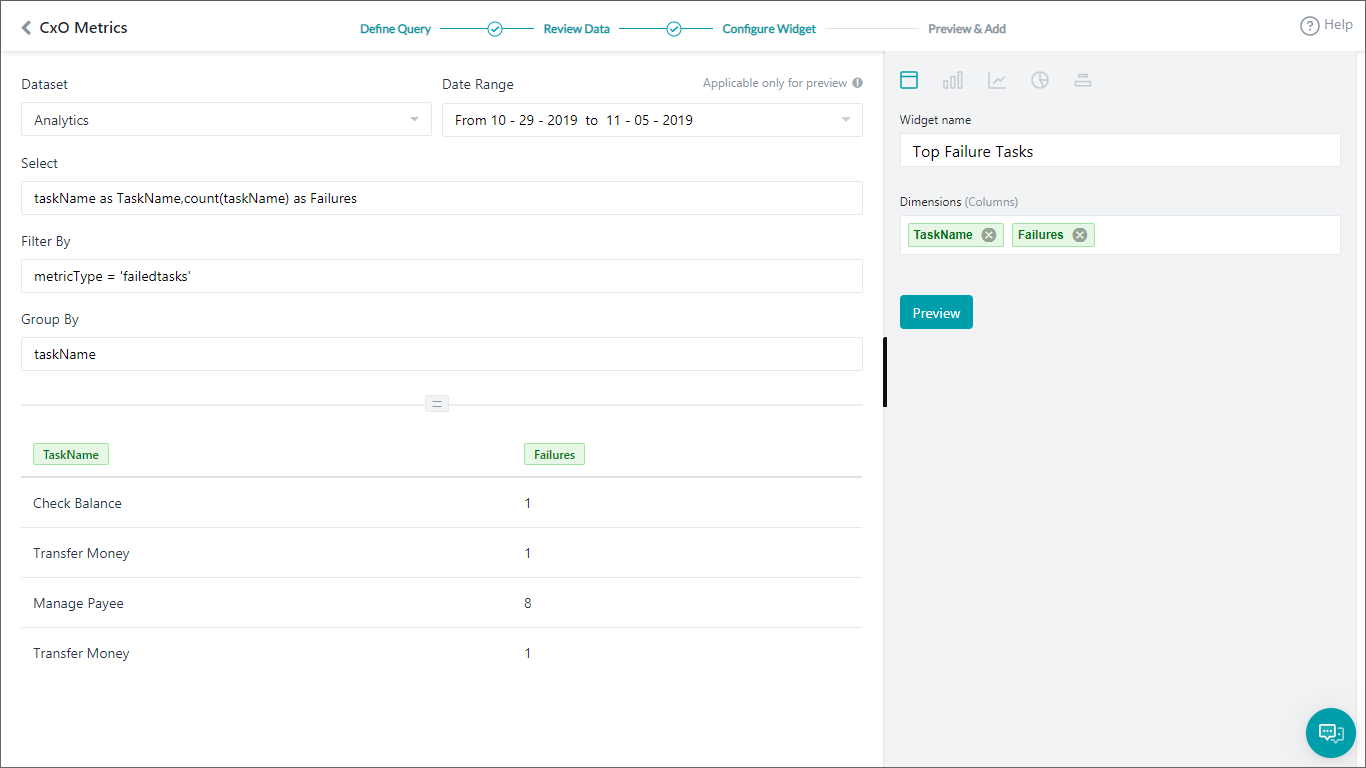
- プレビューおよびダッシュボードの更新を参照してください。
チャネルボリュームのトレンド
上記のステップを、以下の詳細で繰り返します。
- ウィジェットを追加
- クエリのセットアップ:
- データセット – Mesages
- 選択 – date,channel,count(messageId)
- グループ別 – date,channel
- 実行して、上のクエリから結果を表示します。
- ウィジェットのセットアップ
- 折れ線グラフを選択
- ディメンジョンをdateに設定
- 測定を count(messageId) に設定
- オーバーレイをchannelに設定
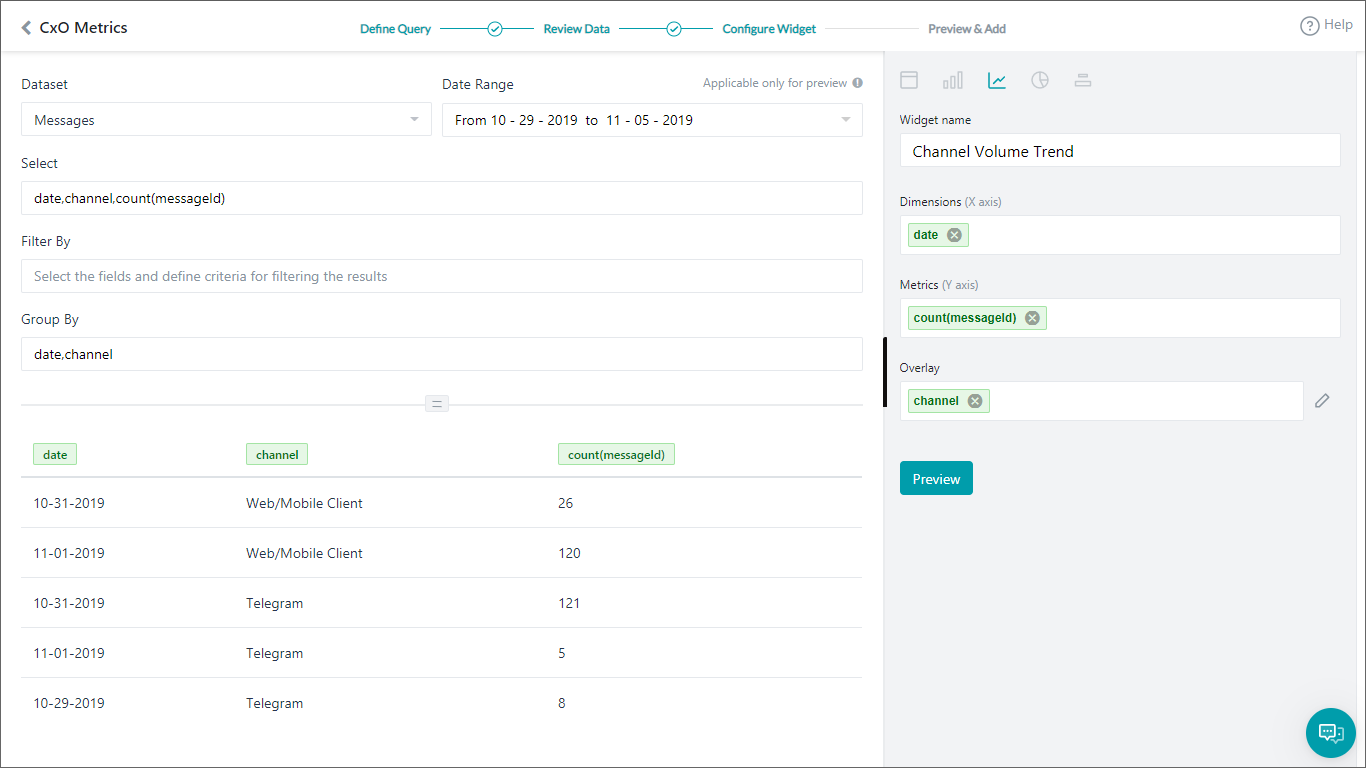
- プレビューおよびダッシュボードの更新を参照してください。
カスタムダッシュボードが準備できました。日付範囲を設定すると、ビジネスシナリオの必須測定が付与されます。