OVERVIEW
Virtual Assistants
Kore.ai Platform
Key Concepts
Natural Language Processing (NLP)
Accessing Platform
VIRTUAL ASSISTANTS
Virtual Assistant Builder
Virtual Assistant Types
Getting Started
Creating a Simple Bot
SKILLS
Storyboard
Dialog Task
Introduction
Dialog Builder (New)
Dialog Builder (Legacy)
User Intent Node
Dialog Node
Entity Node
Supported Entity Types
Composite Entities
Supported Colors
Supported Company Names
Form Node
Logic Node
Message Nodes
Confirmation Nodes
Bot Action Node
Service Node
Custom Authentication
2-way SSL for Service nodes
Script Node
Agent Transfer Node
WebHook Node
Grouping Nodes
Connections & Transitions
Manage Dialogs
User Prompts
Knowledge Graph
Terminology
Building
Generation
Importing and Exporting
Analysis
Knowledge Extraction
Build
Alert Tasks
Introduction
Ignore Words and Field Memory
How to Schedule a Smart Alert
Small Talk
Digital Views
Overview
Configuring Digital Views
Digital Forms
Overview
How to Configure Digital Forms
NATURAL LANGUAGE
Overview
Machine Learning
Introduction
Model Validation
Fundamental Meaning
Introduction
NLP Guidelines
Knowledge Graph
Traits
Introduction
How to Use Traits
Ranking and Resolver
Advanced NLP Configurations
INTELLIGENCE
Overview
Context Management
Overview
Session and Context Variables
Context Object
How to Manage Context Switching
Manage Interruptions
Dialog Management
Sub-Intents & Follow-up Intents
Amend Entity
Multi-Intent Detection
Sentiment Management
Tone Analysis
Sentiment Management
Event Based Bot Actions
Default Conversations
Default Standard Responses
TEST & DEBUG
Talk to Bot
Utterance Testing
Batch Testing
Conversation Testing
CHANNELS
PUBLISH
ANALYZE
Overview
Dashboard
Custom Dashboard
Overview
How to Create Custom Dashboard
Conversation Flows
NLP Metrics
ADVANCED TOPICS
Universal Bots
Overview
Defining
Creating
Training
Customizing
Enabling Languages
Store
Smart Bots
Defining
koreUtil Libraries
SETTINGS
Authorization
Language Management
PII Settings
Variables
Functions
IVR Integration
General Settings
Management
Import & Export
Delete
Versioning
Collaborative Development
PLAN & USAGE
Overview
Usage Plans
Support Plans
Invoices
API GUIDE
API Overview
API List
API Collection
SDKs
SDK Overview
SDK Security
SDK App Registration
Web SDK Tutorial
Message Formatting and Templates
Mobile SDK Push Notification
Widget SDK Tutorial
Widget SDK – Message Formatting and Templates
Web Socket Connect & RTM
Using the BotKit SDK
Installing
Configuring
Events
Functions
BotKit SDK Tutorial – Agent Transfer
BotKit SDK Tutorial – Flight Search Sample Bot
Using an External NLP Engine
ADMINISTRATION
HOW TOs
Creating a Simple Bot
Creating a Banking Bot
Context Switching
Using Traits
Schedule a Smart Alert
Configure UI Forms
Add Form Data into Data Tables
Configuring Digital Views
Add Data to Data Tables
Update Data in Data Tables
Custom Dashboard
Custom Tags to filter Bot Metrics
Patterns for Intents & Entities
Build Knowledge Graph
Global Variables
Content Variables
Using Bot Functions
Configure Agent Transfer
Update Balance Task
Transfer Funds Task
RELEASE NOTES
  1. ホーム
  2. Docs
  3. Virtual Assistants
  4. Channel Enablement
  5. Twitterチャネルの追加

Twitterチャネルの追加

Twitterをチャネルとして設定するには、BotをTwitterアカウントに関連付け、Twitterアプリを定義し、連携を有効にする必要があります。Twitterをチャネルとして追加するには、以下を行う必要があります。

  1. Twitterアプリを作成する Twitterにログインし、Twitterアプリ管理コンソールで、Twitterとお客様のKore.ai Bot間の通信を許可するアプリを作成します。
  2. キーとトークンを設定する – TwitterアプリがKore.ai Botプラットフォームと通信するための認証キーとトークンを生成し、それらのキーとトークンをKore.ai Botビルダーにコピーします。
  3. 権限を更新する – Kore.ai BotのチャネルとしてTwitterを使用するには、Kore.ai Botプラットフォームと対話するために使用するTwitterアプリの権限を定義する必要があります。
  4. チャネルを有効にする – Twitterアプリを設定し、Bot Builderで設定データを入力したら、チャネルを有効にする必要があります。

Twitterチャネルを追加する:
この手順を完了するには、まだアカウントを持っていない場合、Twitterアカウントを作成する必要があります。

注:チャネル要件の変更に合わせて、プラットフォームのバージョン7.1で手順が変更されています。
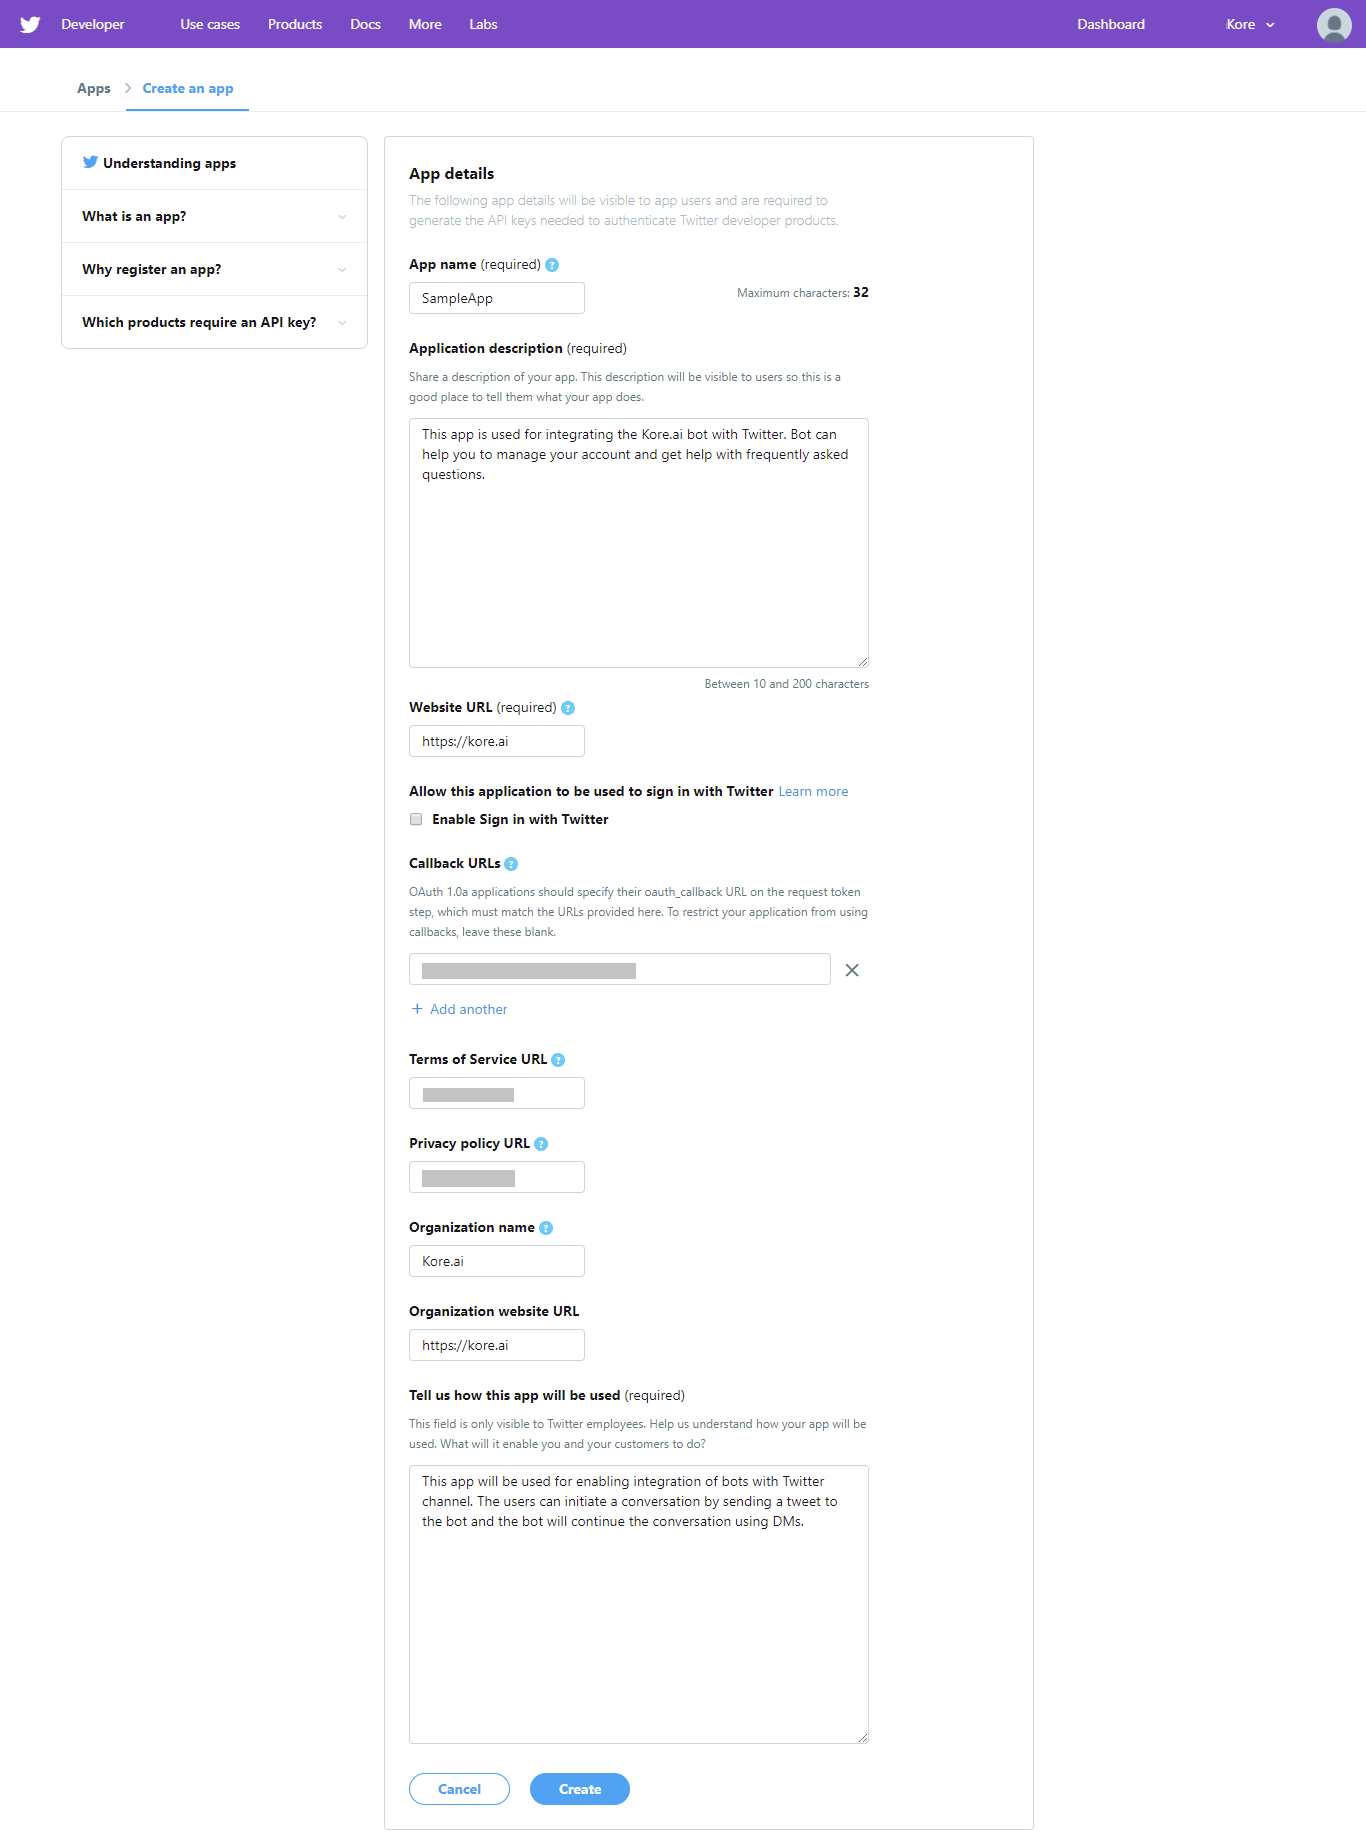
アプリの作成

  1. Twitterアプリを作成するには、コールバックURLが必要です。
    1. BotビルダーのBotセクションで、Twitterチャネルを追加するBotをクリックします。
    2. チャネルタブでTwitterアイコンをクリックします。Twitterチャネルページが表示されます。
    3. Twitterのチャネルページにある設定タブからコールバックURLを使用します。
  2. Twitterアプリポータルにログインし、新しいアプリを作成を選択します。
  3. 必要な情報をすべて入力し、Twitterアプリを作成をクリックして、新しいアプリを作成します。

キーとトークン

アプリケーションの作成後、以下を行います。

  1. キーとトークンタブに進みます。
  2. アクセストークンとアクセストークンシークレットセクションで、作成ボタンをクリックします。この動作により、アクセストークンとアクセストークンシークレットが生成されます。
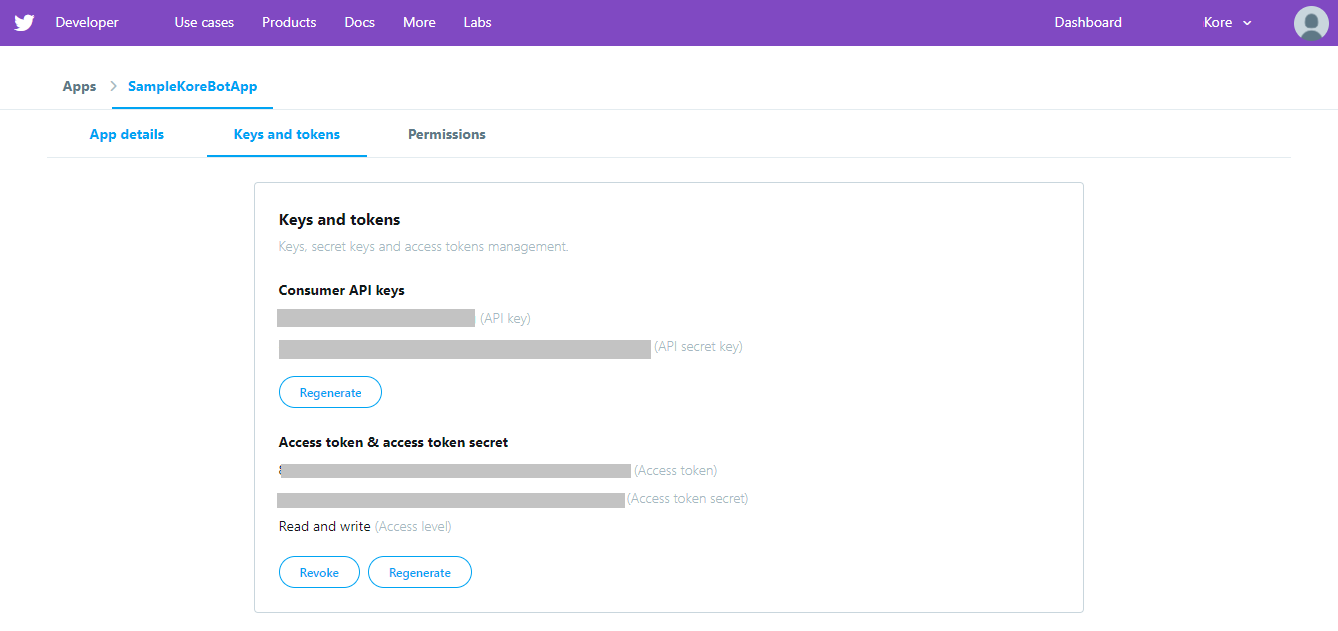
  3. APIキーAPIシークレットキーアクセストークンアクセストークンシークレットフィールドの値をコピーします。それぞれのBotのBotビルダーからTwitterチャネルを設定する際に、これらの値を入力する必要があります。
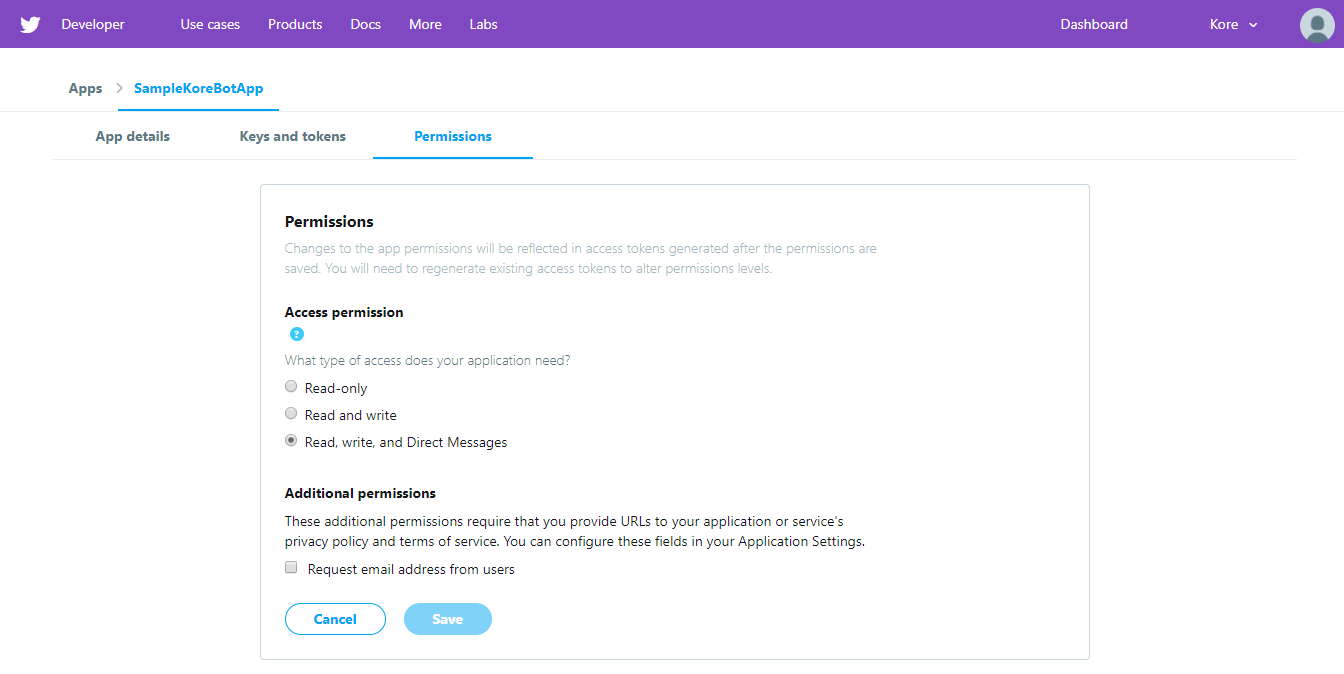
権限

  1. 権限タブに移動し、編集をクリックしてアクセス権限メッセージの読み取り、書き込み、直接送信に設定します。保存をクリックします。
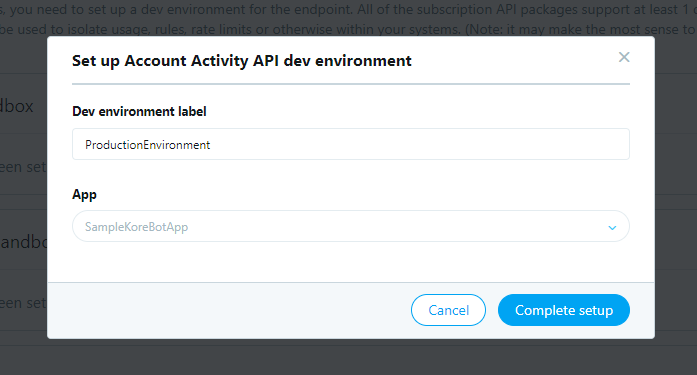
  2. 開発環境ページに移動し、アプリの環境を設定します。アカウントアクティビティAPIセクションの開発環境の設定ボタンをクリックします。開発環境ラベルに値を入力し(「ProductionEnvironment」)、アプリを選択してセットアップの完了をクリックします。

チャネルの有効化

  1. BotビルダーのBotセクションで、Twitterチャネルを追加するBotをクリックします。
  2. チャネルタブでTwitterアイコンをクリックします。Twitterチャネルページが表示されます。
  3. 設定タブに移動します。
  4. Twitterアプリのキーとトークンタブから取得したAPIキーAPIシークレットキーアクセストークンアクセストークンシークレットを入力します。
  5. Twitterアプリの権限で設定した環境ラベルを入力します。
  6. 許可ボタンをクリックすると、WebhookをTwitterアプリに登録したり、リアルタイムのアクティビティを承認したりすることができます。
  7. チャネルを有効化し、保存します。
  8. お客様のTwitterチャネルが設定され、Botを公開する準備が整いました

Twitterチャネルの編集

Twitterチャネルを編集するには、チャネルにカーソルを合わせ、変更をクリックします。チャネルの設定に必要な更新を行い、保存することができます。また、設定アイコンをクリックして、チャネル情報を無効にしたり削除したりすることもできます。

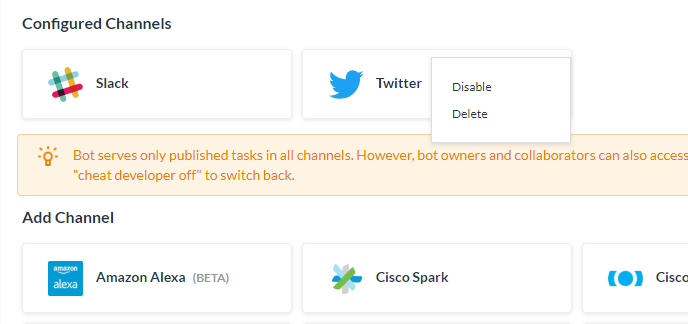
チャネルを変更するには、以下のいずれかのコマンドを選択します。

  • 無効化/有効化無効化をクリックして、一時的にBotのTwitterチャネルの使用を無効にします。Twitterの使用を有効にする場合は、有効化をクリックします。
  • 削除削除をクリックして削除の確認ダイアログでOKをクリックし、Botチャネルの設定を永久に削除します。
警告:この操作は永久的なものであり、元に戻すことはできません。
メニュー
Kore.ai Named a Leader in 2022 Gartner® Magic Quadrant™ for Enterprise Conversational AI PlatformsGet the Report