OVERVIEW
Virtual Assistants
Kore.ai Platform
Key Concepts
Natural Language Processing (NLP)
Accessing Platform
VIRTUAL ASSISTANTS
Virtual Assistant Builder
Virtual Assistant Types
Getting Started
Creating a Simple Bot
SKILLS
Storyboard
Dialog Task
Introduction
Dialog Builder (New)
Dialog Builder (Legacy)
User Intent Node
Dialog Node
Entity Node
Supported Entity Types
Composite Entities
Supported Colors
Supported Company Names
Form Node
Logic Node
Message Nodes
Confirmation Nodes
Bot Action Node
Service Node
Custom Authentication
2-way SSL for Service nodes
Script Node
Agent Transfer Node
WebHook Node
Grouping Nodes
Connections & Transitions
Manage Dialogs
User Prompts
Knowledge Graph
Terminology
Building
Generation
Importing and Exporting
Analysis
Knowledge Extraction
Build
Alert Tasks
Introduction
Ignore Words and Field Memory
How to Schedule a Smart Alert
Small Talk
Digital Views
Overview
Configuring Digital Views
Digital Forms
Overview
How to Configure Digital Forms
NATURAL LANGUAGE
Overview
Machine Learning
Introduction
Model Validation
Fundamental Meaning
Introduction
NLP Guidelines
Knowledge Graph
Traits
Introduction
How to Use Traits
Ranking and Resolver
Advanced NLP Configurations
INTELLIGENCE
Overview
Context Management
Overview
Session and Context Variables
Context Object
How to Manage Context Switching
Manage Interruptions
Dialog Management
Sub-Intents & Follow-up Intents
Amend Entity
Multi-Intent Detection
Sentiment Management
Tone Analysis
Sentiment Management
Event Based Bot Actions
Default Conversations
Default Standard Responses
TEST & DEBUG
Talk to Bot
Utterance Testing
Batch Testing
Conversation Testing
CHANNELS
PUBLISH
ANALYZE
Overview
Dashboard
Custom Dashboard
Overview
How to Create Custom Dashboard
Conversation Flows
NLP Metrics
ADVANCED TOPICS
Universal Bots
Overview
Defining
Creating
Training
Customizing
Enabling Languages
Store
Smart Bots
Defining
koreUtil Libraries
SETTINGS
Authorization
Language Management
PII Settings
Variables
Functions
IVR Integration
General Settings
Management
Import & Export
Delete
Versioning
Collaborative Development
PLAN & USAGE
Overview
Usage Plans
Support Plans
Invoices
API GUIDE
API Overview
API List
API Collection
SDKs
SDK Overview
SDK Security
SDK App Registration
Web SDK Tutorial
Message Formatting and Templates
Mobile SDK Push Notification
Widget SDK Tutorial
Widget SDK – Message Formatting and Templates
Web Socket Connect & RTM
Using the BotKit SDK
Installing
Configuring
Events
Functions
BotKit SDK Tutorial – Agent Transfer
BotKit SDK Tutorial – Flight Search Sample Bot
Using an External NLP Engine
ADMINISTRATION
HOW TOs
Creating a Simple Bot
Creating a Banking Bot
Context Switching
Using Traits
Schedule a Smart Alert
Configure UI Forms
Add Form Data into Data Tables
Configuring Digital Views
Add Data to Data Tables
Update Data in Data Tables
Custom Dashboard
Custom Tags to filter Bot Metrics
Patterns for Intents & Entities
Build Knowledge Graph
Global Variables
Content Variables
Using Bot Functions
Configure Agent Transfer
Update Balance Task
Transfer Funds Task
RELEASE NOTES
  1. ホーム
  2. Docs
  3. Virtual Assistants
  4. Channel Enablement
  5. LINEチャネルの追加

LINEチャネルの追加

Kore.ai BotにLINEチャネルを追加するには、LINEとKore.ai間の接続設定を行うためにWebhookの連携を設定する必要があります。Kore.ai BotにLINEチャネルを追加することで、BotのエンドユーザーはLINEアカウントを使用してBotと対話することができるようになります。BotにLINEチャネルを追加するには、以下を行う必要があります。

  1. プロバイダを作成する – LINEチャネルを設定するには、LINEの開発者アカウントにログインして「新しいプロバイダ」を作成するか、このBotに使用したいプロバイダを選択してからチャネルの追加に進みます。LINEチャネルを有効にするには、LINE開発者ポータルで開発者アカウントを作成して登録する必要があります。
  2. チャネル情報を入力する – アプリアイコン、アプリ名、プラン、カテゴリ、サブカテゴリ、メールアドレスなど、メッセージングAPIのチャネル情報を入力します。
  3. Webhookの連携をセットアップする – Kore.ai BotへのLINE連携を有効にするには、BotビルダーのLINEチャネルページの設定タブにあるWebhook URLをコピーして、Webhook連携を有効にします。
  4. チャネルを有効にする – 連携のセットアップを完了し、Botビルダーで設定の詳細を入力したら、チャネルを有効にする必要があります。
LINEプロバイダの作成
  1. LINE開発者アカウントポータルにログインします。
  2. このBotに使用したい「プロバイダ」が既にある場合は、「プロバイダリスト」オプションからプロバイダを選択し、メッセージングAPIにある「チャネルを作成」をクリックします。
  3. 新しいプロバイダを追加したい場合は、「新しいプロバイダを作成/追加」を使用して、新しいプロバイダを作成します。
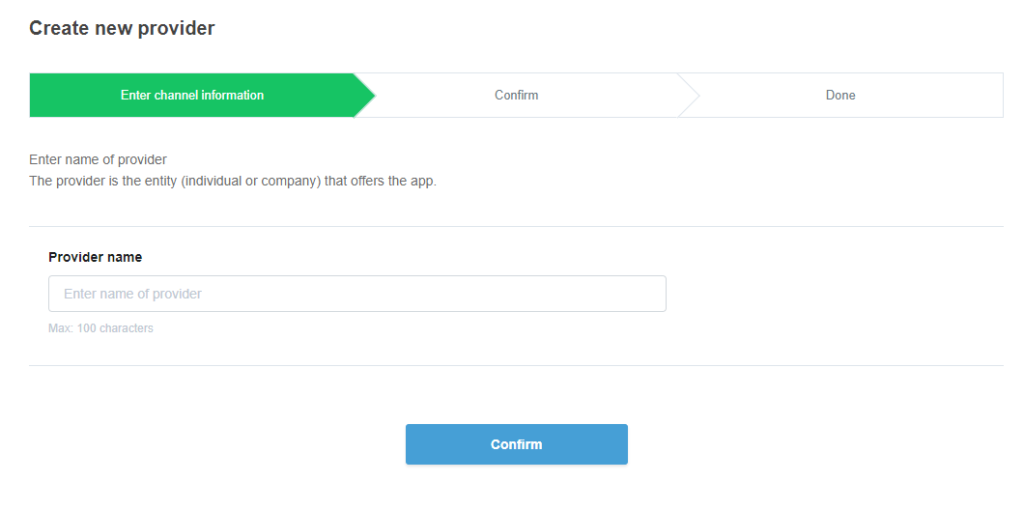
  4. プロバイダ名を入力して、新しいプロバイダの作成に進みます。プロバイダを作成したら、「メッセージングAPI」オプションの「チャネルを作成」を選択してチャネルの追加を進めます。
LINEチャネルの追加
  1. BotビルダーBotセクションで、LINEチャネルを追加するBotをクリックします。
  2. チャネルタブでLINEアイコンをクリックします。LINEチャネルページが表示されます。
  3. チャネル情報を入力フィールドで、アプリアイコン、アプリ名、プラン、カテゴリ、サブカテゴリなど必要な詳細を入力し、チャネルを作成します。確認をクリックして確認し、チャネルの作成を進めます。

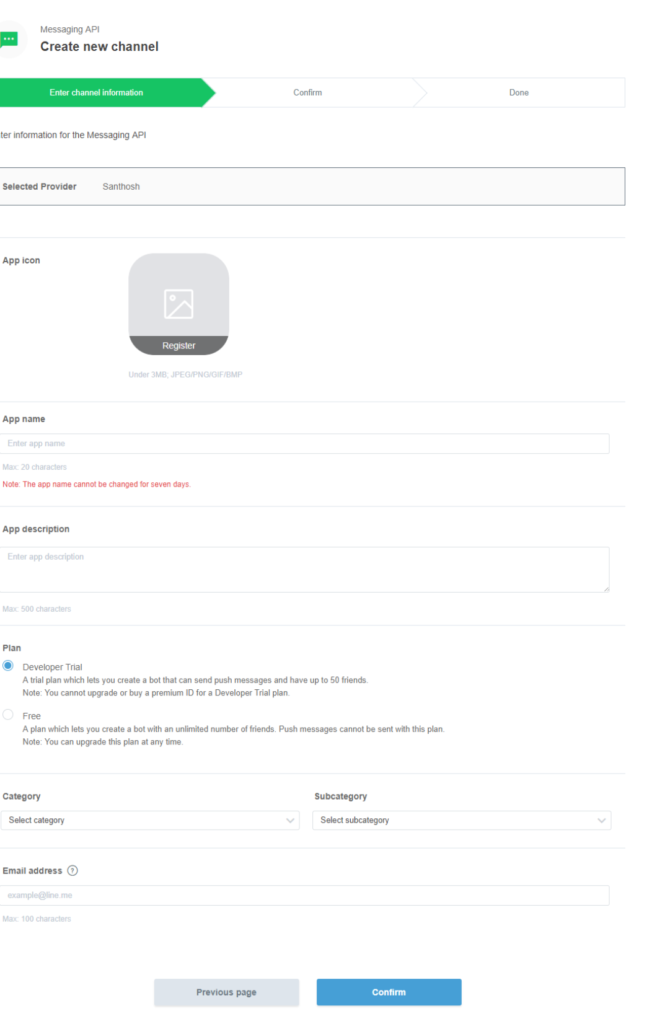
注:Kore.aiプラットフォームは「PUSH_MESSAGE」APIを利用して、Botのエンドユーザーにアラート通知を配信します。LINEのプランオプションをよく確認して、ニーズに適したプランを選択してください。

チャネルの詳細の取得
  1. チャネルが作成されると、利用可能なチャネル一覧があるプロバイダダッシュボードにリダイレクトされます。
  2. 上記で作成したチャネルを選択してチャネル設定を続行します。
  3. LINEチャネルのチャネルIDチャネルシークレットを取得し、このページの設定タブに入力します。
Webhook連携の有効化
  1. Webhook連携を設定するには、「メッセージ設定」セクションに移動し、Webhookを使用するオプションを有効にします。
  2. チャネルページの設定タブにあるWebhook URLをコピーして「Webhook URL」フィールドに入力し、更新をクリックします。
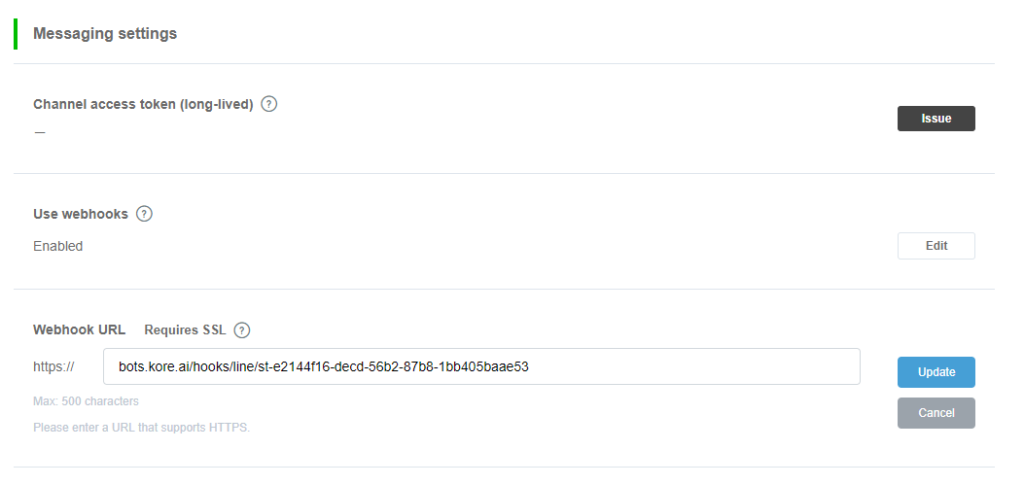
  3. Webhook URLを保存したら、検証オプションをクリックして、LINEからのWebhookコールがKore.aiプラットフォームに認識されていることを確認します。
その他のオプションの確認
  1. グループ動作や自動返信、挨拶メッセージなど、LINEチャネルで利用可能なその他のオプションを確認します。
  2. このページの設定タブに移動し、セットアップを完了します
    1. Webhook URL:LINEにはすでに「https://」の部分が含まれているため、これらを省略して入力します。
    2. チャネルID:LINEチャネルのチャネルIDを取得し、ここに入力します。
    3. チャネルシークレット:お客様のLINEチャネルからチャネルシークレットを取得し、ここに入力します。

LINEチャネルの編集

LINEチャネルを編集するには、チャネルにカーソルを合わせ、変更をクリックします。チャネルの設定に必要な更新を行い、保存することができます。また、設定アイコンをクリックして、チャ
ネル情報を無効にしたり削除したりすることもできます。

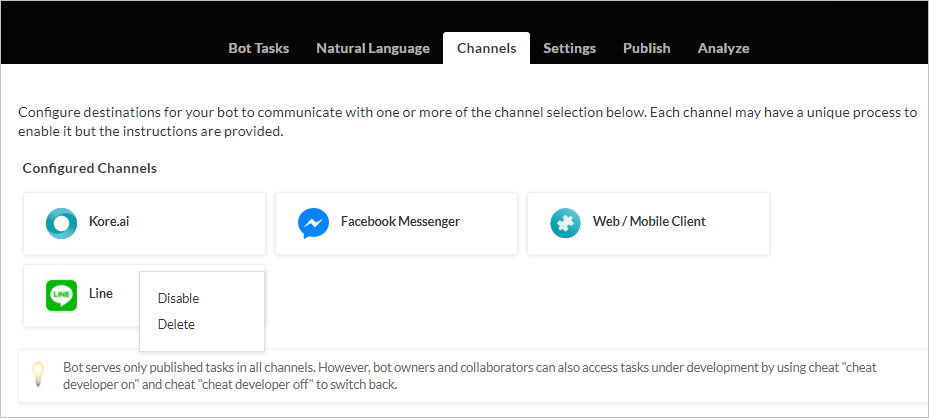
チャネルを変更するには、以下のいずれかのコマンドを選択します。

  • 無効化/有効化無効化をクリックして、一時的にBotのLINEチャネルの使用を無効にします。LINEチャネルの使用を有効にする場合は、有効化をクリックします。
  • 削除削除をクリックして削除の確認ダイアログでOKをクリックし、Botチャネルの設定を永久に削除します。
警告:この操作は永久的なものであり、元に戻すことはできません。
メニュー
Kore.ai Named a Leader in 2022 Gartner® Magic Quadrant™ for Enterprise Conversational AI PlatformsGet the Report