OVERVIEW
Virtual Assistants
Kore.ai Platform
Key Concepts
Natural Language Processing (NLP)
Accessing Platform
VIRTUAL ASSISTANTS
Virtual Assistant Builder
Virtual Assistant Types
Getting Started
Creating a Simple Bot
SKILLS
Storyboard
Dialog Task
Introduction
Dialog Builder (New)
Dialog Builder (Legacy)
User Intent Node
Dialog Node
Entity Node
Supported Entity Types
Composite Entities
Supported Colors
Supported Company Names
Form Node
Logic Node
Message Nodes
Confirmation Nodes
Bot Action Node
Service Node
Custom Authentication
2-way SSL for Service nodes
Script Node
Agent Transfer Node
WebHook Node
Grouping Nodes
Connections & Transitions
Manage Dialogs
User Prompts
Knowledge Graph
Terminology
Building
Generation
Importing and Exporting
Analysis
Knowledge Extraction
Build
Alert Tasks
Introduction
Ignore Words and Field Memory
How to Schedule a Smart Alert
Small Talk
Digital Views
Overview
Configuring Digital Views
Digital Forms
Overview
How to Configure Digital Forms
NATURAL LANGUAGE
Overview
Machine Learning
Introduction
Model Validation
Fundamental Meaning
Introduction
NLP Guidelines
Knowledge Graph
Traits
Introduction
How to Use Traits
Ranking and Resolver
Advanced NLP Configurations
INTELLIGENCE
Overview
Context Management
Overview
Session and Context Variables
Context Object
How to Manage Context Switching
Manage Interruptions
Dialog Management
Sub-Intents & Follow-up Intents
Amend Entity
Multi-Intent Detection
Sentiment Management
Tone Analysis
Sentiment Management
Event Based Bot Actions
Default Conversations
Default Standard Responses
TEST & DEBUG
Talk to Bot
Utterance Testing
Batch Testing
Conversation Testing
CHANNELS
PUBLISH
ANALYZE
Overview
Dashboard
Custom Dashboard
Overview
How to Create Custom Dashboard
Conversation Flows
NLP Metrics
ADVANCED TOPICS
Universal Bots
Overview
Defining
Creating
Training
Customizing
Enabling Languages
Store
Smart Bots
Defining
koreUtil Libraries
SETTINGS
Authorization
Language Management
PII Settings
Variables
Functions
IVR Integration
General Settings
Management
Import & Export
Delete
Versioning
Collaborative Development
PLAN & USAGE
Overview
Usage Plans
Support Plans
Invoices
API GUIDE
API Overview
API List
API Collection
SDKs
SDK Overview
SDK Security
SDK App Registration
Web SDK Tutorial
Message Formatting and Templates
Mobile SDK Push Notification
Widget SDK Tutorial
Widget SDK – Message Formatting and Templates
Web Socket Connect & RTM
Using the BotKit SDK
Installing
Configuring
Events
Functions
BotKit SDK Tutorial – Agent Transfer
BotKit SDK Tutorial – Flight Search Sample Bot
Using an External NLP Engine
ADMINISTRATION
HOW TOs
Creating a Simple Bot
Creating a Banking Bot
Context Switching
Using Traits
Schedule a Smart Alert
Configure UI Forms
Add Form Data into Data Tables
Configuring Digital Views
Add Data to Data Tables
Update Data in Data Tables
Custom Dashboard
Custom Tags to filter Bot Metrics
Patterns for Intents & Entities
Build Knowledge Graph
Global Variables
Content Variables
Using Bot Functions
Configure Agent Transfer
Update Balance Task
Transfer Funds Task
RELEASE NOTES
  1. ホーム
  2. Docs
  3. Virtual Assistants
  4. Builder
  5. Dialog Task
  6. 天気情報レポートの定義

天気情報レポートの定義

標準のKore.aiアラートを設定して、その日の天気予報や毎日の潮汐予報などと一緒に、ユーザーにアラートメッセージを送信することができます。しかし、ユーザーが3日間予報や10日間予報を希望している場合はどうでしょうか?単一のメッセージにプッシュするにはたくさんのデータが必要になります。Kore.ai Botプラットフォームを使用すれば、メッセージにリンクを定義して、エンドユーザーが必要に応じて取得できる書式設定された表に天気データを表示することができます。
天気情報レポートタイプは、以下の図に示すように、3日間予報の取得というレポートの天気アラートメッセージにリンクとして表示させることができます。
DIYBotBuilderAlertReportTasksWeatherInfoAlert
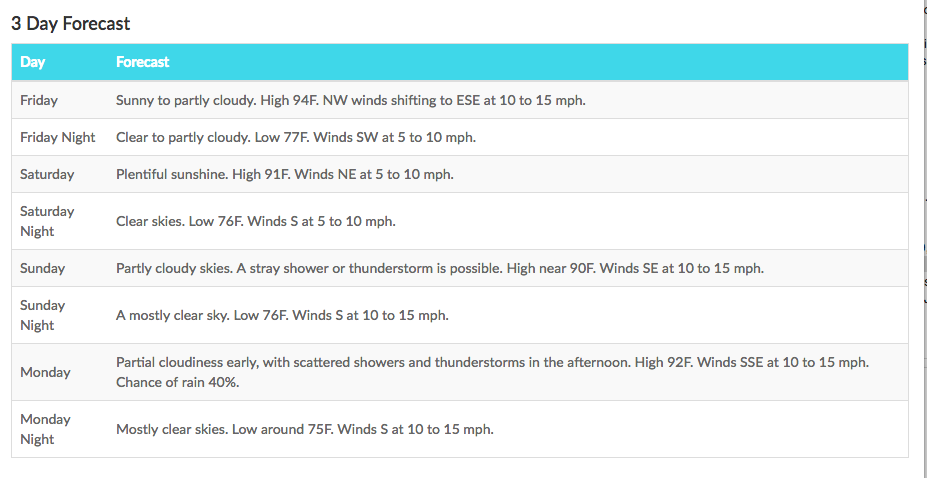
ユーザーがメッセージのリンクをクリックすると、以下の3日間予報レポートの図に示すように、天気レポートに表のヘッダー、任意の表の説明、およびヘッダー行で定義された列のデータが表示されます。
DIYBotBuilderAlertReportTasksWeatherInfoReportClicked
天気情報レポートを定義する
以下の手順を完了するには、天気情報レポートへのリンクを追加するアラートタスクや情報タスクなどのタスクをすでに定義している必要があります。可変幅の列を含む天気情報レポートを定義するには、以下の手順内のステップを完了します。

  1. Botビルダーで、天気レポートのリンクを追加するBotのタスクを選択します。

    注:未公開のタスクのみ変更可能です。

  2. 設定アイコンをクリックし、編集をクリックします。
  3. 天気情報レポートを追加するタスクのBotの応答タブで、展開アイコンをクリックして、レポートのテンプレートの定義セクションを表示します。
  4. リンク タイトルフィールドに、タスク投稿でエンドユーザーに表示するリンクテキストを入力します(例:3日間の予報を取得)。
  5. ヘッダーフィールドには、天気情報レポートがエンドユーザーに表示された際に表示される、レポートのタイトルを入力します。
  6. 詳細フィールドには、レポートのヘッダー直下に表示されるエンドユーザーヘルプ情報を任意で入力します(例:マイ天気レポートの3日間予報レポートの詳細説明はこちらです)。
  7. テンプレートドロップダウンリストで、天気情報を選択します。
  8. テンプレートを編集をクリックします。表の設定ダイアログが表示されます。
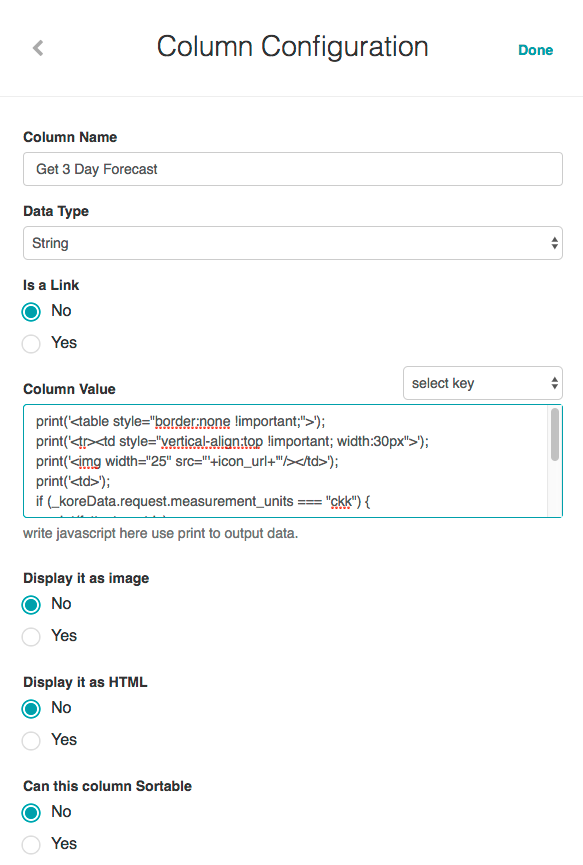
  9. 列を追加をクリックします。下図のように列の設定ダイアログが表示されます。
    Weather Info Report - Column Configuration Dialog
  10. 列名フィールドに、最初の列のタイトルを入力します(例:3日間の予報を取得)。
  11. データタイプフィールドで、列に表示される情報として以下のデータタイプのいずれかを選択します。
    1. 文字列
    2. 日付
  12. 列内のデータがハイパーリンクの場合、リンクを有効にします。有効にした場合:
    1. リンクラベルフィールドに、リンク用のテキストを表示するJavaScriptを入力します(例:print(Name);
    2. URLの値フィールドに、リンクラベルがクリックされた場合に出力するデータを表示するJavaScriptを入力します(例:print("https://login.salesforce.com/" + Id);)。
  13. リンクが有効になっていない場合は、列の値を表示するJavaScriptを入力します(例:print(StageName);)。
  14. 画像として表示するセクションで、列の値が画像の場合ははいを選択します。
  15. HTMLとして表示するセクションで、列の値にHTMLコンテンツが含まれている場合ははいを選択します。
  16. この列の並べ替え可否セクションで、エンドユーザーが列を並べ替えることができるようにする場合は「はい」を選択します。
  17. 完了をクリックします。表の設定ダイアログは、以下の図のように新しい列が追加されて表示されます。
    Weather Info Report - Table Configuration DIalog
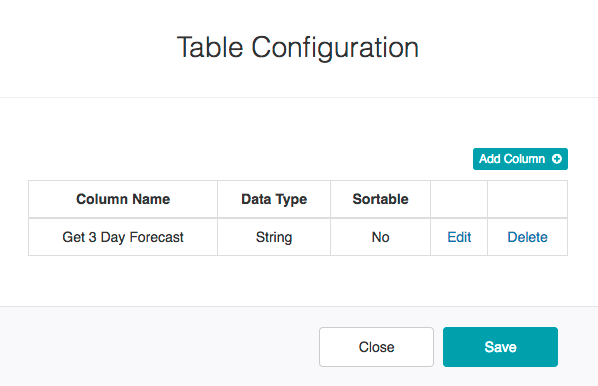
  18. ステップ9~17をレポートに列を追加するごとに繰り返し、保存をクリックして列の設定を保存し、閉じるをクリックします。
  19. レポートテンプレートの定義セクションで、保存をクリックして、天気情報レポートを保存します。

ページ上部に応答データは正常に保存されましたというメッセージの表示とともに、天気情報レポートは保存されます。

メニュー
Kore.ai Named a Leader in 2022 Gartner® Magic Quadrant™ for Enterprise Conversational AI PlatformsGet the Report