Form node lets you integrate the UI Forms with Dialog Task. This facilitates the presentation of form to capture user inputs for specific use cases.
The primary purpose of the Form node is to represent a UI Form in the dialog task and make the form available for end-users on their channel. For example, let us consider a banking bot that has a form to capture the customer details to open a new account. You want to use the form instead of prompting for each and every entity value.
Add a Form Node to the Dialog Task
- Open the Dialog Task in which you want to add the Form node.
- Click the
 icon next to the respective node.
 - Select Form and select the UI Forms from the available list (Note you cannot create a new Form Node from within a Dialog like other nodes).
- The Form window is displayed with the Component Properties tab selected by default.
Configure the Component Properties
The Form Component Properties allow you to configure the General Settings, User, and Error Prompts.
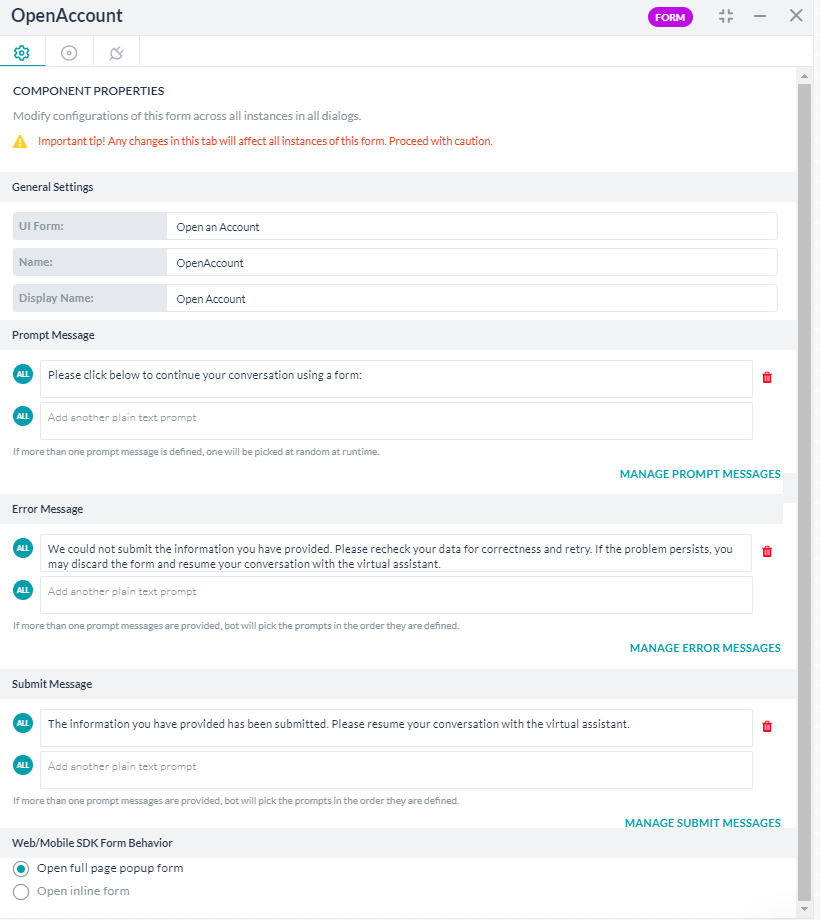
- On the Component Properties tab, under the General Settings section, enter a Name and Display Name for the entity node. Entity names cannot have spaces. The UI Form property is set to the UI Form you selected and it cannot be changed.
- In the Prompt Message text box, enter the prompt message that you want the user to see for this form. It gives instructions to the user to click on the link to initiate the form. It is not recommended to change the context variable reference (of the form
{{context.form_node.formLink}})coded therein. You can enter channel-specific messages for user prompts. For more information, refer to Using the Prompt Editor. - In the Error Message text box, review the default error message, and if required modify it. For more information, refer to Using the Prompt Editor.
- In the Submit Message text box, review the default message that is displayed after successful submission of the form, and if required, modify it. This message is applicable only when the UI Form is opened in a browser tab and not for Web/Mobile SDK. For more information, refer to Using the Prompt Editor.
- Under the Web/Mobile SDK Form Behavior section, you can set how the form is displayed. You can select:
- Open full page popup form – This is the default setting where the form opens as a full page on the SDK chat interface.
- Open inline form – The form opens as an inline form within the chat window.
- In the Variable Namespaces section (in v8.0), associate the variable namespaces used to execute this node and its transitions. This option is visible only when the variable namespace is enabled for the bot. You can go with the task level settings or customize it for this node. For more information, refer to Managing Namespace.
Configure the Instance Properties
Use the Instance Properties to define any user tags that you want to set.
- On the Form window, click the Instance Properties tab.
- Under the Custom Tags section, add tags to build custom profiles of your bot conversations. Click here for more
Configure the Connections Properties
From the node’s Connections tab, you can determine the node in the dialog task to execute next. You can write the conditional statements based on the values of any Entity or Context Objects in the dialog task, or you can use intents for transitions.
To setup Component Transitions, follow the below steps:
- On the Form window, click the Connections tab.
- Under the Connection Rules section, you can select a node from the Default drop-down list.
- To configure a conditional flow, click Add IF.
- Configure the conditional expression based on one of the following criteria:
- Entity: Compare an entity node in the dialog with a specific value using one of these operators: Exists, equals to, greater than equals to, less than equals to, not equal to, greater than, and less than. Select the entity, operator using the respective drop-down lists, and type the number in the Value box. For example, PassengerCount (entity) greater than (operator) 5 (specified value).
- Context: Compare a context object in the dialog with a specific value using one of these operators: Exists, equals to, greater than equals to, less than equals to, not equal to, greater than, and less than. For example, Context. entity.PassengerCount (Context object) greater than (operator) 5 (specified value).
- Intent: Select an intent that matches the next user utterance.
- In Then go to drop-down list, select the next node to execute in the dialog flow if the conditional expression succeeds. For example, if the PassengerCount (entity) greater than (operator) 5 (specified value), Then go to Offers (sub-dialog).
- In the Else drop-down list, select the node to execute if the condition fails.
- Click Save.