Chatbot Overview
Conversational Bots
Intents & Entities
Intelligent Bots
Kore.ai's Approach
Kore.ai Conversational Platform
Bot Concepts and Terminology
Natural Language Processing (NLP)
Bot Types
Bot Tasks
Starting with Kore.ai Platform
How to Access Bot Builder
Working with Kore.ai Bot Builder
Building your first Bot
Getting Started with Building Bots
Using the Dialog Builder Tool
Creating a Simple Bot
Release Notes
Latest Updates
Older Releases
Deprecations
Bot Builder
Creating a Bot
Design
Develop
Storyboard
Dialog Task
User Intent Node
Dialog Node
Entity Node
Supported Entity Types
Composite Entities
Supported Colors
Supported Company Names
Form Node
Logic Node
Message Nodes
Confirmation Nodes
Service Node
Custom Authentication
2-way SSL for Service nodes
Script Node
Agent Transfer Node
WebHook Node
Grouping Nodes
Connections & Transitions
Managing Dialogs
User Prompts
Alert Tasks
Alert Tasks
Ignore Words and Field Memory
Digital Forms
Digital Views
Knowledge Graph
Terminology
Building
Generation
Importing and Exporting
Analysis
Knowledge Extraction
Small Talk
Action & Information Task
Action Tasks
Information Tasks
Establishing Flows
Natural Language
Overview
Machine Learning
Model Validation
Fundamental Meaning
NLP Settings and Guidelines
Knowledge Graph Training
Traits
Ranking and Resolver
NLP Detection
Advanced NLP Configurations
Bot Intelligence
Overview
Context Management
Session and Context Variables
Context Object
Dialog Management
Sub-Intents & Follow-up Intents
Amend Entity
Multi-Intent Detection
Sentiment Management
Tone Analysis
Sentiment Management
Default Conversations
Default Standard Responses
Channel Enablement
Test & Debug
Talk to Bot
Utterance Testing
Batch Testing
Record Conversations
Publishing your Bot
Analyzing your Bot
Overview
Dashboard
Custom Dashboard
Conversation Flows
Bot Metrics
Advanced Topics
Bot Authorization
Language Management
Collaborative Development
IVR Integration
Data Table
Universal Bots
Defining
Creating
Training
Customizing
Enabling Languages
Smart Bots
Defining
Sample Bots
Github
Asana
Travel Planning
Flight Search
Event Based Bot Actions
koreUtil Libraries
Bot Settings
Bot Functions
General Settings
PII Settings
Customizing Error Messages
Manage Sessions
Bot Management
Bot Versioning
Using Bot Variables
API Guide
API Overview
API List
API Collection
SDKs
SDK Overview
SDK Security
SDK App Registration
Web SDK Tutorial
Message Formatting and Templates
Mobile SDK Push Notification
Widget SDK Tutorial
Widget SDK – Message Formatting and Templates
Web Socket Connect & RTM
Using the BotKit SDK
Installing
Configuring
Events
Functions
BotKit SDK Tutorial – Agent Transfer
BotKit SDK Tutorial – Flight Search Sample Bot
Using an External NLP Engine
Bot Administration
Bots Admin Console
Dashboard
User Management
Managing Users
Managing Groups
Managing Role
Bots Management
Enrollment
Inviting Users
Bulk Invites
Importing Users
Synchronizing Users from AD
Security & Compliance
Using Single Sign-On
Security Settings
Cloud Connector
Analytics
Billing
How Tos
Creating a Simple Bot
Creating a Banking Bot
Transfer Funds Task
Update Balance Task
Context Switching
Using Traits
Schedule a Smart Alert
Configure Digital Forms
Add Form Data into Data Tables
Configuring Digital Views
Add Data to Data Tables
Update Data in Data Tables
Custom Dashboard
Custom Tags to filter Bot Metrics
Patterns for Intents & Entities
Build Knowledge Graph
Using nlMeta
Global Variables
Content Variables
Using Bot Functions
Configure Agent Transfer
  1. Home
  2. Docs
  3. Bots
  4. SDKs
  5. SDK App Registration

SDK App Registration

This topic describes how to register your application and generate credentials for you clients that are required to exchange messages between your application and the Kore.ai Bots Platform.
When you register your app, you will need to select a security algorithm:

  • HS256 – Bot Builder generates and displays the Client ID and Client Secret necessary to generate the JWT token from your server.
  • RS256 – You upload your public key to the platform and use the private key to generate the signature from your server.

To register an app

  1. Open the bot to which you want to add the Web/Mobile Client channel.
  2. On the bots menu, click Channel > Web/Mobile Client.
  3. In the Select App drop-down list, select your existing app registration or click Create App to create a new app.
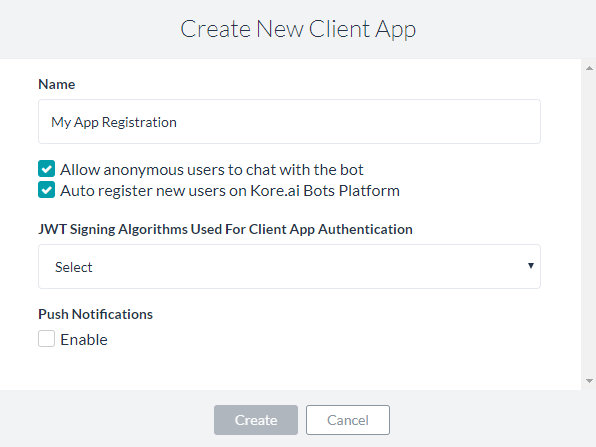
  4. In the Name field, enter the name for the app registration used in Bot Builder, for example, My App Registration.
  5. Select one of these scopes for the app:
    • Allow anonymous users to chat with the bot: enables anonymous users to interact with the bot.
    • Auto register new users on Kore.ai Bots Platform: Select to control the auto-user registration in Kore.ai if the user assertion is unknown.
  6. In the JWT Signing Algorithms Used For Client App Authentication drop-down list, select one of the following security algorithms:
    • RS256: Select to enable the Public Key field. The Public Key is used by the Kore.ai Bots Platform to authenticate the client application.
    • HS256: Select to generate a Secret Key and a Client ID. The Client ID is required for SDK initialization, and the Secret Key used by the Kore.ai Bots Platform to authenticate the client application.

    Refer here on how to generate the above keys.

  7. Optionally, In the Push Notifications section, click Enable and then specify a URL to send the notifications to.
  8. Click Create. The app registration details appear.
  9. To copy the app registration details to the clipboard for your application, you can click Copy for Bot Name, Bot ID, and Client ID. For Client Secret, click View, and then click Copy.
  10. In the Allow Alert Task Setup section, Select Yes to enable your application users to set up their own alert tasks using the web client. By default, this setting is disabled for web client users, but mobile client users can always setup their own alerts.
  11. In the Enable Channel section, select Yes to enable the channel immediately after saving.
  12. Click Save to save the settings and close the Web/Mobile Client Channel page.

The Channel Information updated successfully message is displayed on the top-right corner of the page.

Menu