Visualizing how end-users are expected to interact with the bots is a very essential exercise in building successful bots. This helps you design engaging conversations as well as simplifies the communication between business users, conversation designers, language experts, and bot developers.
Designing chatbots comes with different challenges as compared to the development of traditional websites or apps. Most of the design tools like flow charts, tracking tools, and versioning software cater to app development.
Kore.ai’s Storyboard is an intuitive conversation designer that simplifies and streamlines the bot development process. It allows you to design various scenes that are representative of the actual end-user conversations with the bot. You can share scenes with your teams for collaborative development. You can also present scenes as prototypes to the business owners to receive feedback.
Note: This feature was introduced in v7.2 of the platform
Features
The Storyboard feature is in Beta Version. The features of Storyboard are as follows:
- Design conversations using simple text messages, carousels, lists, and more.
- Elaborate the conversations with link messages across the paths.
- Visualize the complete conversation across different paths as a unified flow.
- Build a comprehensive user flow by linking various conversations.
- Co-create conversations by collaborating with other designers.
- Share interactive prototypes with stakeholders for reviews and feedback.
Overview
The Storyboard consists of multiple scenes. Each scene depicts a conversation as a series of bot and user messages. Bot messages are defined as plain text messages or using rich templates. Scenes have the following features:
- You can view the scenes either in an interactive conversation view or flow view for easy tracking and understanding.
- There can be multiple inter-linked paths in a scene to represent various alternate flows of the conversation.
- It allows for a collaborative effort. You can share with various stakeholders for review, approval, and/or development.
- Stakeholders can review and add their comments.
- There is a provision for developers to add notes to describe or explain a particular path or message.
- A story timeline is generated to mark crucial states in the conversation using either predefined hashtags or custom tags.
- Preview the flow for a real-time experience and much more.
Let us look into each of these features in detail.
Storyboard
The storyboard is the primary module that provides a complete overview of all the scenes available in that bot, the status of these scenes, and various other options associated with these scenes. You can access it from the Storyboard option on the left navigation pane of the Kore.ai Bot Builder platform.
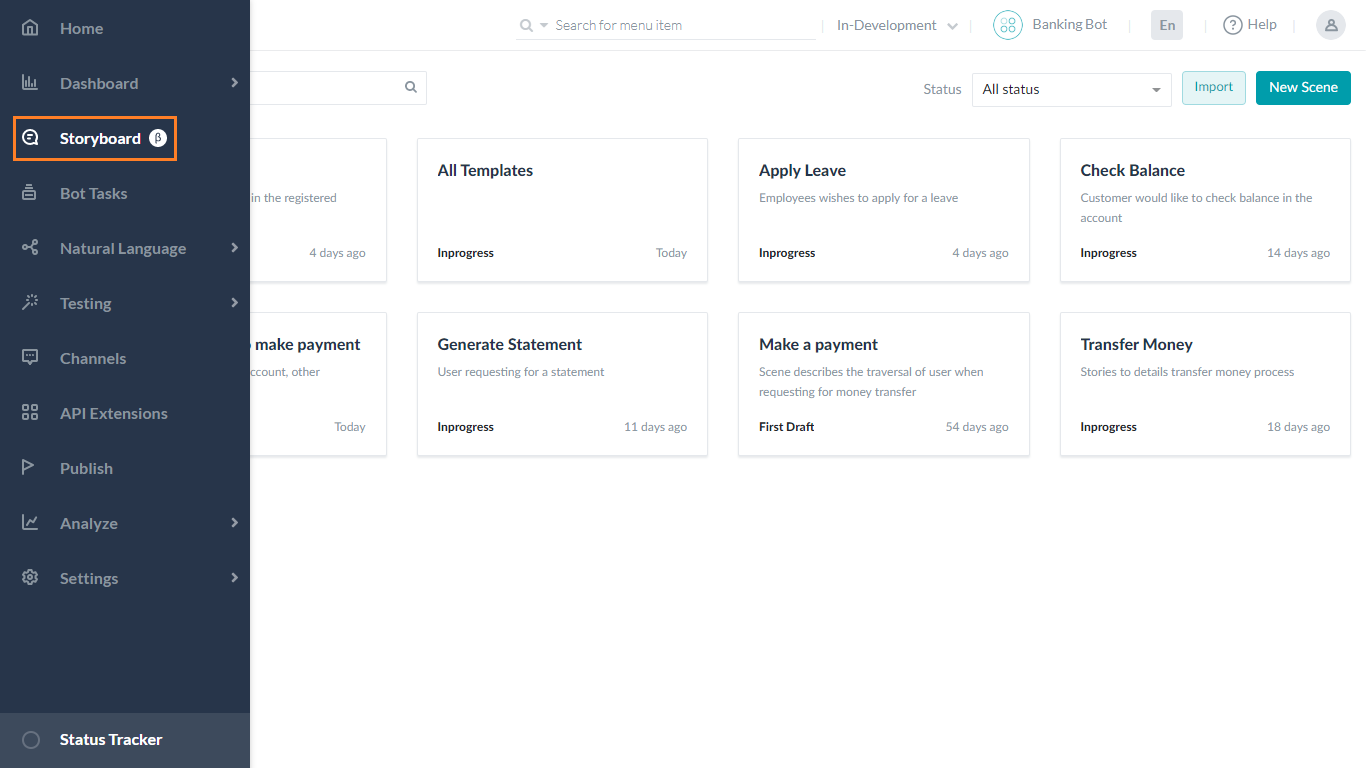
This page allows you to create a New Scene. To create, follow the below steps:
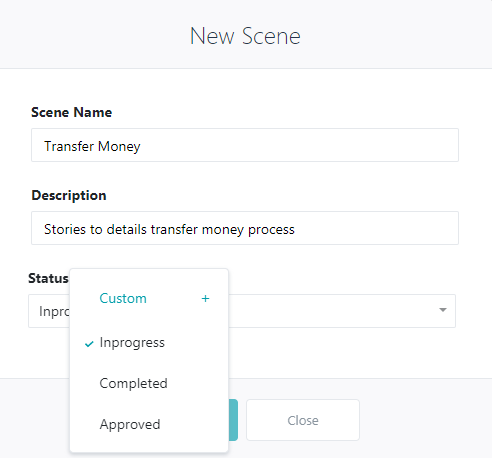
- Click New Scene on the top-right.
- On the New Scene dialog box, enter a name in the Scene Name field and a description in the Description field.
- Select a status from the Status drop-down list. Available statuses are In Progress, Completed, and Approved. You can also create a custom status if needed.
- Click Proceed.
You can also perform the below-listed actions:
- Import an existing scene in a CSV format.
- Filter scenes based upon their status.
- Search for a scene by name.
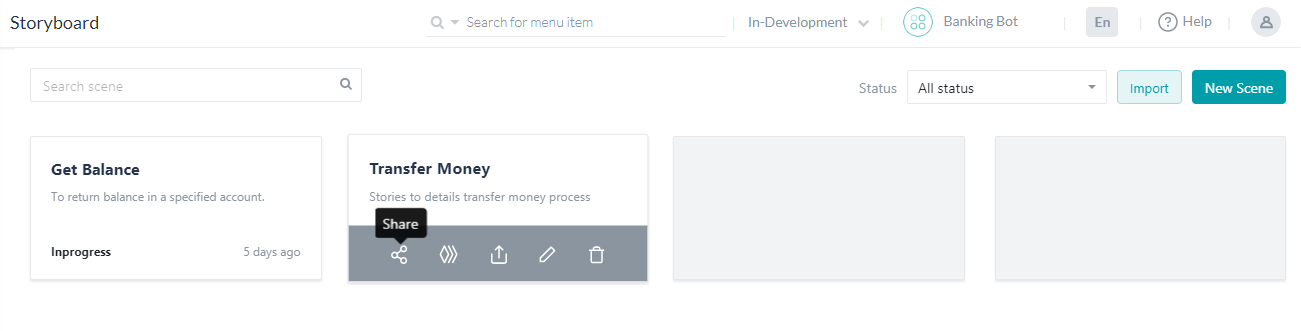
- For each scene, you have an option to:
- Share the scene with other users or teams.
- Duplicate the scene to create a copy.
- Export the scene into CSV format.
- Edit the name, description, and status of the scene.
- Delete the scene.
Scenes
As mentioned in the Overview section, a scene depicts the conversation as a series of bot and user messages.
Conversation View
After you add a scene to your Storyboard, you are presented with a blank Conversation View, where you can enter the user-bot messages.

The editor has the following features to help you design the conversation:
- User Tab: It is used to enter possible messages from users either requesting information or providing input to a request by the bot. These messages are defined as:
- Plain text messages. For example, in a Banking Bot, I want to transfer money or I want to know my account balance.
- Attachments. For example, in a Banking Bot, to upload documents to complete KYC requirements.

- Bot Tab: It is used to design bot messages. Bot Messages are messages that the bot sends to users as a greeting, information, answer to a user query, or requesting for input. These messages are defined as:
- Plain text messages with options to mark text as bold, italics, indent, multi-line, and lists – ordered and unordered.

- Rich messages using the predefined templates like buttons, list, quick reply, etc,. (see below for a list of supported templates).

- Plain text messages with options to mark text as bold, italics, indent, multi-line, and lists – ordered and unordered.
- Notes: It is used to add text between messages describing an action or portion of the conversation.
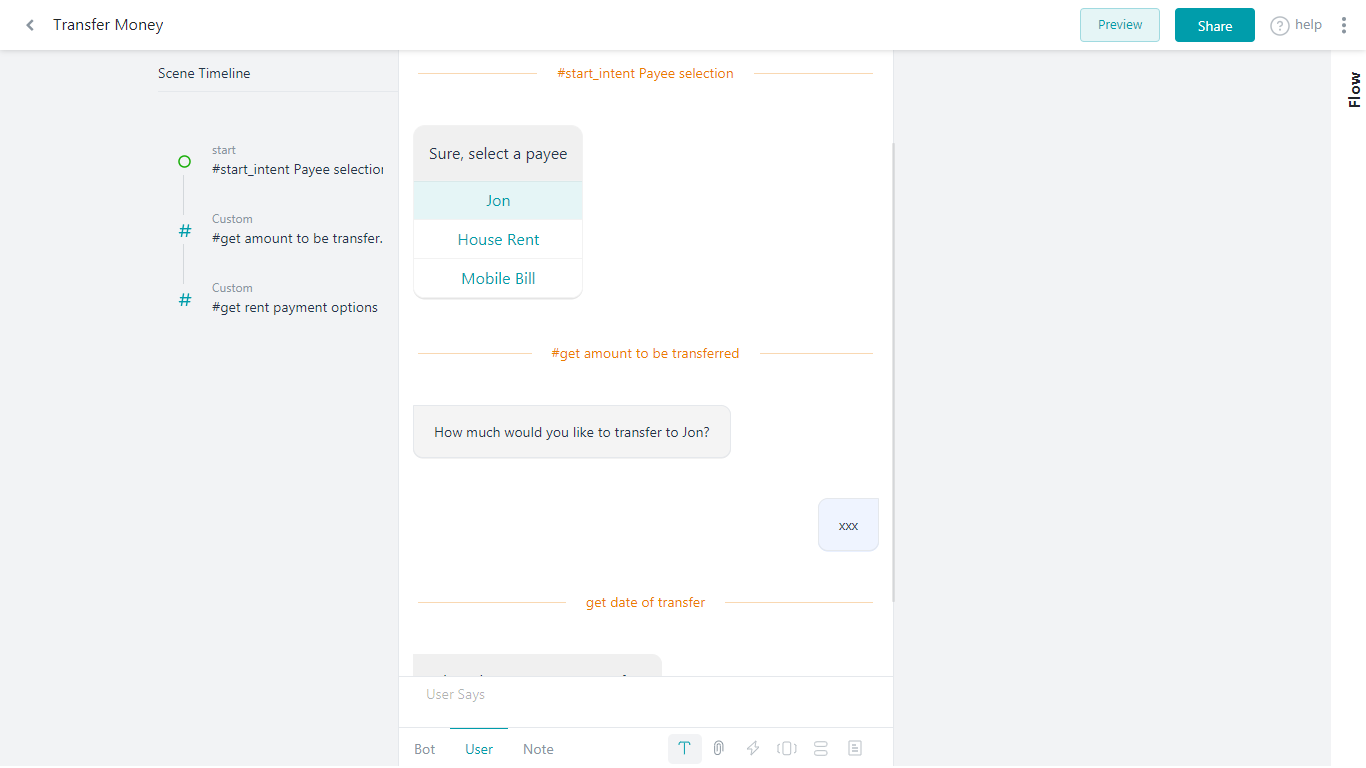
 Notes also provide an option to define the timeline of the conversation by using hashtags. Thus defined notes help denote an important state in the conversation. It appears on the left of the conversation under the Story Timeline. You can move to the relevant place in the conversation by clicking the tag on the timeline.
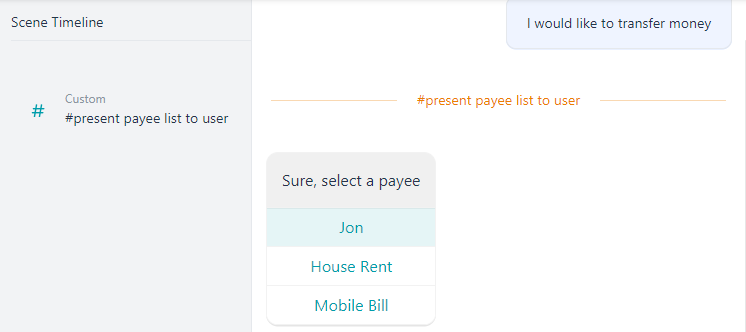
You can define your own custom tags or use one of the pre-defined tags. Each of these pre-defined tags is depicted by a unique symbol in the timeline indicating its purpose. These pre-defined tags include:- #Start_<intent-name>
- #Hold_<intent-name>
- #End_<intent-name>
- #Resume_<intent-name>.
With the tag option, you can classify notes using an existing or by creating a new custom tag. These tags are color-coded for reference.

- Paths: Paths are different flows in which the conversations provide based on the options provided by the bot or the user. For example, a bot expects a yes or no response from the user, and the path differs based upon the user response. Using the bot message, the template pre-defines the number of alternate paths allowed. The business logic can also decide the number of paths.
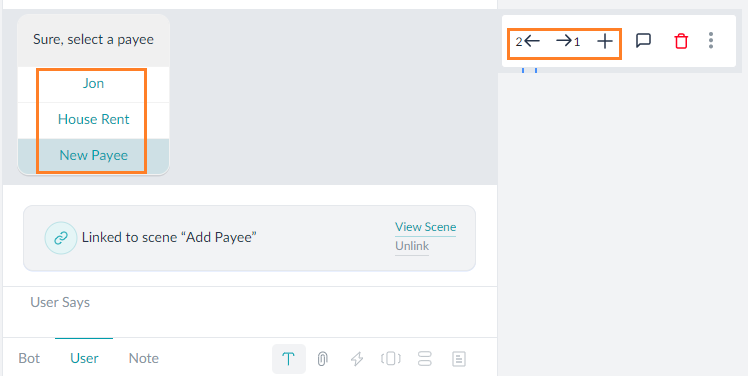
To continue the scene along a specific path, you can select the path either using the Previous Path (<-) and Next Path (->) or select the options given to the user. You can also add additional paths using the New Path (+) option.
Message Options
You can reorder the messages by a simple drag and drop action. When you hover over a message you can find the following options:
- Go to Previous and Next Paths
- Add New Path
- Add Comments
- Delete a message

- Link a Message: You can use this option to link another message in this scene and continue a flow that is already designed. When selected, this option transitions to the Flow view from where you can select the message node, and the same is linked to the current node.
Note: This option is available only for the leaf nodes with no flow defined.

- Link a Scene: You can use this option to link a pre-defined scene in the storyboard. This scene is invoked during the preview. When selected, this option gives a list of scenes for you to select from and the same is linked to the current node. You can also perform the below-listed actions:
- View Scene: Click View Scene to open in a read-only window.
- Unlink: Click Unlink to unlink the scene.

- Edit: You can edit a message.
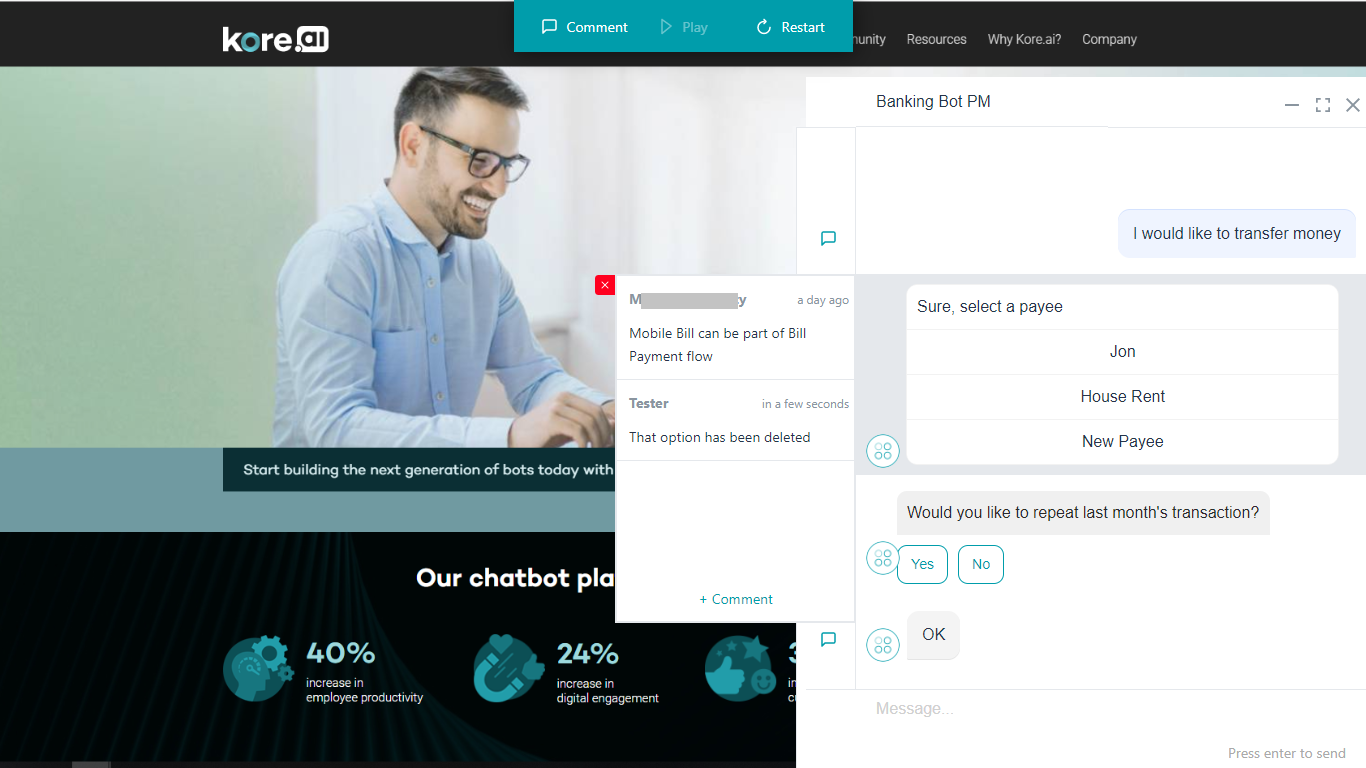
Comments
Comments are a very useful collaborative tool. Storyboard allows users to add comments to any component of the scene like user messages, bot messages, and notes. You can also reply to an existing comment thus maintaining a comments thread.
You can access comments using the comment icon next to the corresponding message/note. You can access the full comment history using the comments icon at the scene level.

Scene Options
From the Scene page, you can perform the following actions:

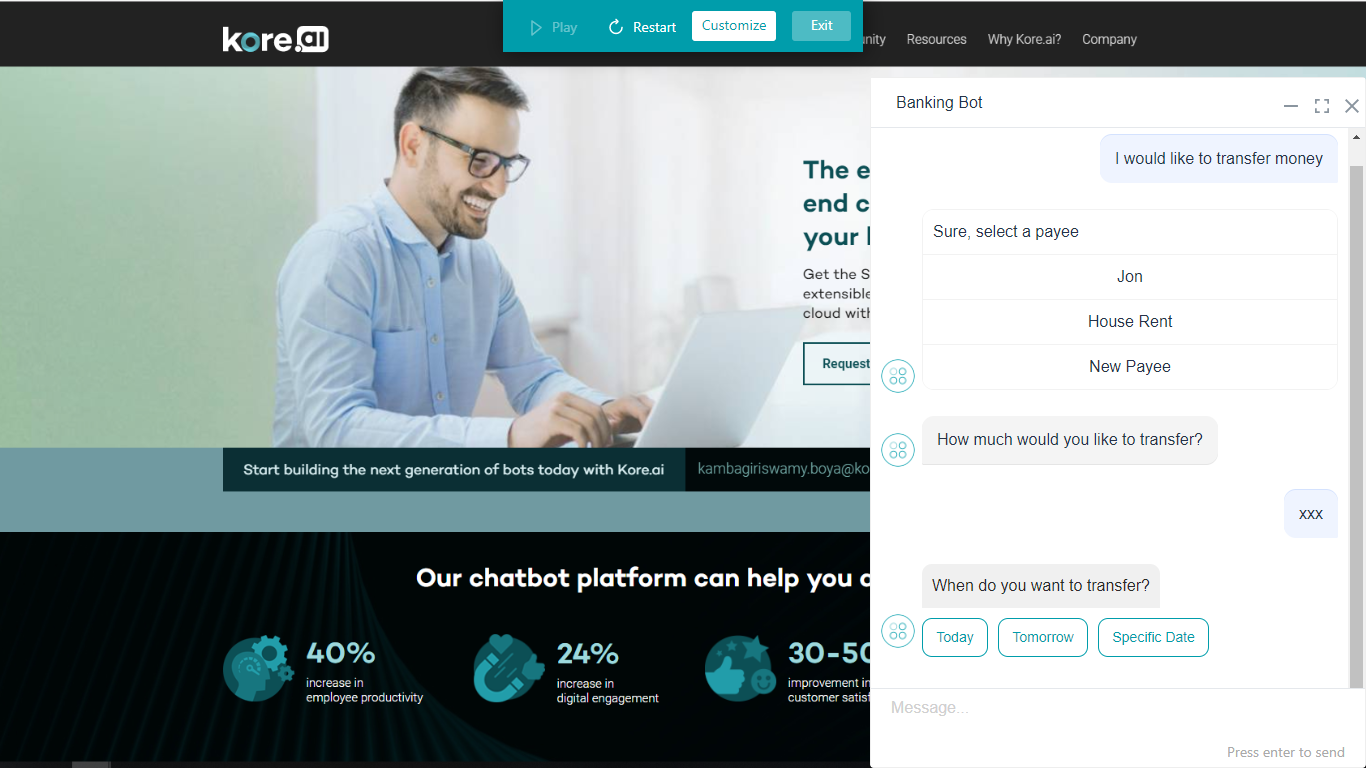
- Preview: It is used to see how the conversation flows on your website. This opens in a mock website with the chat window. You can Play/Pause, Restart, Customize, and Exit the preview. (See here for customizing options)
- Share: This option gives you a URL that you can share with others. This URL presents the scene preview and you can let the various stakeholders a glimpse of what to expect and take their feedback. You can secure the scene preview URL with a password.
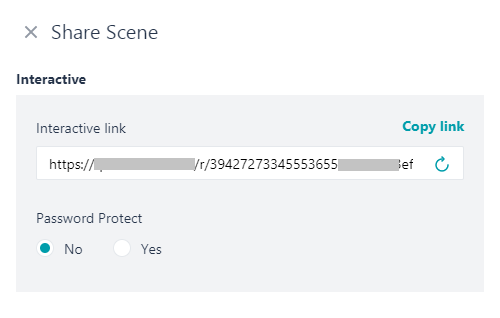
The Share link allows the viewer to add comments that are communicated back to the developer for further action.
- Click the More icon to perform the below-listed actions. Most of these actions are available on the Storyboard page also.
- Edit: Edit the name, description, and status of the scene.
- Clone: Clone the scene to create a copy.
- Export: Export the scene into CSV format.
- Import: Import an existing scene in CSV format. Import fails if the import scene has linked scenes which are not present in the current bot.
- Delete: Delete the scene. Unlink all linked scenes before deleting it.
- Version History
- A list of recent 20 changes made to a scene.
- Version is automatically created whenever the following changes are made:
- Message Added
- Message Edited (included edits to templates)
- Message Removed
- Message Reordered
- Scene Restored
- Note Added
- Note Modified
- Note Removed
- Linked to a Message
- Linked to a Scene
- An option to restore to any of those versions.
- You can also download a particular version in CSV format.
Preview Customization
The customize option from the scene preview allows you to view the conversation in the widget view. By default, the platform provides two themes:
- Light
- Dark
These themes set the light or dark background for the widget and the text accordingly.
You can create your own theme, save it, and use it across the scenes in your storyboard. There are four aspects of the conversation widget that you can customize:
- Background Image
- Overall Chat Widget
- User Message Bubbles – text and background colors.
- Bot Message Bubbles – text and background colors for various components.
Background Image
The background image that is displayed on the mock website where the conversation widget is previewed can be customized. You need to provide a valid URL with the location of the image.

Chat Widget
This option will let you customize the entire chat widget. This includes:
- Widget background-color
- Widget text color
- Widget border-color
- Widget divider color

User Message
This option is used to customize the color of the user message bubble and text.

Bot Message
This option is used to customize the color of the bot message bubble and text. You can also customize the button template messages if any are used.

Bot Messages Templates
| Template Type | Template Definition | Comments |
| Carousel |
For each Carousel:
|
|
| Buttons |
|
|
| List |
For each List Item:
|
|
| Quick Reply |
|
|
| Attachment |
|
|
| Image |
|
Flow View
After you design, switch to the Flow View to see the scene in a flowchart.
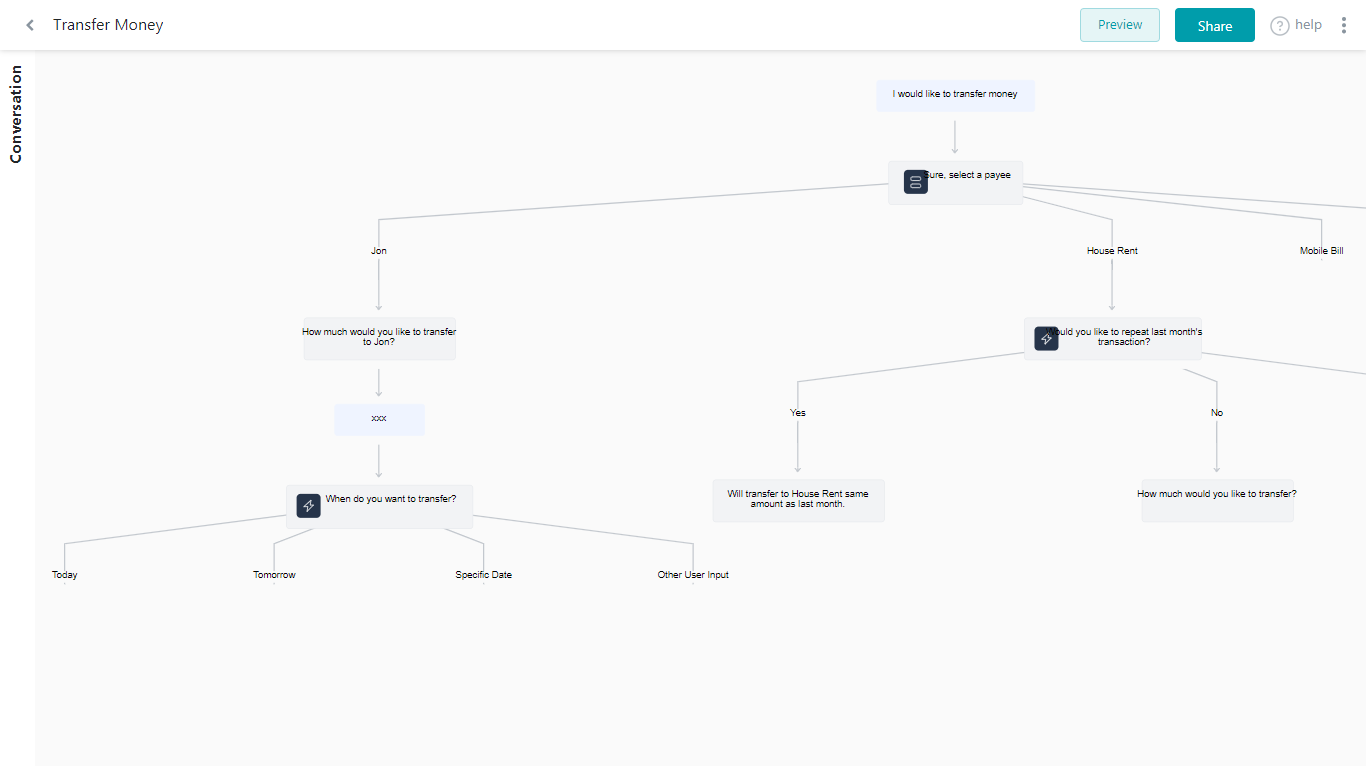
All the Scene Options mentioned in the previous section are available with the following exceptions:
- You cannot import a scene from the flow.
- Export results in a PDF document.