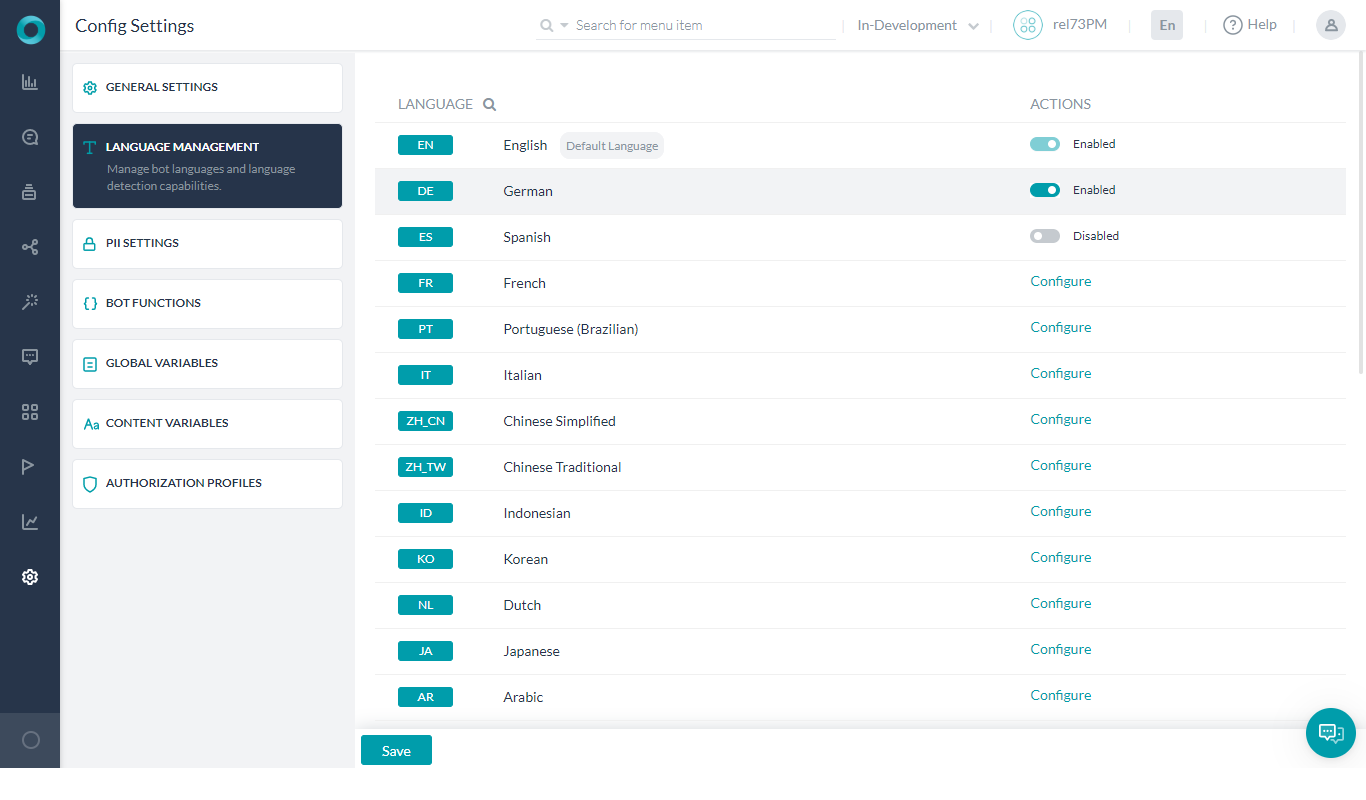
Consumers are more likely to engage with your bot if it can communicate in their preferred language. Kore.ai Bots Platform supports enabling multiple languages for a bot without having to rebuild the bot definitions.
You can build the bot in your preferred language and then enable one or more supported languages. As part of enabling the language, the platform automatically translates all Standard Responses and you can then translate various other bot elements in the new language.
Supported Languages
Bots Platform currently supports the following languages. While most of the features are supported in all languages, there are some exceptions, see here for more details.
- Arabic
- Chinese Simplified
- Chinese Traditional
- Dutch
- English
- French
- German
- Indonesian
- Italian
- Japanese
- Korean
- Portuguese (Brazilian)
- Spanish
- Finnish (post v6.4 release)
- Russian (post v7.0 release)
- Polish (post v7.0 release)
- Ukranian (post v7.0 release)
- Swedish (post v7.1 release)
- Kazakh (post v7.2 release)
- Norwegian (post v8.1 release)
- Hindi (post v8.1 release)
Default Language
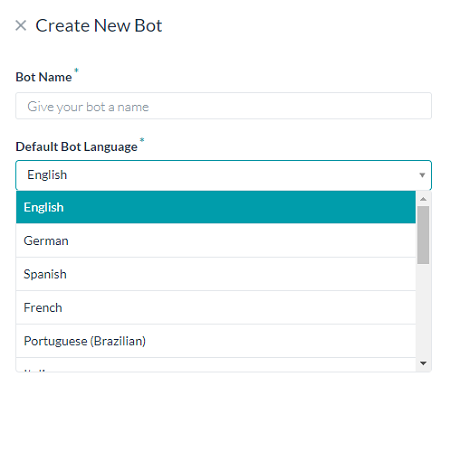
You can choose a default language for the bot while creating it (see image below). Bot communicates with the user in the default language until the user’s language is identified. If the bot supports the user’s language, it switches to that language for the current or all of the following user sessions, depending on Bot’s Language settings.
Configuring/Enabling Languages
Enabling a supported language to a bot involves the following steps:
Step 1: Configure a new language
Follow these steps to enable a new language for the bot:
- Open the bot for which you want to enable other languages.
- Hover over the side navigation panel select Settings > Config Settings and click Language Management.
- From the list of Supported Languages, next to the language you want to enable, click Configure.
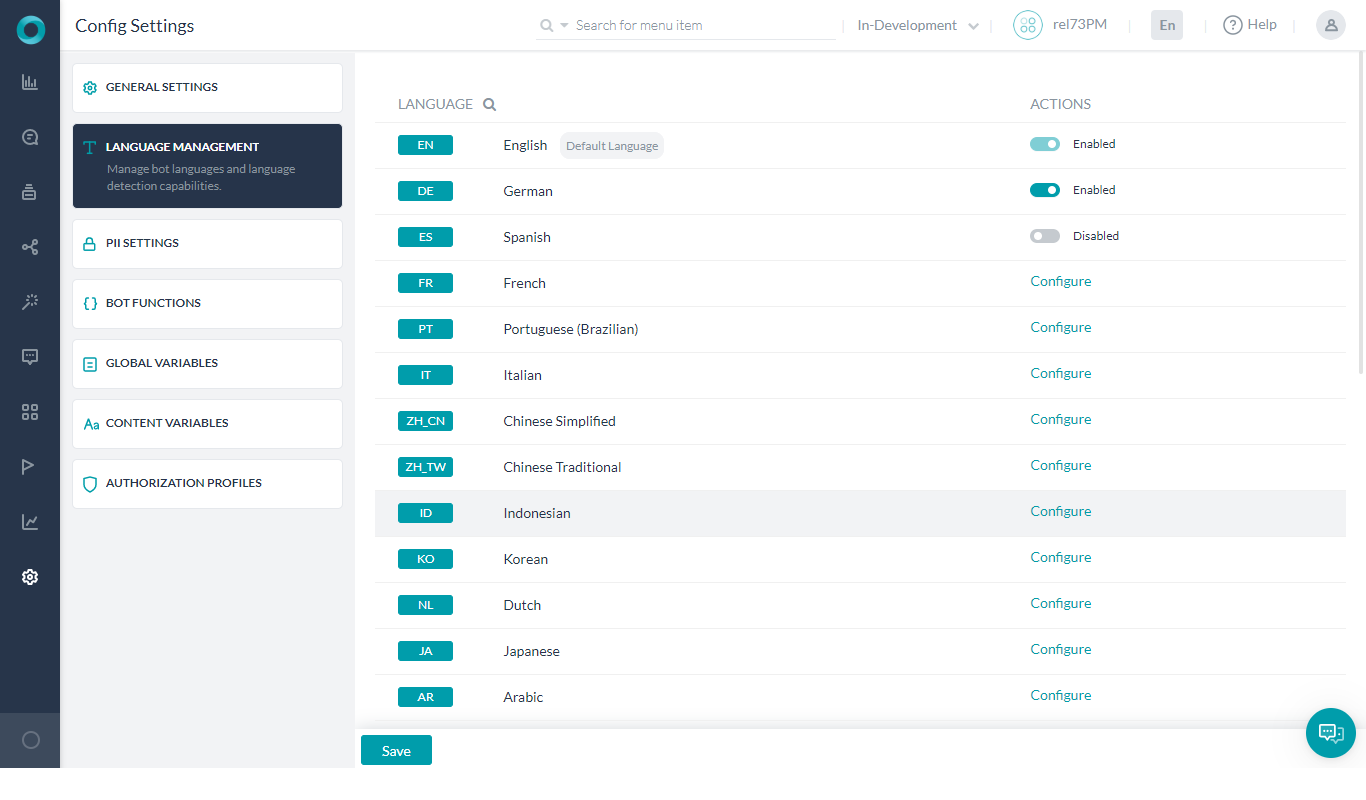
- Clicking Configure opens the Enable Language – <Language Name> dialog where you have two options to enable the selected language for the bot – duplicate an existing language pack or creating a new language pack, as explained in Step 2 below.
Step 2: Create a language-specific version of the bot
You can configure a new language for the bot in the following two ways:
Option 1: Duplicate the default language
If you want to configure the new language for the bot quickly and translate the bot elements incrementally, you can begin by copying the configuration of the default language for the new language. It replicates the bot definition for the configured language but continues to have all the bot elements in the default language, which you can translate from the application UI.
Follow these steps to create a new bot version by copying over the default language configurations:
- On the Enable Language – <Language name> window, select Copy default language.
- On the top-right corner of the window, click Enable. After a successful import, a prompt appears notifying that the new language bot is enabled.
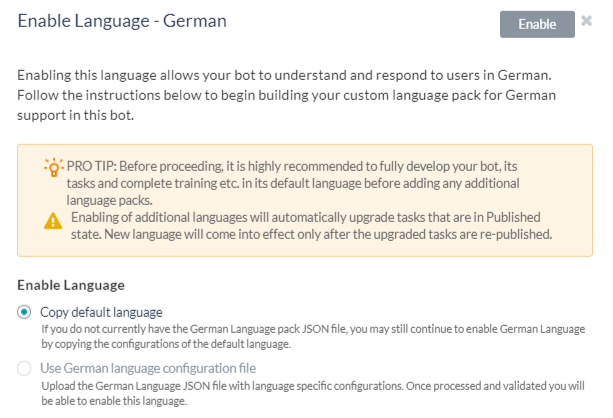
- After completing the previous steps, the bot definition gets created for the newly enabled language but the bot elements remain in the default language. You need to translate the bot elements from the UI.
- Refer to the Translatable Bot Components section to view the complete list of bot elements for which you can add translations.
Option 2: Create a new language pack
You can create a translated version of the bot elements directly, perhaps with help from a language expert, by creating a JSON language pack for the enabled language.
You can download a JSON language pack of any of the already-enabled languages from the bot and then add translations in the JSON file.
Follow these steps to create a JSON language pack for the new enabled language:
- On the Enable Language – <Language name> window, select Use <language-name> language configuration file option
- From the Base Language Pack drop-down, select a language to download its language pack.
- Click Download JSON.
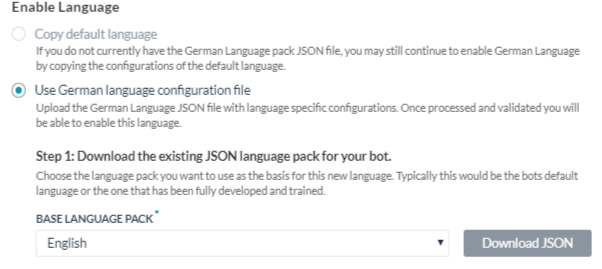
- The downloaded JSON file consists of various bot elements for which you should provide the translations. Refer to the Translatable Bot Components section to learn more about these bot elements.
- To enter a translation for a bot element in the JSON file, replace the corresponding text with the translated text.
- After customizing the downloaded JSON file for the new language, in the Enabling language pack field, click Choose File and upload the new language pack.

- On the top-right corner of the window, click Enable. Upon successful import, the Import Successful window appears with the import results.
- Click OK. Success prompt appears on the top-right corner of your screen.
- After you configured a new language, the status of all the published tasks that are modified to Enabled. To make the new language work in the bot, you must re-publish the bot. Until then, the bot continues to function with the previously published languages.
- Support for Synonyms is restricted to English, French, Spanish and German languages. The respective sections in Natural Language and Entity Node will be in a disabled state for other languages.
Verification
When the bot supports multiple languages, the top right corner of the bot window shows the default bot language followed by a drop-down to view the other supported languages. Check if the enabled language appears in the list.
Step 3: Add or edit translations
After enabling a new language for the bot, you might need to add or edit translations on an ongoing basis. You can make these edits from the application UI, which is particularly helpful if you have created the bot version by copying over the default bot configurations. Editing from the UI also helps when you want to make minor edits.
Note: If you need to make significant changes to the language pack, we recommend you to make the changes in the offline copy of the language pack and then upload it to the bot. Refer to Editing and Re-uploading a language pack to learn how to do it.
To add or edit translations to a bot element from the UI, follow these steps:
- On the top right corner of the bot window, click the current bot language.
- From the drop-down list, select the bot language in which you want to make the changes.
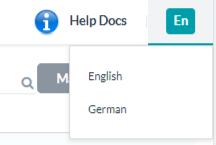
- Enter the language-specific text for the selected bot elements, just as you did for the default language.
For example, if you want to add a bot synonym in the new language, follow these steps:- Hover over the bot’s side-navigation panel and click Natural Language > Synonyms.
- From the list of keywords and synonyms, click the keyword for which you want to add the synonym.
- In the synonyms box, type the synonym (in the enabled language) and press enter.
Editing and Re-uploading a language pack
If you need to make major changes to the language pack, the recommended practice is to make the changes in the offline copy of the language pack and re-upload it to the bot.
To re-upload a language pack to a bot, follow these steps:
- On the top right corner of the bot window, click the current bot language.
- From the drop-down list, select the bot language in which you want to make the changes.
- Hover over the side navigation panel and click Settings > Config Settings -> Language Management.
- The Language Management window opens displaying the disable/enable/configure actions against each language.
- Click on any enabled/disabled language to open the Manage Language window.
- From the Manage Language window click Choose File and upload the updated language pack.
- Click Update to update the language pack.
Disabling/Enabling Language
Once you have configured and enabled a language you can:
- Disable or deactivate a language that is previously enabled for the bot. The actual language-specific data that has been added while enabling the language will continue to exist in the bot even after disabling the language. Disabling would prevent the users from talking to the bot in that language (can be viewed in bot export copy)
- If a language is disabled you can enable it again, since the data is preserved you need not enter all the details.
- No changes can be made to the Default Language, ie the language selected while creating the bot.
NOTE: Any change in language settings, need to be published before it can take effect in the published bot.
Language Detection and Selection
Multilingual bots auto-detect and switch language based on the user’s utterance. An exception to this rule is when the user is expected to enter a value against an entity and the user input satisfies that entity’s criteria.
Language Detection
There are three ways a bot can detect the language based upon the user utterance:
- By Default: Kore.ai Bots platform uses its own language detection algorithm to detect language from the user utterance. This is the default setting and the end user’s language will be detected by the platform.
- For on-prem installation, you can go with the above-mentioned default setting of Kore.ai’s in-house language detection algorithm or use Google APIs for language detections. You can set it in the Kore Config file.
- If you are using BotKit SDK, you may also send the following cheat command from your BotKit to the platform:
cheat language <language name or code>
The bot continues to communicate with the user in the same language. If the user switches to another enabled language anytime later, the bot changes to the new language automatically.
If the bot fails to detect a user’s language with high confidence, it requests the user to select a preferred language from the list of enabled options.
Language Selection Logic for Bot Users
- Bot identifies user language from every utterance. In case a change is detected, it will get a confirmation from the user regarding the switch and proceeds as per the user response. These standard responses can be customized using the getCurrentOptions utility, see here for more. Note that the current conversation will be discarded in case the user wants to switch languages.
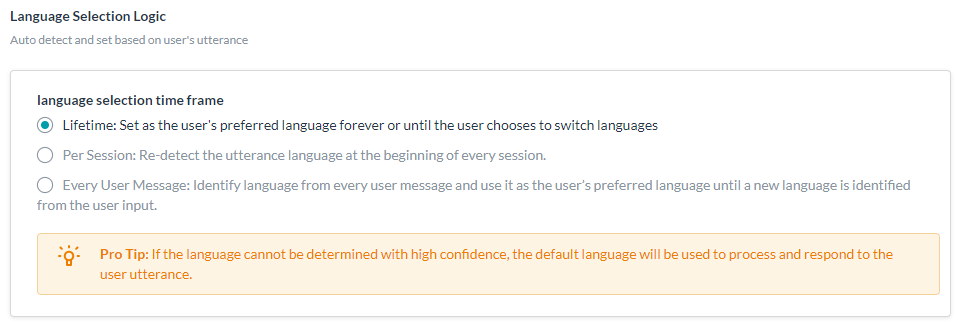
- Language selection settings – In addition, you may want to configure the language selection options. On the Bot menu, click Settings > Config Settings -> Language Management. Under Language Selection Logic (scroll down for the option), for language selection time frame, set to one of the following:
- Lifetime: The auto-detected language will be set as the user’s preferred language and used for all subsequent communications until the user interacts in another enabled language anytime later. If the user starts to talk in another enabled language, the bot changes to that language.
- Per Session: Detects the user’s language at the beginning of every session and responds accordingly.
- Every User Message: Identifies the user’s language from every utterance. In case a change is detected, will get a confirmation from the user regarding the switch and proceeds as per the user response. Note that the current conversation will be discarded in case the user wants to switch languages. This feature was introduced in release 7.2 and is the default setting for multi-lingual bots.
- For testing and debugging purposes, you can override the language selection settings by using the cheat command during a chat session:
Replace the language name or code with one of these values:- English: English or EN
- German: German or DE
- French: French or FR
- Spanish: Spanish or ES
Translatable Components
This section lists the bot elements for which you can provide translations, along with their JSON properties. You can also translate these elements from the application UI. Refer to the help links added across the article to get an overview of the relevant topic areas.
Bot Metadata
JSON object consisting of the following translatable elements
| Field Name | Type | Description |
|---|---|---|
| Bot Name | String | Name of the bot |
| Bot Description | String | Description of the bot |
| Bot Synonyms | Object | Arrays of important words in the task names and their corresponding synonyms. Enter translation of the words as well as their synonyms. Refer to Managing Synonyms to learn more about bot synonyms. |
| Bot Error Codes | Object | Arrays of error codes and their corresponding messages. Enter translations of the error message. Refer to Customizing Error Messages to learn more about error messages. |
Dialog Tasks
JSON object consisting of the following translatable components of your bot’s Dialog Tasks.
| Field Name | Type | Description |
|---|---|---|
| Dialog Task Name | String | Name of the dialog task |
| Dialog Task Desc | String | Description of the dialog task |
| Dialog Task Upgrade Message | String | Message displayed to the developer on the History page for the upgraded task |
Dialog Components
JSON object consisting of the following translatable components related to the NLP settings of a dialog task.
| Field Name | Type | Description |
|---|---|---|
| Dialog Component Intent | String | Name of the User Intent node |
| Dialog Component Description | String | Description of the User Intent node |
| Dialog Component Synonyms | Object | Synonyms for the words in the entity node names. Refer to Managing Synonyms to learn more. |
| Dialog Component Patterns | Object | Patterns for the User Intent and Entity nodes in the dialog task. Refer to Managing Patterns to learn more. |
Message Templates
JSON object with arrays of Message Template IDs and Message Template Text values. They correspond to the User Responses field in the Message node and the Bot Prompts and Error Prompts fields in the Entity node of the dialog tasks.
| Field Name | Type | Description |
|---|---|---|
| Message Template Text | String | The text entered in User Responses, Bot Prompts, or Error Prompts fields in any Message or Entity node of a dialog task. |
Action Task
JSON object consisting of the following translatable components of your bot’s Action Tasks.
| Field Name | Type | Description |
|---|---|---|
| Action Name | String | Name of the action task |
| Action Short Desc | String | Description of the action task |
| Action Keywords | Array | The search keywords entered for the action task |
| Action Patterns | Array | Arrays of patterns related to the action task’s name. Replace the pattern text with the translated text. Refer to Managing Patterns to learn more. |
| Action Field Synonyms | Object | Arrays of synonyms for each task field. Replace the field name and the synonyms with the translated text. Refer to Managing Synonyms to learn more. |
| Action Field Patterns | Object | Array consisting of patterns for each task field. Replace the pattern text with the translated text. Refer to Managing Patterns to learn more. |
| Action Ignore Words | Array | Array of ignore words related to the action task. Replace the words with the translated text. Refer to Managing Ignore Words and Field Memory to learn more. |
| Action Upgrade Short Message | String | Upgrade Short Message related to the action task. |
| Action Upgrade Long Message | String | Upgrade Long Message related to the action task. |
| Action Query Fields | Object | Key-value pairs of Action Field Help and Action Field Title. Replace the text with the translated text. |
| Action Payload Fields | Object | Key-value pairs of Alert Payload fields. Replace the text with the translated text. |
Alert Task
JSON object consisting of the following translatable components of your bot’s Alert Tasks.
| Field Name | Type | Description |
|---|---|---|
| Alert Name | String | Name of the alert task |
| Alert Short Desc | String | Description of the alert task |
| Alert Keywords | Array | The search keywords entered for the alert task |
| Alert Patterns | Array | Array of patterns related to the alert task’s name. Replace the pattern text with the translated text. Refer to Managing Patterns to learn more. |
| Alert Field Synonyms | Object | Arrays consisting of synonyms for each task field. Replace the field name and the synonyms with the translated text. Refer to Managing Synonyms to learn more. |
| Alert Field Patterns | Object | Arrays consisting of patterns for each task field. Replace the pattern text with the translated text. Refer to Managing Patterns to learn more. |
| Alert Ignore Words | Array | Arrays of ignore words related to the alert task. Replace the words with the translated text. Refer to Managing Ignore Words and Field Memory to learn more. |
| Alert Upgrade Short Message | String | Upgrade short message related to the alert task. |
| Alert Upgrade Long Message | String | Upgrade long message related to the alert task. |
| Alert Query Fields | Object | Arrays consisting of key-value pairs of Alert Field Help and Alert Field Title. Replace the text with the translated text. |
| Alert Payload Fields | Object | Arrays consisting of key-value pairs of Alert Payload fields. Replace the text with the translated text. |
Action Fields
JSON object consisting of the following translatable components in the API Request tab of the Action task.
| Field Name | Type | Description |
|---|---|---|
| Action Field Title | String | The title of the user input field related to the action task, for example, Choose account |
| Action Field Help | String | The help text displayed below the field title to describe the task, for example, Which account would you like to get the balance for? |
| Action Field Placeholder | Array | The placeholder text displayed inside the field |
Alert Fields
JSON object consisting of the following translatable components in the API Request tab of the Alert task.
| Field Name | Type | Description |
|---|---|---|
| Alert Field Title | String | The title of the user input field related to the alert task, for example, Choose city |
| Alert Field Help | String | The help text displayed below the field title to describe the task, for example, Which city would you like to get weather alerts for? |
| Alert Field Placeholder | String | The placeholder text displayed inside the field. |
Bot Filters
JSON object consisting of the following translatable components related to Bot filters
| Field Name | Type | Description |
|---|---|---|
| Filter Name | String | Name of the task filter |
IDP Config Form Fields
JSON object consisting of the following translatable components related to IDP configuration form
| Field Name | Type | Description |
| IDP Form Field | String | Name of the IDP Form Field displayed to the end-user in the authentication dialog |

