To add LivePerson as a channel to your Kore.ai bot, you will need to add a Bot user in LivePerson and setup the integration. Adding the LivePerson channel to your Kore.ai Bot allows end-users for your bot to interact with your bot using their LivePerson account.To add the LivePerson channel to your Bot, you will need to:
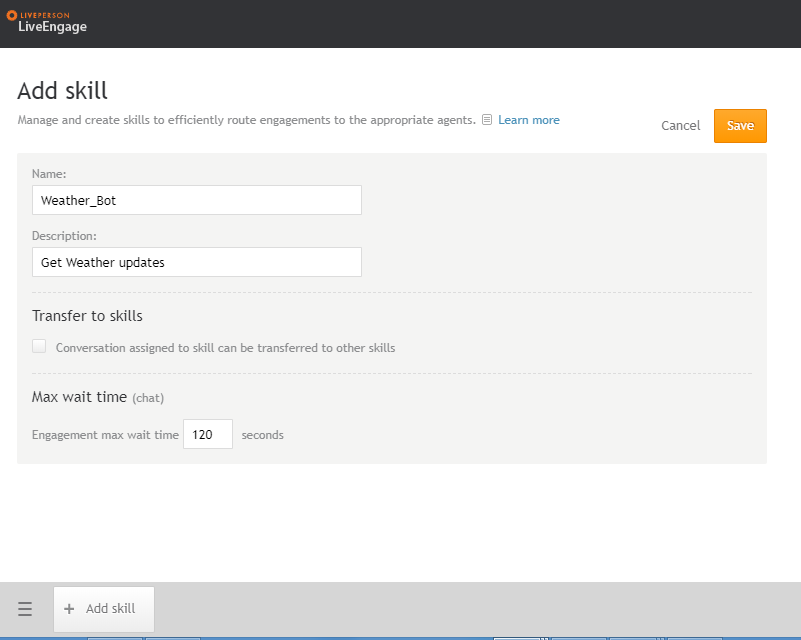
- Create a Bot Skill– To enable LivePerson as a channel for your Kore.ai bot, you will need to sign into LivePerson portal and create a bot skill. Initially, you must have created and registered for a LivePerson developer account.
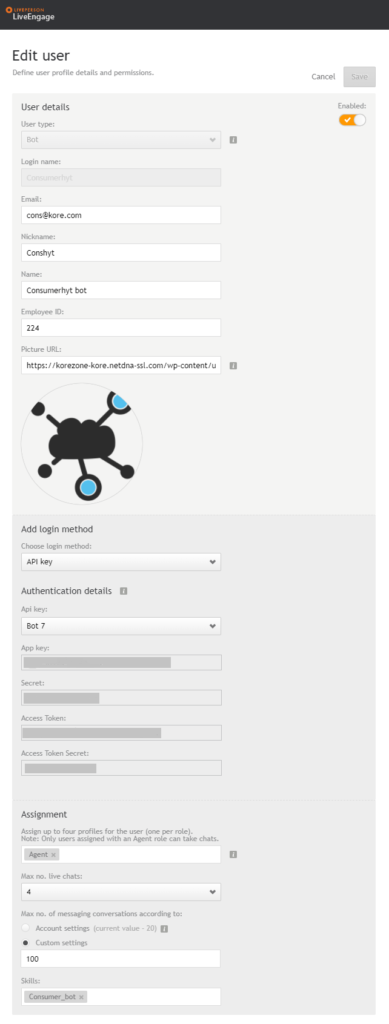
- Add User- To add a Bot user in LivePerson channel, define Bot User details and other permissions.
- Generate API key– Copy the authorization details to enter them in the ‘Configurations’ tab of the LivePerson channel page.
- Enable channel- After completing the integration and entering the Configuration details, you will need to enable channel.
To add the LivePerson channel:
- In the Bots section of the Bot Builder, click the Bot that you want to add the LivePerson channel to.
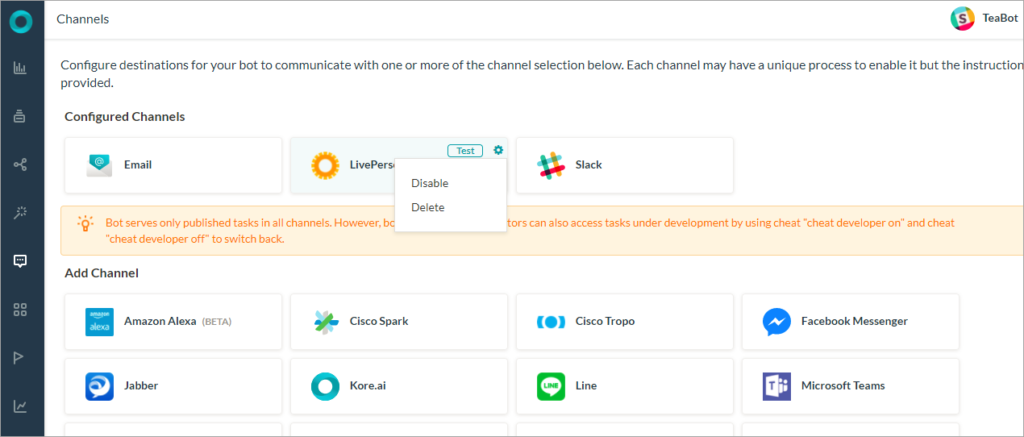
- On the Channels tab,click the LivePerson icon. The LivePerson Channel page gets displayed.
- In a new browser tab, sign in to your LivePerson account as an administrator and then navigate to the Users tab.
- In the Users section, click on the Skill tab and select Add Skill to create a new skill (From the bottom bar)
- Add the skill name as <bot_name>. E.g. if your Kore.ai bot name is Weather Bot, then the skill name should be Weather Bot_bot.
- Give a Description for your bot, and then un-select the option ‘Conversation assigned to skill can be transferred to other skills’ and click Save to ‘Save’ the skill.

- To Add User, in the Add user page, select User Type as Bot and provide all other required details.
- Enter a Login name, Email, Nickname, Employee ID and Name. The nickname and name will be displayed on the screen in the user chat.
- Provide a URL for the Bot avatar.
- Choose the Login method as API Key, and select Generate API Key option from ‘Api key’ dropdown to generate new API key. Make note of the App key, Secret, Access Token and Access Token Secret and provide them in the Configurations tab of the LivePerson Channel page.
- Select Agent as the option in Assignment dropdown, set ‘Max no. live chats’ as Unlimited, and select the skill that was created in the previous step in ‘Skills’ dropdown.

- Navigate to the Configurations tab, and in the Account ID field, enter your LivePerson account ID.
- In the Login Name field, provide your ‘Login Name’ of the Bot user from your LivePerson account.
- To enter the API Key Details, Provide details of API KEY associated with your LivePerson user account.
- In the Enable Channel section, select Yes to activate the channel, and then click Save to complete user creation process.
Editing the LivePerson Channel
To edit the Live Person channel, hover your mouse over the channel to modify, and then click the Settings icon to display the command menu as shown in the following illustration.

Select one of the following commands to modify the channel:
-
- Disable/Enable – Click Disable to temporarily disable use of the LivePerson channel for your Bot.To enable use of the LivePerson channel, Click Enable.
- Delete – Click Delete, and then click OK in the Delete Confirmation dialog to permanently delete the Bot channel configuration.
Warning: This operation is permanent, and cannot be undone.
