GETTING STARTED
Kore.ai XO Platform
Virtual Assistants Overview
Natural Language Processing (NLP)
Concepts and Terminology
Help & Learning Resources
Quick Start Guide
Accessing the Platform
Navigating the Kore.ai XO Platform
Building a Virtual Assistant
Using Workspaces
Release Notes
Current Version
Previous Versions
Deprecations
Request a Feature
CONCEPTS
Design
Storyboard
Overview
FAQs
Conversation Designer
Overview
Dialog Tasks
Mock Scenes
Dialog Tasks
Overview
Navigate Dialog Tasks
Build Dialog Tasks
Nodes & Connections
Overview
Node Types
Intent Node
Dialog Node
Entity Node
Entity Rules
Form Node
Confirmation Node
Message Nodes
Logic Node
Bot Action Node
Service Node
Webhook Node
Script Node
Process Node
Agent Transfer
Node Connections Setup
Sub-Intent Scoping
User Prompts
Voice Call Properties
Dialog Task Management
Supported Entity Types
Supported Company Names
Supported Colors
Knowledge Graph
Introduction
Knowledge Extraction
Build Knowledge Graph
Create Node Structure
Build the Graph
Add FAQs
Add FAQs from an Existing Source
Run a Task
Traits, Synonyms, and Stop Words
Manage Variable Namespaces
Update Knowledge Graph
Introduction
Move Question and Answers Between Nodes
Edit and Delete Terms
Edit Questions and Responses
Knowledge Graph Analysis
Knowledge Graph Import and Export
Prepare Data for Import
From a CSV File
From a JSON File
Importing Knowledge Graph
Exporting Knowledge Graph
Auto-Generate Knowledge Graph
Alert Tasks
Small Talk
Digital Skills
Overview
Digital Forms
Digital Views
Introduction
Widgets
Panels
Session and Context Variables
Context Object
Train
NLP Optimization
ML Engine
Overview
Model Validation
FM Engine
KG Engine
Traits Engine
Ranking and Resolver
Training Validations
NLP Configurations
NLP Guidelines
Intelligence
Introduction
Event Handlers
Default Standard Responses
Contextual Memory
Contextual Intents
Interruption Management
Multi-intent Detection
Amending Entities
Default Conversations
Conversation Driven Dialog Builder
Sentinment Management
Tone Analysis
Test & Debug
Overview
Talk to Bot
Utterance Testing
Batch Testing
Conversation Testing
Health and Monitoring
Deploy
Channels
Publishing
Versioning
Analyze
Introduction
Overview Dashboard
Conversations Dashboard
Users Dashboard
Performance Dashboard
Custom Dashboards
Introduction
Custom Meta Tags
Create Custom Dashboard
NLP Insights
Conversations History
Conversation Flows
Analytics Dashboard Filters
Usage Metrics
Containment Metrics
Smart Bots
Universal Bots
Introduction
Universal Bot Definition
Universal Bot Creation
Training a Universal Bot
Universal Bot Customizations
Enabling Languages
Store
Manage Assistant
Plan & Usage
Overview
Usage Plans
Support Plans
Invoices
Authorization
Multilingual Virtual Assistants
Get Started
Supported Components & Features
Manage Languages
Manage Translation Services
Multiingual Virtual Assistant Behavior
Masking PII Details
Variables
Collections
IVR Settings
General Settings
Assistant Management
Manage Namespace
Data as Service
Data Table
Table Views
App Definitions
Sharing Data Tables or Views
HOW TOs
Build a Travel Planning Assistant
Travel Assistant Overview
Create a Travel Virtual Assistant
Design Conversation Skills
Create an ‘Update Booking’ Task
Create a Change Flight Task
Build a Knowledge Graph
Schedule a Smart Alert
Design Digital Skills
Configure Digital Forms
Configure Digital Views
Train the Assistant
Use Traits
Use Patterns
Manage Context Switching
Deploy the Assistant
Configure Agent Transfer
Use Bot Functions
Use Content Variables
Use Global Variables
Use Web SDK
Build a Banking Assistant
Design Conversation Skills
Create a Sample Banking Assistant
Create a Transfer Funds Task
Create a Update Balance Task
Create a Knowledge Graph
Set Up a Smart Alert
Design Digital Skills
Configure Digital Forms
Configure Digital Views
Add Data to Data Tables
Update Data in Data Tables
Add Data from Digital Forms
Train the Assistant
Composite Entities
Use Traits
Use Patterns for Intents & Entities
Manage Context Switching
Deploy the Assistant
Configure an Agent Transfer
Use Assistant Functions
Use Content Variables
Use Global Variables
Intent Scoping using Group Node
Analyze the Assistant
Create a Custom Dashboard
Use Custom Meta Tags in Filters
APIs & SDKs
API Reference
API Introduction
API List
API Collection
koreUtil Libraries
SDK Reference
SDK Introduction
SDK Security
SDK Registration
Web Socket Connect and RTM
Using the BotKit SDK
BotKit SDK Tutorial - Blue Prism
Widget SDK Tutorial
Web SDK Tutorial
ADMINISTRATION
Introduction to Admin Console
Administration Dashboard
User Management
Add Users
Manage Groups
Manage Roles
Assistant Management
Enrollment
Invite Users
Send Bulk Invites
Import User Data
Synchronize Users from AD
Security & Control
Using Single-Sign On
Security Settings
Cloud Connector
Analytics
Billing
  1. Home
  2. Docs
  3. Virtual Assistants
  4. Bot Administration
  5. Enrollment
  6. Importing Users and User Data

Importing Users and User Data

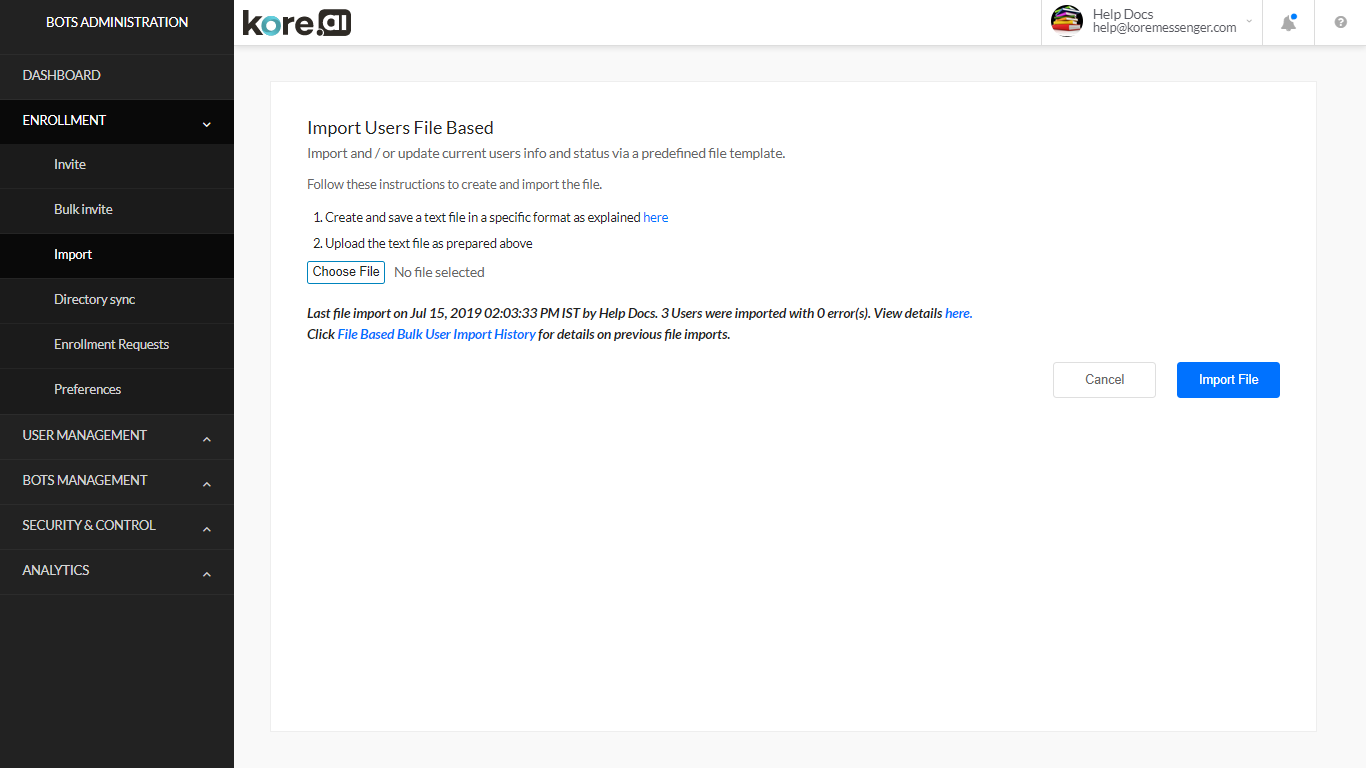
If you need to invite multiple Kore.ai users and you have information about users in addition to the email address, such as the First Name, Last Name, Department, Phone, and Job Title, you can use the Import page to add new users and update existing users based on a list that contains additional user information. The following illustration is an example of the Import page in the Enrollment module.

The import file can be a basic text file and saved as a .txt or .csv file format. After you create an import file, you can upload the file to add or update the Kore.ai users in your account.

File Requirements

When you create an import file, you must adhere to the following guidelines:

  • The first row identifies the name of the field under which the data is stored within Kore.ai, kind of header row.
  • The following Kore.ai account fields are required:
    • Email ID – mandatory
    • First Name – mandatory
    • Last Name – mandatory
    • Alternate ID, Work Phone, Title, Department – optional
    • User Status – – mandatory – One of
      • New
      • Update
      • Delete
      • Activate
  • Create one row for each Kore.ai user
  • Valid field delimiters are comma, pipe, semicolon, and tab

When using an import file, the following validation rules are applied:

  • Entries with invalid email formats are ignored.
  • Each successful import of an email address generates an invitation email to become a Kore.ai user.
  • Existing users in your Kore.ai account are not sent invitation emails.
  • Imported users with status set to Activate are sent a notification that the Kore.ai account is activated.

Sample File

For a .txt file:

Email ID, First Name, Last Name, Alternate ID, Work Phone, Title, Department, User Status
Kore.aiUser1@kore.com,User1FirstName,User1LastName,,800-555-1212,President,Executive,New
Kore.aiUser2@kore.com,User2FirstName,User2LastName,,800-555-5555,VicePresident,Executive,New
Kore.aiUser3@kore.com,User3FirstName,User1LastName,,,,,New

Create and Upload an Import File

You can create a file to invite users in your organization to become Kore.ai users that you can manage as a Bots Admin. This topic describes how to create a file that contains the email addresses and user information, such as first and last name, phone number, department, and so forth, for the users that you want to invite to become Kore.ai users in your account. If you only have email address information for your users, you should create and import a bulk invite file instead. To create an import file

  1. In a text editor or spreadsheet, enter the field IDs on the first line, and then enter a complete email address and data on each following line or in a comma-separated list as shown in the following example:

For a .txt file:

Email ID, First Name, Last Name, Alternate ID, Work Phone, Title, Department, User Status
Kore.aiUser1@kore.com,User1FirstName,User1LastName,User1AlternateID,800-555-1212,President,Executive,New
Kore.aiUser2@kore.com,User2FirstName,User2LastName,User2AlternateID,800-555-5555,VicePresident,Executive,New
Kore.aiUser3@kore.com,User3FirstName,User1LastName,,,,New
  1. Save the import file as a .txt or .csv file, for example, Kore.aiImport.txt or Kore.aiImport.csv. After you create an import file, you can upload the file to invite your account users.

After you have created an import file, you need to upload the import file. This topic describes how you can upload your import file of users of your account. To upload a user import file

  1. In the Enrollment > Import page, click Choose File.
  2. Navigate to your import file, and then click Open. The filename is displayed to the right of the Choose File button.
  3. Click Import File. The status of the import is described immediately following the Import File button.
  4. You can click the File Based Bulk User Import History link to review an import status from a prior import

    .UserEnrollmentImportUsersWithData

View Results

You can review the import operation results on a per-user basis if needed. This topic describes how to view the results of the current import report. To view the results of the current user import

  1. On the Enrollment > Import page, click the here link, as shown below.
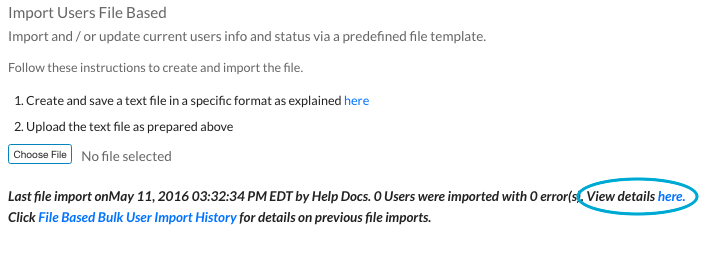
  2. The Report On File Import dialog opens.

View History

After you create and import a list of users in your account, you may want to review the results of the import. This topic describes how to view the historical list of file-based user imports. To view historical import reports

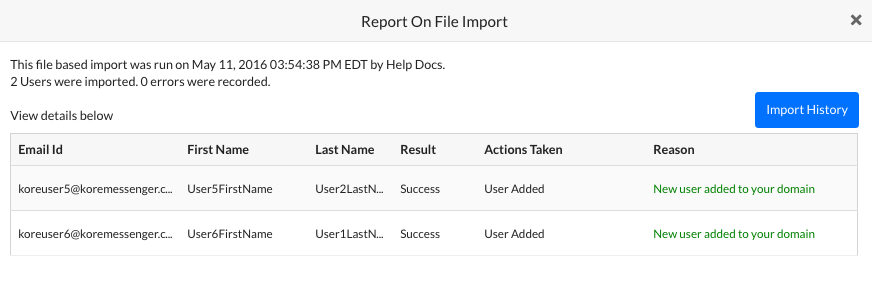
  1. In the Enrollment module, on the Import page, click File Based Bulk User Import History as shown in the following illustration.

    userenrollmentimportuserswithdatahistory

  2. In the File Based Import History dialog, to view the results of an import, in the Report column for the import that you want to view, click Results. The individual user results for the import are displayed in the the File Based Import Results dialog as shown in the following illustration.

    userenrollmentimportuserswithdatahistoryresult

Menu