Introduction & Use Case
Composite Entities help you capture multiple entity values in a user utterance. These multiple entity values are optional and come in any order in the user utterance.
Let us consider the below example.
A travel agency receives a typical request, which can be of the form:
I am interested in traveling tomorrow from LA to NYC, first class, and I want a window seat.
In such a query, the Virtual Assistant needs to process information such as: travel date, departure city, arrival city, flight class and seat preference, in order to respond to this enquiry.
Each of these multiple values or details come from different independent entities. Composite Entities enable you to combine these independent entities or sub-entities.
How it Works?
When a composite entity reaches the dialog flow:
- If the input is received as a JSON object, the input JSON object is added to the Context object under the corresponding entity without any analysis.
- If the input is received as a text input
- All the possible sub-entities from the defined composite entity patterns are identified.
- All possible instances of those sub-entities are located in the user utterance and the location recorded.
- The composite entity patterns are then evaluated to identify the specific pattern that matches the set of sub-entity instances captured.
i.e. the composite entity pattern is not used to identify the sub-entities but to match the entire pattern.
Composite Entity Patterns
These patterns help you to establish the relationship between the sub-entities. Sub-entities are included in the composite entity using the @ tag, i.e.,@subentity in the composite entity pattern. These sub-entities must be pre-defined and should not be part of the current dialog flow. The sub-entities come from other Dialog Tasks too.
Various patterns like AND, OR, etc,. are built similar to the ones used in defining Entity Patterns (refer here for more).
The Composite Entity values take the form of a JSON object wherein the sub-entities are referenced as properties of that object, i.e. to access a sub-entity value, you can use: {{context.entities.<<composite_entity>>.<<sub_entity>> }}
You can access each of the sub-entities using the structure they are defined with, as they are accessed when used independently of the composite entity. For example, if the sub-entity is of the type Airport, then one can access the airport name as follows: {{context.entities.<<composite_entity>>.<<sub_entity>>.AirportName }}
Create a Composite Entity
Building a composite entity involves the following steps:
- Create sub-entities
- Establish a relationship between these sub-entities.[/vc_column_text]
Create Sub-Entities
Since the Composite Entity is a combination of other entities, you need to build individual entities in the dialog task. To capture the Flight Information from the above example, you must create sub-entities that capture the required details. Here is a sample mapping of sub-entities for a primary entity called Flight , for which we create a few sub-entities to capture relevant information:
ENTITY ENTITY TYPE Travel Date
Date: To capture the travel date from the user utterance. The VA recognizes dates automatically.
Departure City
List of Items: To capture the name of the departure city from the user utterance. As a developer, you must build this list in the entity.
Arrival City
List of Items: To capture the name of the arrival city from the user utterance. As a developer, you must build this list in the entity.
Class
List of items: : To capture the flight class from the user utterance. As a developer, you must build this list in the entity.
Seat Preference
List of items: To capture the seat preference from the user. As a developer, you need to build the list in the entity.
Note: Sub-entities can only be combined into a composite entity and are recommended not to use for any other purpose in the dialog task. If you are creating sub-entities in the current dialog task, remove all transitions to these sub-entities, so that they are not a part of the dialog task flow.
Define a Composite Entity
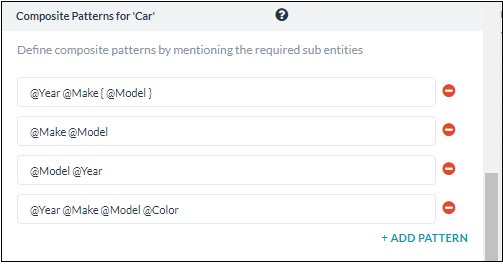
Add a Composite Entity after a relevant node in the dialog task. To make this entity capture multiple entity values, you need to create Composite Patterns. To create, follow the below steps:
- On the Entity window, click the NLP Properties tab.
- On the NLP Properties tab, under the Composite Patterns for Entity section, add relevant patterns. The various patterns built are similar to the ones used in defining Entity Patterns (refer here for more).
For the above composite entity patterns, the following are the sample utterances and the output:
Sample Utterance Corresponding Pattern Output I want to fly from LA to NY tomorrow, first class with a window seat. @departurecity @arrivalcity @traveldate @class @seatpreference " "Flight": { "Departure": "LA", "Arrival": "NYC", "Date": tomorrow, "class": 1,"Seatpreference": Window, } }You can also define the Synonyms and Patterns as with any other entity.
Limitations
- The Sub-entity with Description cannot be part of a composite entity.
- Make sure that the sub-entities are not part of the dialog flow in the task using the composite entity.
- If the sub-entity allows multi-items, the parent composite entity accepts only one value for the sub-entity and not a list.
Passing Values
You can pass values to composite entities using the entity pre-assignment from source Dialog tasks, refer here for more on entity pre-assignment.
In terms of composite entities following scenarios can be addressed:
- From composite to standard entity: Works as long as the target is of the same entity type as the one used in the source composite.
For example,context.entities.targetMyCity=context.entities.sourceComposite.sourceTravelCity - From composite to composite: As long as the target is of the same entity type as the one used in the source composite.
For example,context.entities.sourceComposite.destinationCity=context.entities.targetCompsite.myCity - From standard to composite: As long as the target is of the same entity type as the one used in the source composite.
For example,context.entities.targetCompsite.myCity=context.entities.sourceCity
Post v8.0.07, you can use the Entity Pre-Assignments and Entity Post-Assignments from the Dialog Node, Instance Properties as shown in the image below (the numbers in the below image correspond to the number in the above use case):

JSON Object for Composite Entity
In v8.0 of the platform, the Composite Entity is enhanced to handle the JSON object as input. This helps in handling the scenarios where the enabled channels send data as a JSON object. For example, MS Teams and Cisco Spark channels. The user input received from these channels is stored as a JSON object in the Context object under the respective composite entity name.
To enable the composite entity to handle JSON object data, do not add any Patterns from the NLP Properties tab.