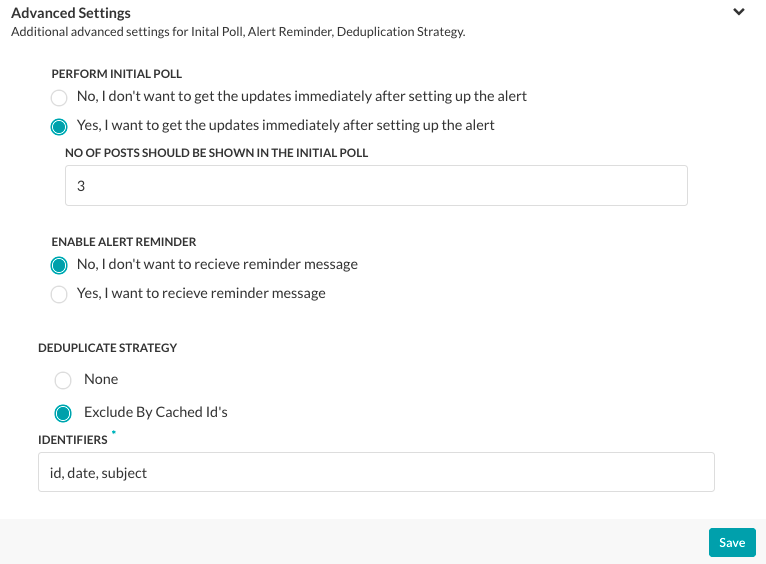
As seen here, in the Advanced Settings section, you can define alert task settings for enabling and limiting the initial set of alert messages displayed to the end-user when the task is set up, define alert message reminders, and if required, prevent duplicate messages sent to the user.
Defined Advanced Settings
In the Advanced Settings section, you can define the initial polling results for a task, define an alert reminder, and specify keys the Bots Platform should use to prevent duplicate alert messages, for example, in a Twitter or Facebook feed.
To define advanced settings for a task, on the Settings tab, click the Expand ![]() icon in the Advanced Settings section as shown in the following illustration.
icon in the Advanced Settings section as shown in the following illustration.
Initial Polling Setup
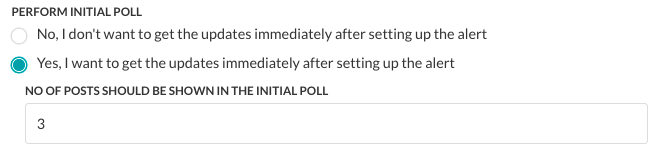
Initial polling is an option you can define to enable display of events to end-users immediately after they set up the task. For example, for a CNN News Bots, you can enable initial polling to show the last 10 news posts immediately after the end-user adds the task to their application. If initial polling is not defined, the task polling begins after the specified Trigger Interval has elapsed.
To enable and configure initial polling, in the Perform Initial Poll section, select Yes. In the No of posts field, enter the number of previous posts that should be posted immediately in the end-user application, as shown in the following illustration.
Setting Up Alert Reminders
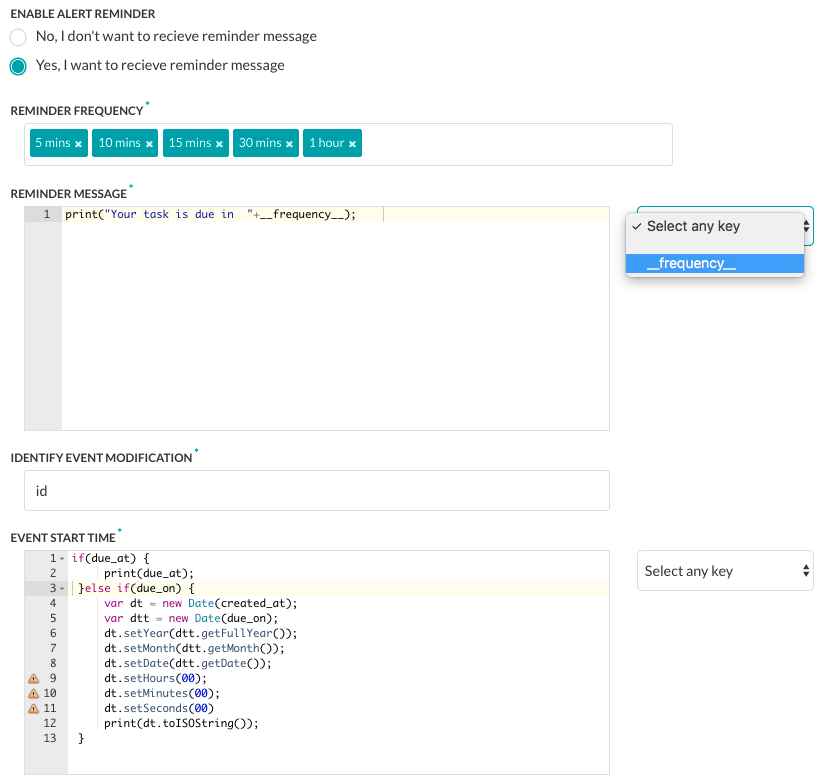
For some tasks, for example, the Google Calendar Event Updates task, you may want to add a reminder to the task. The reminder sends a reminder message to the end-user after receipt of the original task message. For example, the end-user may want to set up a 30-minute and 15-minute reminder before an event with the task message.
To enable and configure reminders, in the Enable Alert Reminder section, click Yes. The reminder configuration section is displayed as shown in the following illustration.
To configure an alert reminder:
- In the Enable Alert Reminder section, click Yes to display the alert reminder settings.
- In the Reminder Frequency section, click in the text box to display and select one or more intervals for the frequency of the reminder ranging from 5 mins to 7 days.
- In the Reminder Message text area, enter the message to display to the end-user for the event reminder. For example,
print('Event starts in '+__frequency__);
To use system generated keys, click Select any key and choose a key from the dropdown list. - In the Identity Event Modification section, enter one or more keys in a comma-separated list used to identify new events. For example, id, LastModifiedDateTime, subject.
- In the Event Start Time section, enter the message to display to the end-user for the start date and time of the event using the alert task payload field that contains the event start time. For example,
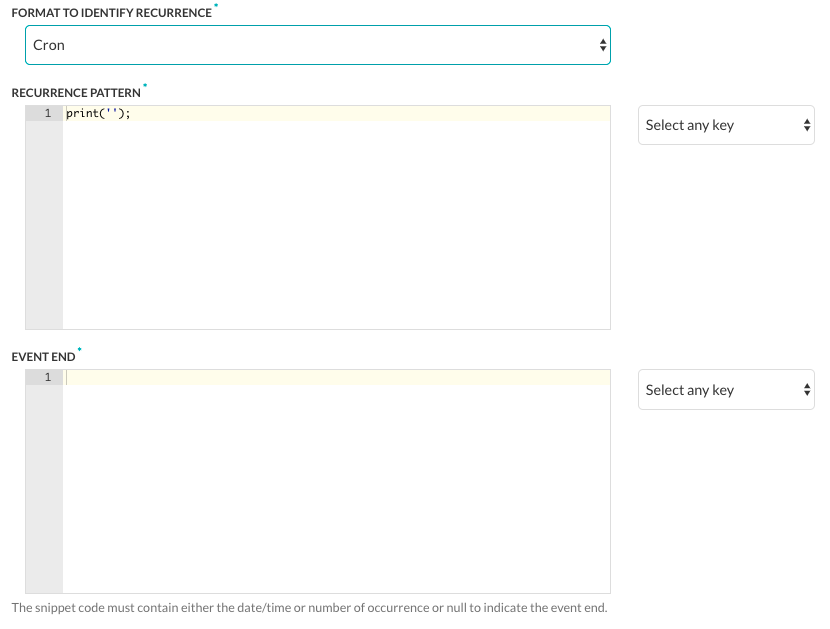
if (due_at) { print(due_at); } else if (due_on) { var dt = new Date(created_at); var dtt = new Date(due_on); dt.setYear(dtt.getFullYear()); dt.setMonth(dtt.getMonth()); dt.setDate(dtt.getDate()); dt.setHours(00); dt.setMinutes(00); dt.setSeconds(00) print(dt.toISOString()); } - In the Format to Identify Recurrence section, select the type of recurrence pattern format used in the payload as one of RRule or Cron.
- RRule – A JavaScript library for working with recurrence rules for calendar dates. Use this for iCalendar events. For more information, see Recurrence Rule.
- Cron – Used for scheduling tasks in the future. For more information, see Cron Expressions.
- In the Recurrence Pattern section, define the string displayed to the end-user to show the frequency of a repeating event, such as a recurring weekly meeting. For example,
if (typeof(Recurrence) !== 'undefined' && Recurrence) { var map = new Object(); map['Daily'] = "DAILY"; map['Weekly'] = "WEEKLY"; map['AbsoluteMonthly'] = "MONTHLY"; map['RelativeMonthly'] = "MONTHLY"; map['AbsoluteYearly'] = "YEARLY"; map['AbsoluteYearly'] = "YEARLY"; map['First'] = 1 map['Second'] = 2 map['Third'] = 3 map['Fourth'] = 4 map['Last'] = -1 map['Sunday'] = 'SU' map['Monday'] = 'MO' map['Tuesday'] = 'TU' map['Wednesday'] = 'WE' map['Thursday'] = 'TH' map['Friday'] = 'FR' map['Saturday'] = 'SA' var rrule = ''; if (typeof(Recurrence.Pattern.Type) !== 'undefined') { var freq = map[Recurrence.Pattern.Type]; rrule = rrule + 'FREQ=' + freq + ';'; } if (typeof(Recurrence.Range.StartDate) !== 'undefined') { var stDate = new Date(Recurrence.Range.StartDate).toISOString(); rrule = rrule + 'DTSTART=' + stDate + ';'; } if (typeof(Recurrence.Pattern.Interval) !== 'undefined') { var interval = Recurrence.Pattern.Interval rrule = rrule + 'INTERVAL=' + interval + ';'; } if (typeof(Recurrence.Range.EndDate) !== 'undefined' && Recurrence.Range.Type !== 'NoEnd') { var edDate = new Date(Recurrence.Range.EndDate).toISOString(); rrule = rrule + 'UNTIL=' + edDate + ';'; } if (typeof(Recurrence.Pattern.Month) !== 'undefined' && Recurrence.Pattern.Month !== 0) { rrule = rrule + 'BYMONTH=' + Recurrence.Pattern.Month + ';'; } if (typeof(Recurrence.Pattern.DayOfMonth) !== 'undefined' && Recurrence.Pattern.DayOfMonth !== 0) { rrule = rrule + 'BYMONTHDAY=' + Recurrence.Pattern.DayOfMonth + ';'; } if (typeof(Recurrence.Pattern.Index) !== 'undefined') { var wno = map[Recurrence.Pattern.Index]; rrule = rrule + 'BYSETPOS=' + wno + ';'; } if (typeof(Recurrence.Pattern.DaysOfWeek) !== 'undefined') { var arr = []; for (var i = 0; i < Recurrence.Pattern.DaysOfWeek.length; i++) { arr.push(map[Recurrence.Pattern.DaysOfWeek[i]]) } rrule = rrule + 'BYDAY=' + arr.join(',') + ';'; } print(rrule); } - If the Format to Identify Recurrence field is set to Cron, then define the Event End section to define the string displayed to the end-user to show the date and time of the last recurring event.
Click Save to save the settings.
Preventing Duplicate Message Alerts
After you add your filters for the response object, you should determine if you need to apply a strategy to prevent the display of duplicate messages to the end-user. For example, if you set up an RSS task, you may want to prevent duplicate messages for the same subject, or for Facebook, prevent duplicate messages each time a comment is added to a post.
In Kore.ai, you can choose one of two options for Deduplicate Strategy:
- None – This is the default method to prevent duplicate alert messages. Each incoming task payload is hashed and the latest 500 task hash values are persisted. Each new task payload is compared against the list to prevent duplicate task alert messages. This option works for most tasks.
- ExcludeByCachedIds – Select to enter one or more response identifier keys in a comma-separated list used to filter Kore.ai task alert messages and prevent duplication based on the cached hash value of the key for up to 500 hash values. If any of the key hash values match the response object, then the alert message is filtered and not displayed. For RSS Alert Types, RSS XML payloads are parsed as JSON. To filter by RSS item, enter
$..guid[0]._to prevent duplicate messages using the XML < GUID > tag parsed to JSON as:{ "guid": [ "_": "some link" ] }
To define settings to prevent duplication messages for a task, on the Settings tab, click the Expand ![]() icon in the Advanced Settings section to display the Deduplicate Strategy section as shown in the following illustration.
icon in the Advanced Settings section to display the Deduplicate Strategy section as shown in the following illustration.
