OVERVIEW
Virtual Assistants
Kore.ai Platform
Key Concepts
Natural Language Processing (NLP)
Accessing Platform
VIRTUAL ASSISTANTS
Virtual Assistant Builder
Virtual Assistant Types
Getting Started
Creating a Simple Bot
SKILLS
Storyboard
Dialog Task
Introduction
Dialog Builder (New)
Dialog Builder (Legacy)
User Intent Node
Dialog Node
Entity Node
Supported Entity Types
Composite Entities
Supported Colors
Supported Company Names
Form Node
Logic Node
Message Nodes
Confirmation Nodes
Bot Action Node
Service Node
Custom Authentication
2-way SSL for Service nodes
Script Node
Agent Transfer Node
WebHook Node
Grouping Nodes
Connections & Transitions
Manage Dialogs
User Prompts
Knowledge Graph
Terminology
Building
Generation
Importing and Exporting
Analysis
Knowledge Extraction
Build
Alert Tasks
Introduction
Ignore Words and Field Memory
How to Schedule a Smart Alert
Small Talk
Digital Views
Overview
Configuring Digital Views
Digital Forms
Overview
How to Configure Digital Forms
NATURAL LANGUAGE
Overview
Machine Learning
Introduction
Model Validation
Fundamental Meaning
Introduction
NLP Guidelines
Knowledge Graph
Traits
Introduction
How to Use Traits
Ranking and Resolver
Advanced NLP Configurations
INTELLIGENCE
Overview
Context Management
Overview
Session and Context Variables
Context Object
How to Manage Context Switching
Manage Interruptions
Dialog Management
Sub-Intents & Follow-up Intents
Amend Entity
Multi-Intent Detection
Sentiment Management
Tone Analysis
Sentiment Management
Event Based Bot Actions
Default Conversations
Default Standard Responses
TEST & DEBUG
Talk to Bot
Utterance Testing
Batch Testing
Conversation Testing
CHANNELS
PUBLISH
ANALYZE
Overview
Dashboard
Custom Dashboard
Overview
How to Create Custom Dashboard
Conversation Flows
NLP Metrics
ADVANCED TOPICS
Universal Bots
Overview
Defining
Creating
Training
Customizing
Enabling Languages
Store
Smart Bots
Defining
koreUtil Libraries
SETTINGS
Authorization
Language Management
PII Settings
Variables
Functions
IVR Integration
General Settings
Management
Import & Export
Delete
Versioning
Collaborative Development
PLAN & USAGE
Overview
Usage Plans
Support Plans
Invoices
API GUIDE
API Overview
API List
API Collection
SDKs
SDK Overview
SDK Security
SDK App Registration
Web SDK Tutorial
Message Formatting and Templates
Mobile SDK Push Notification
Widget SDK Tutorial
Widget SDK – Message Formatting and Templates
Web Socket Connect & RTM
Using the BotKit SDK
Installing
Configuring
Events
Functions
BotKit SDK Tutorial – Agent Transfer
BotKit SDK Tutorial – Flight Search Sample Bot
Using an External NLP Engine
ADMINISTRATION
HOW TOs
Creating a Simple Bot
Creating a Banking Bot
Context Switching
Using Traits
Schedule a Smart Alert
Configure UI Forms
Add Form Data into Data Tables
Configuring Digital Views
Add Data to Data Tables
Update Data in Data Tables
Custom Dashboard
Custom Tags to filter Bot Metrics
Patterns for Intents & Entities
Build Knowledge Graph
Global Variables
Content Variables
Using Bot Functions
Configure Agent Transfer
Update Balance Task
Transfer Funds Task
RELEASE NOTES
  1. Home
  2. Docs
  3. Virtual Assistants
  4. Builder
  5. Dialog Task
  6. Implementing Custom Authentication

Implementing Custom Authentication

You can implement custom authentication for your bot by providing URL from the service node to an external application that manages the authentication. The platform provides the necessary functionality to handle successful and failed authentication scenarios and manage the corresponding task flows.

Bot Builder mechanism to implement custom authentication involves the following steps:

Generate the Custom Authentication URL from the Service Node

To implement custom authentication, you first need to configure a dialog tasks’ service node with the URL of the authenticating service. When you do so, the platform internally appends the authentication URL you entered with the bot’s webhook and creates a custom authentication URL. It performs to facilitate the authentication service to send back the necessary details to the platform after completing the authentication process.

Populate the Context and Present the Custom URL to the User

During task execution, when a dialog reaches the service node, the platform populates the customer authentication URL in the context and presents a message to the end-user requesting authentication credentials. Then, the platform waits for the external authentication service to send a response on the webhook.

Receive Callback after Authentication

The external system, on its part, performs a callback to the platform using the webhook URL, which is populated in the Context Object. Once all this is complete, the dialog task progresses based on the transitions defined for the node.

Configure the Custom Authentication Service

  1. Open the dialog task in which you want to implement the custom authentication.
  2. Add a service node after the appropriate node in the task flow.
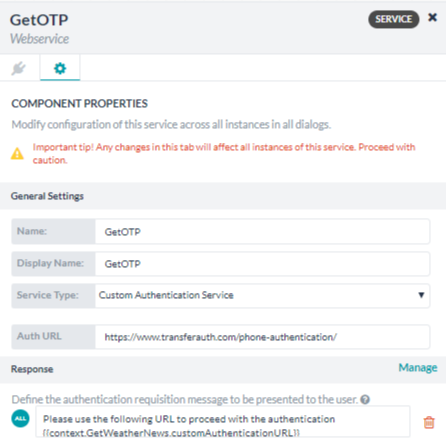
  3. On the Component Properties tab of the node, enter a Name for the node.
  4. In the Service Type drop-down list, select Custom Authentication Service.
  5. In the Auth URL field, enter the URL of the external authentication service.
  6. Under the Response section, it shows the default authentication requisition message that the bot presents to the user. You can edit the message or click Manage to define advanced or channel-specific messages. Learn about message formatting and templates.
    Note: The default message here is based on the default name of the service node and is as follows: Please use the following URL to proceed with the authentication {{context.<<Service Node Name>>.customAuthenticationURL}}. If you change the node name later, ensure that you also update the message to reflect the revised name.
  7. Define the transitions for the node.
Menu
Kore.ai Named a Leader in 2022 Gartner® Magic Quadrant™ for Enterprise Conversational AI PlatformsGet the Report