Kore.ai Bots Platform provides access to bot development using secured APIs. All key developer activities like bot creation, bot import and export, training, and publishing are available using these APIs. Key account management activities like managing Bot Builder access, managing admin, and bot roles can also be performed via secured public APIs. For a complete list of APIs and usage instructions refer here.
Authentication of the API requests involves the following two steps:
- Creating an App: As a part of creating the app, you need to select the API scopes for the App, which allows you to provide access to only the selected APIs to the app.
- Bot Builder API Scopes: Bot developers can define bot specific API Scopes from the Bot Builder tool.
- Bot Admin Console API Scopes: Account administrators can define API Scopes to access any of the bots built in their accounts from the Admin Console.
- Associate API Scopes to an App: To allow a client application to access the Bots Platform APIs, you need to associate the client app with the bot.
Additionally, you can secure the connections with the platform by the following methods:
- Enforce JTI Claim – Once enabled, the platform would accept the requests only from calls with the JTI Claim in the requests and those without JTI Claim would be rejected
- Enforce JWE Encryption– Generating JWT token: To access Bot Platform’s public APIs, the application making the API request requires authentication. Kore.ai uses the JWT (JSON Web Token) mechanism to handle the authentication. For a quick overview of the JWT token, read Introduction to JWT tokens.
Use the Client ID and Client Secret of the client app from above to generate a JWT token. This token needs to be passed as a part of each API request for authorization.
Creating & Managing Apps
Bot Builder
The following steps let you create a Client App from the Bot Builder:
- Select Deploy tab from the top menu
- From the left menu, click Integrations -> Manage Apps
- Click New App.
- On the Create Client App page:
- enter a name for the app,
- enforce JTI and/or JWE as per your requirements
- Click Next and Done.
- You will be directed to the Manage Apps page, where all the apps associated with this Bot will be displayed.
- Once you select an app, the Client ID and Client Secret section appear. Also displayed will be a list of places where this app is used like web SDK, bot kit SDK, etc.
- You can also use this screen to delete apps by using the trash icon against the respective app. Note, only the Bot Owner can delete an app.

Note: Before the release of ver 7.3 of the platform, apps were associated with the user. The apps are associated with a bot since the release of ver 7.3 of the platform. Bot developers, other than the bot owner, with Apps and Scopes permission, will have access to these apps. To ensure backward compatibility, if an app is being used in more than one bot, then the app will be duplicated with the same credentials for each of these bots.
Bot Admin Console
Following steps let you create a Client App from the Bot Admin Console:
- On the side-navigation panel of the Bots Admin homepage, click Security & Control > API Scopes.
- On the API Scopes page, click New.
- To create a new app, click the Manage Apps link.
- Click New App,
- enter a name and
- enforce JTI and/or JWE as per your requirements
- Click Save.
Data Table
The Data table option has been added to the platform in v7.3 of the platform (see here for more). Access control to these would be different from the Bot Builder and Bot Admin Console access controls.
You can define apps to securely access the data from data tables and data views.
- You can create one or more apps and they would be owned by you, see here for how.
- These apps can be used for:
- Accessing the data tables and views over public APIs
- Accessing the data tables and views using Service Node
- Accessing the export and import API for the definition of data table and views
- You can grant this app read, write, and delete permissions to each table and view separately, see here for more.

Associating API Scopes
Once created a client app needs to be associated with API scopes.
Bot Builder
Following steps let you associate API Scopes to a Client App from the Bot Builder:
- Hover over the side-navigation panel of the bot and click API Extensions.
- On the API Extensions page, click the API Scopes tab and then click New.
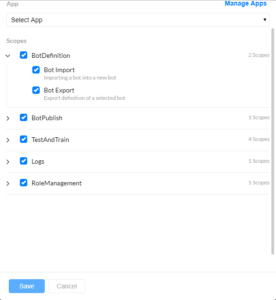
- On the New API Scope Mapping page, from the App drop-down list, select an existing client app for authentication.
- Once you select an app, the Client ID and Client Secret section appear. You can copy the values.

- Under the Scopes section, select the APIs for which you want the client app to have access. The apps cannot access the APIs that aren’t selected here. The following are the list of scopes that can be selected:
- Intent and Entity Detection – to allow intent and entity detection from an utterance using secured APIs
- Chat History – to retrieve chat transcripts of this bot using secured APIs
- Debug Logs – to retrieve debug logs of this bot using secured APIs
- Bot Export – to export the definition of a selected bot
- Import Variables – to import variables of this bot using secured APIs
- Export Variables – to export variables of this bot using secured APIs
- Train ML – to match a given utterance against the NL model to identify possible intents and entities present in the utterance
- Train Faq – to match a given faq against the faq model
- Utterances Import – to import utterances for a bot task
- Utterances Export – to export utterances for a bot task
- Logs History – to retrieve the change logs for the particular bot
- Bot Sessions – to retrieve bot conversation sessions
- Custom Reports – to retrieve the data associated with custom widgets and reports
- RCS Message Events – for opting in users to RCS Business Messaging channel and sending broadcast messages
- Link External Bots – to allow linking of child bots which are not part of this account
NOTE: Once enabled, the API Scopes need to be Published. Follow the Publish procedure ensuring that the API Scopes are selected from the API Extensions option.
Bot Admin Console
Following steps let you associate API Scopes to a Client App from the Bot Admin Console:
- On the side-navigation panel of the Bots Admin homepage, click Security & Control > API Scopes.
- On the API Scopes page, click New.
- On the New API Scope Mapping page, from the App drop-down list, select an existing client app for authentication. To create a new app, click the Manage Apps link.
- Once you select an app, the Client ID and Client Secret section appear. Copy the values.
- You can also use this screen to delete apps by using the trash icon against the respective app.
- Under the Scopes section, select the APIs for which you want the client app to have access.
Refer here for the list of API scopes.
Generating JWT Token
Once you have associated the API scopes to a client app, you need to generate the JWT token for API requests.
- You can use the following link to generate the token. Click here.
- Select the algorithm you want to use to generate the token – HS256 or RS256
- Scroll down to the Decoded section.
- Replace the contents in the Payload box with the Client ID of the app copied in the previous section.
{
  "appId": "your-client-id-here"
}
Note: The Bot Builder validates the token only when it is generated exactly as “appId”. The platform doesn’t validate tokens generated with any other formats such as “App ID” “appid” or “app ID”. - In the Verify Signature box,
- for HS256 encoding enter the Client Secret copied from the previous section in the box with the text your-256-bit-secret.
- for RS256 encoding enter the public and private keys in the corresponding text areas.
Note: your key must be pasted within the Begin and End tags.
- Copy the generated JWT token from the Encoded section on the top or use the Copy JWT button at the bottom.
- This token can be used to access the required API and it needs to be passed as a part of each API request for authorization.
- You can use the API Collection to test the APIs from your Postman setup. See here for more.