This tutorial is an end-to-end walkthrough for setting up and running an instance of the Kore.ai BotKit SDK which is a collection of libraries that you can use for more control of the messages and webhook events for Kore.ai bots for your web service. For this tutorial, you will use the sample bot called Flight Search Sample that you can install as a new bot, generate authentication tokens, and then test the bot using ngrok as a test callback server.
Prerequisites
To complete this tutorial, you will have to setup and configure the following prerequisites:
- Install and run ngrok as your test callback server. The test callback server application, ngrok, is used to simulate your callback server application.
- Install node.js on your computer (version 10 or above) – The BotKit SDK requires node.js to communicate between your server and the Kore.ai Bots Platform.
Installing and running ngrok
To download the test callback server application, click https://ngrok.com/download, and then download and install the ngrok file for your operating system.
In a Terminal Window, start ngrok to monitor port 8003 using the following command:
ngrok http 8003
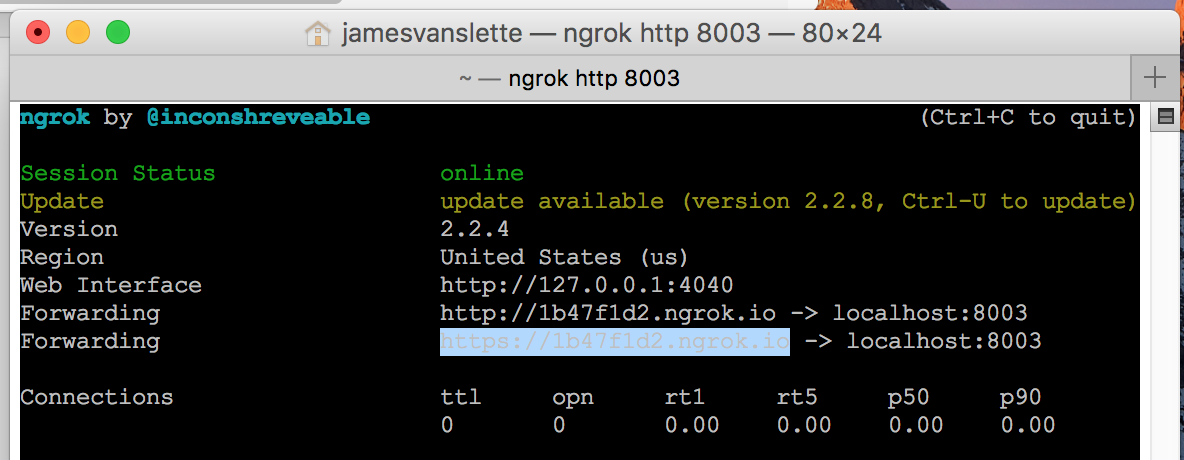
Copy the https Forwarding URL as shown in the previous illustration, for example, https://1b47f1d2.ngrok.io. Leave the terminal window open and ngrok running.
Installing node.js
The BotKit SDK requires node.js (version 10 or above) to run on the same server where the SDK is installed. Go to https://nodejs.org/en/download/, and then select your OS as a .pkg file type for Mac, and .msi file type for Windows.
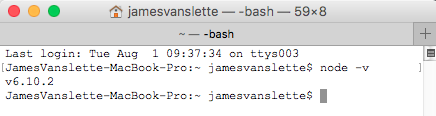
In a Terminal window, run the node -v command to verify installation and version, for example, v6.10.2as shown in the following illustration.
Installing and Configuring Your Bot
With the prerequisites installed and running, you are ready to install the Flight Search Sample bot. In this section, you will:
- Install the Flight Search Sample Bot
- Create an App Registration
- Generate Security Credentials
- Install and Configure the BotKit SDK – config.json and FindAFlight.js files
Installing the Flight Search Sample Bot
Kore.ai provides ready to use sample bots that you can install into your instance of Bot Builder. For this tutorial, you will need to install the Flight Search Sample bot.
To install the Flight Search Sample bot
- Log on to Bot Builder, and then click New Bot > Install Sample Bot.
- Point to Flight Search Sample, and then click Install. The Instructions tab on the Flight Search Sample_XXXX_X opens.
- Review the instructions, click the Configuration tab, and then rename your sample bot to Flight Search Sample Tutorial.
- The Flight Search Sample_NAME_Instance# installed successfully message appears.
The Flight Search Sample bot is only available in Bot Builder and must be added as a new bot. For more information, see Flight Search Sample Bot.
Registering Your App and Generating Client Credentials
To register your BotKit SDK with the Kore.ai Bots platform, you will need to create an app registration, and then generate security credentials used to securely communicate between the SDK installed on your server platform and the Kore.ai Bots Platform.
Creating an App Registration
- Hover over the side-navigation panel of the bot and click API Extensions.
- On the API Extensions page, click the BotKit SDK tab.
- Next to the App name drop-down list, click Add.
- Enter a name for the app and then click Next.
- The Client ID and Client Secret details appear. Click Done.
- In the Callback URL field, enter the URL for your application that you copied from the Forwarding URL from the ngrok application that you installed and ran as part of the prerequisites, for example, https://1b47f1d2.ngrok.io.
Note: Each running instance of ngrok will generate a session unique URL. You will need to update the Callback URL field if you stop and restart ngrok.
- In the Events section, select OnHookNode – An event is triggered when a Webhook node is encountered in the dialog task flow.
- Click Save. The Successfully subscribed message is displayed.
To configure the BotKit SDK settings, you will need to:
- Copy the Client ID, for example, cs-6e5eb411-e592-50d9-9ba2-ccc748d4f719.
- View, and then copy the Client Secret, for example, dTTmuTOgs8SOCwF/tFizouE0EPy28fXojOJWedOEF6s=.
Publishing the Bot
A developer can use any installed bot immediately for testing as bots are available to the owner on save. If you only want to run and test this bot for this tutorial, you can skip to the next section, Installing and Configuring the BotKit SDK.
To enable the bot for other users, you must publish the bot so the Enterprise Admin for other users can approve and deploy the bot for users in their enterprise. For more information, see Publishing Tasks.
After you publish a bot in Bot Builder, an Enterprise Admin for your bot must complete one of the following bot deployments in the Bots Admin Console depending if your bot Target Audience is set to Enterprise Users (managed users) or General Public (unmanaged users):
- For Enterprise Users
- In the Bots Admin Console, in the Bots Management module, on the Enterprise Bots page, click the Ellipses icon for the Agent Transfer bot that you want to deploy, and then click Manage bot tasks. The Manage Bot Tasks dialog is displayed.
- Expand the Bot Tasks field to view the available and deployed tasks.
- Select all tasks of the bot and then click Confirm.
- In the Manage bots tasks dialog, click Confirm. The Bot status changed successfully message is displayed.
- On the Enterprise Bots page, click the Ellipses icon for the Agent Transfer bot that you want to assign enterprise users to, and then click Bot & task assignments. The Bot & task assignments dialog is displayed.
- Assign the bot to the selected users in the enterprise.
– or –
- For General Public Users
- In the Bots Admin Console, in the Bots Management module, on the Consumer Bots page, click the Ellipses icon for the Agent Transfer bot that you want to deploy, and then click Manage bot tasks. The Manage Bot Tasks dialog is displayed.
- Expand the Bot Tasks field to view the available and deployed tasks.
- Select all tasks of the bot and then click Confirm. The Bot status changed successfully message is displayed.
Installing and Configuring the BotKit SDK
You will need to download and then uncompress the Kore.ai BotKit SDK from https://github.com/Koredotcom/BotKit. Be sure to download the latest version that contains the LiveChat.js files.
config.json
In your BotKit SDK folder, you will need to edit the config.json file that contains the connection information to your callback server. For this tutorial, you are using ngrok, along with the security credentials generated when you created the app registration for the Flight Search Sample bot, and adding a new line to config.json file that contains the license key for your LiveChat agent application.
Modify the default config.json file for the following parameters as follows:
url– Add this parameter with the Forwarding URL field from ngrokapikey– Update parameter using Client SecretappId– Update parameter using Client ID
{
    "server": {
        "port": 8003
    },
    "app": {
        "apiPrefix" : "",
        "url": "< ngrok Forwarding URL >"
    },
    "credentials": {
        "apikey": "< Client Secret from Bot Builder >",
        "appId": "< Client ID from Bot Builder >"
    },
    "redis": {
        "options": {
            "host": "localhost",
            "port": 6379
        },
        "available": false
    },
    "examples" : {
        "mockServicesHost"  : "http://localhost:8004"
    }
}
The following code is an example of a fully defined sample config.json file:
{
    "server": {
        "port": 8003
    },
    "app": {
        "apiPrefix" : "",
        "url": "https://1b47f1d2.ngrok.io"
    },
    "credentials": {
        "apikey": "dTTmuTOgs8SOCwXXXXXXXXE0EPy28fXojOJWedOEF6s=",
        "appId": "cs-6e5eb411-XXXX-XXXX-9ba2-ccc748d4f719"
    },
    "redis": {
        "options": {
            "host": "localhost",
            "port": 6379
        },
        "available": false
    },
    "examples" : {
        "mockServicesHost"  : "http://localhost:8004"
    }
}
FindAFlight.js
The FindAFlight.js file in the BotKit SDK contains the JavaScript that handles the webhook call for flight information. For this tutorial, you will configure the webhook settings with the following information:
In Bot Builder, select the Flight Search Sample bot, and then on the Settings -> Config Settings section, select the General Settings section. The General Settings page is displayed. Copy the:
- Bot Name – The name of the bot on the Bots Platform, for example, Flight Search Sample Tutorial.
- Bot ID – The Bots Platform system unique ID for the Bot, for example, st-26cfae3a-XXXX-XXXX-991a-376b7fe579d5.
In the FindAFlight.js file, update and save the following case-sensitive variables with the settings from your bot instance:
var botId = "< Bot ID >";

var botName = "< Bot Name >";
For example:
var botId = "st-26cfae3a-XXXX-XXXX-991a-376b7fe579d5";

var botName = "Flight Search Sample Tutorial";
Starting the BotKit SDK Application
To start using the Flight Search Sample bot using the BotKit SDK, node.js must be installed and ngrok running listening on port 8003.
To start BotKit SDK
In a Terminal window, navigate to your BotKit SDK folder, and then enter the following command:
node app.js
When node.js is running, you should get the following response:
app listening at http://:::8003
Testing the BotKit SDK Bot
To test your bot, you need the following:
- ngrok running – Command =
ngrok http 8003 - node.js running – Command =
node app.js - Bot Builder – Start Talk to the Bot by clicking the following icon on the bottom right corner of any Bot Builder page:

After the Flight Search Sample dialog is started, messages are exchanged between the third-party webhook as a web service and the BotKit SDK.
Next Steps
To use the Kore.ai bot in your application, you would need to configure the BotKit SDK and register your application with CallBack URL to point to your company application server instead of ngrok. And of course, to share the bot with other users, the Enterprise Admin for your company would need to approve the bot, and deploy the bot to those users after you publish the bot.