OVERVIEW
Virtual Assistants
Kore.ai Platform
Key Concepts
Natural Language Processing (NLP)
Accessing Platform
VIRTUAL ASSISTANTS
Virtual Assistant Builder
Virtual Assistant Types
Getting Started
Creating a Simple Bot
SKILLS
Storyboard
Dialog Task
Introduction
Dialog Builder (New)
Dialog Builder (Legacy)
User Intent Node
Dialog Node
Entity Node
Supported Entity Types
Composite Entities
Supported Colors
Supported Company Names
Form Node
Logic Node
Message Nodes
Confirmation Nodes
Bot Action Node
Service Node
Custom Authentication
2-way SSL for Service nodes
Script Node
Agent Transfer Node
WebHook Node
Grouping Nodes
Connections & Transitions
Manage Dialogs
User Prompts
Knowledge Graph
Terminology
Building
Generation
Importing and Exporting
Analysis
Knowledge Extraction
Build
Alert Tasks
Introduction
Ignore Words and Field Memory
How to Schedule a Smart Alert
Small Talk
Digital Views
Overview
Configuring Digital Views
Digital Forms
Overview
How to Configure Digital Forms
NATURAL LANGUAGE
Overview
Machine Learning
Introduction
Model Validation
Fundamental Meaning
Introduction
NLP Guidelines
Knowledge Graph
Traits
Introduction
How to Use Traits
Ranking and Resolver
Advanced NLP Configurations
INTELLIGENCE
Overview
Context Management
Overview
Session and Context Variables
Context Object
How to Manage Context Switching
Manage Interruptions
Dialog Management
Sub-Intents & Follow-up Intents
Amend Entity
Multi-Intent Detection
Sentiment Management
Tone Analysis
Sentiment Management
Event Based Bot Actions
Default Conversations
Default Standard Responses
TEST & DEBUG
Talk to Bot
Utterance Testing
Batch Testing
Conversation Testing
CHANNELS
PUBLISH
ANALYZE
Overview
Dashboard
Custom Dashboard
Overview
How to Create Custom Dashboard
Conversation Flows
NLP Metrics
ADVANCED TOPICS
Universal Bots
Overview
Defining
Creating
Training
Customizing
Enabling Languages
Store
Smart Bots
Defining
koreUtil Libraries
SETTINGS
Authorization
Language Management
PII Settings
Variables
Functions
IVR Integration
General Settings
Management
Import & Export
Delete
Versioning
Collaborative Development
PLAN & USAGE
Overview
Usage Plans
Support Plans
Invoices
API GUIDE
API Overview
API List
API Collection
SDKs
SDK Overview
SDK Security
SDK App Registration
Web SDK Tutorial
Message Formatting and Templates
Mobile SDK Push Notification
Widget SDK Tutorial
Widget SDK – Message Formatting and Templates
Web Socket Connect & RTM
Using the BotKit SDK
Installing
Configuring
Events
Functions
BotKit SDK Tutorial – Agent Transfer
BotKit SDK Tutorial – Flight Search Sample Bot
Using an External NLP Engine
ADMINISTRATION
HOW TOs
Creating a Simple Bot
Creating a Banking Bot
Context Switching
Using Traits
Schedule a Smart Alert
Configure UI Forms
Add Form Data into Data Tables
Configuring Digital Views
Add Data to Data Tables
Update Data in Data Tables
Custom Dashboard
Custom Tags to filter Bot Metrics
Patterns for Intents & Entities
Build Knowledge Graph
Global Variables
Content Variables
Using Bot Functions
Configure Agent Transfer
Update Balance Task
Transfer Funds Task
RELEASE NOTES
  1. ホーム
  2. Docs
  3. Virtual Assistants
  4. How Tos
  5. カスタムダッシュボードの作成方法

カスタムダッシュボードの作成方法

このハウツーでは、さまざまな測定を使用してBotパフォーマンスを分析、およびビジネスニーズのトレンドを追跡するバンキングBotのシナリオを調査します。カスタムダッシュボードとは何か、およびKore.ai Botプラットフォームへの実装方法の詳細については、こちらを参照してください

例題

バンキングBot顧客が、以下の測定の追跡をしたいと考えています。

  • 顧客タイプに基づく使用統計
  • 取引額分割
  • 日ごとのタスクの成功対失敗のトレンド
  • チャネルごとの使用詳細
  • 失敗する上位タスク

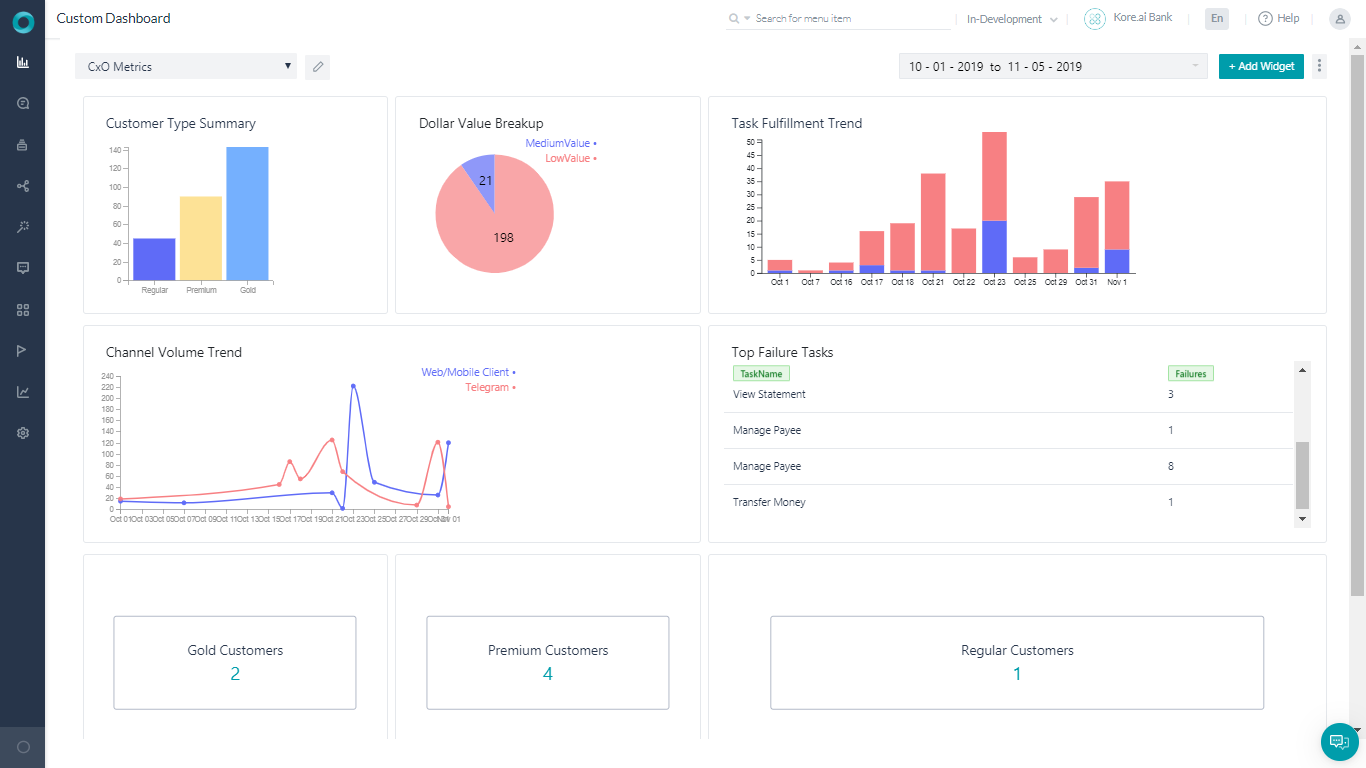
この文書では、カスタムダッシュボードを使用して上記のすべてのシナリオを達成するステップバイステップの詳細を説明します。これが構築するダッシュボードです。

Pre-requisites

  • Botビルドナレッジ。
  • カスタムメタタグの使用についての、 詳細はこちらを参照してください
  • 以下で述べるダイアログ付きバンキングBot
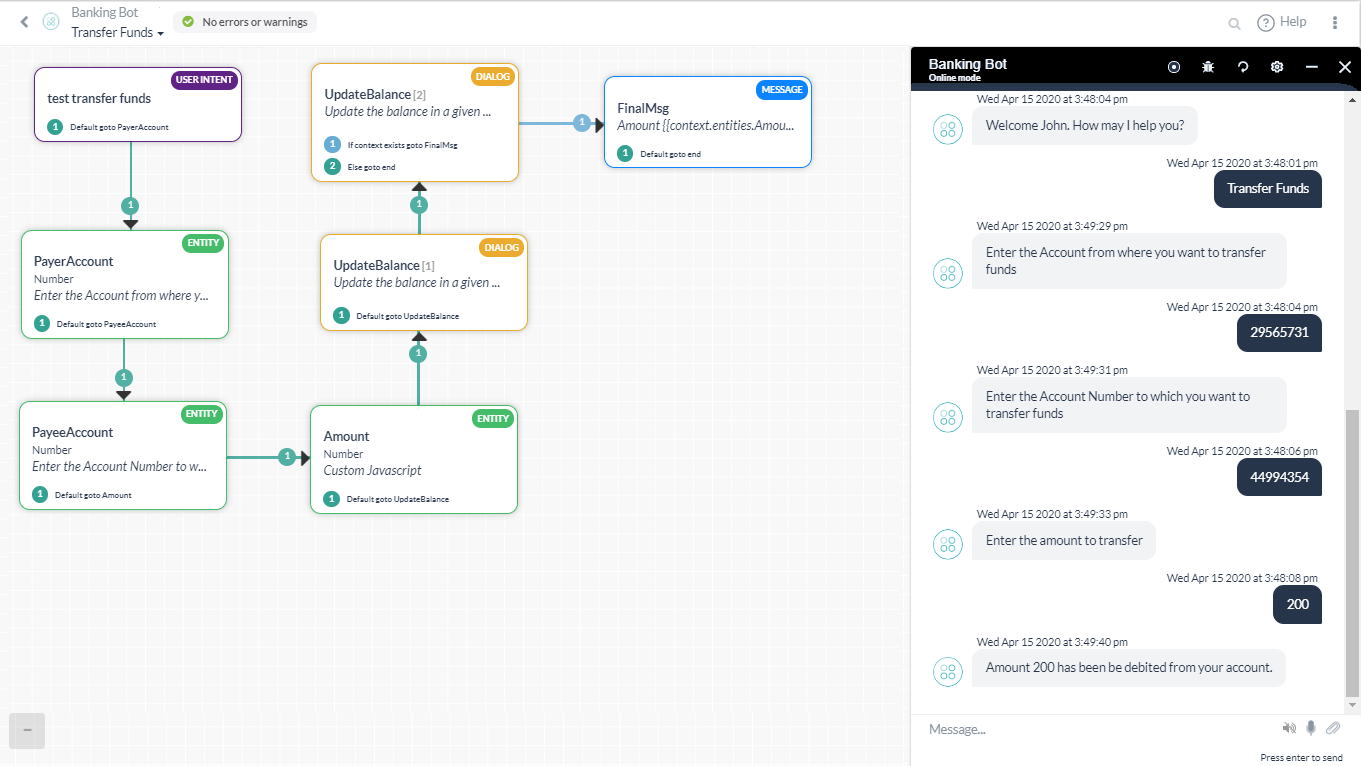
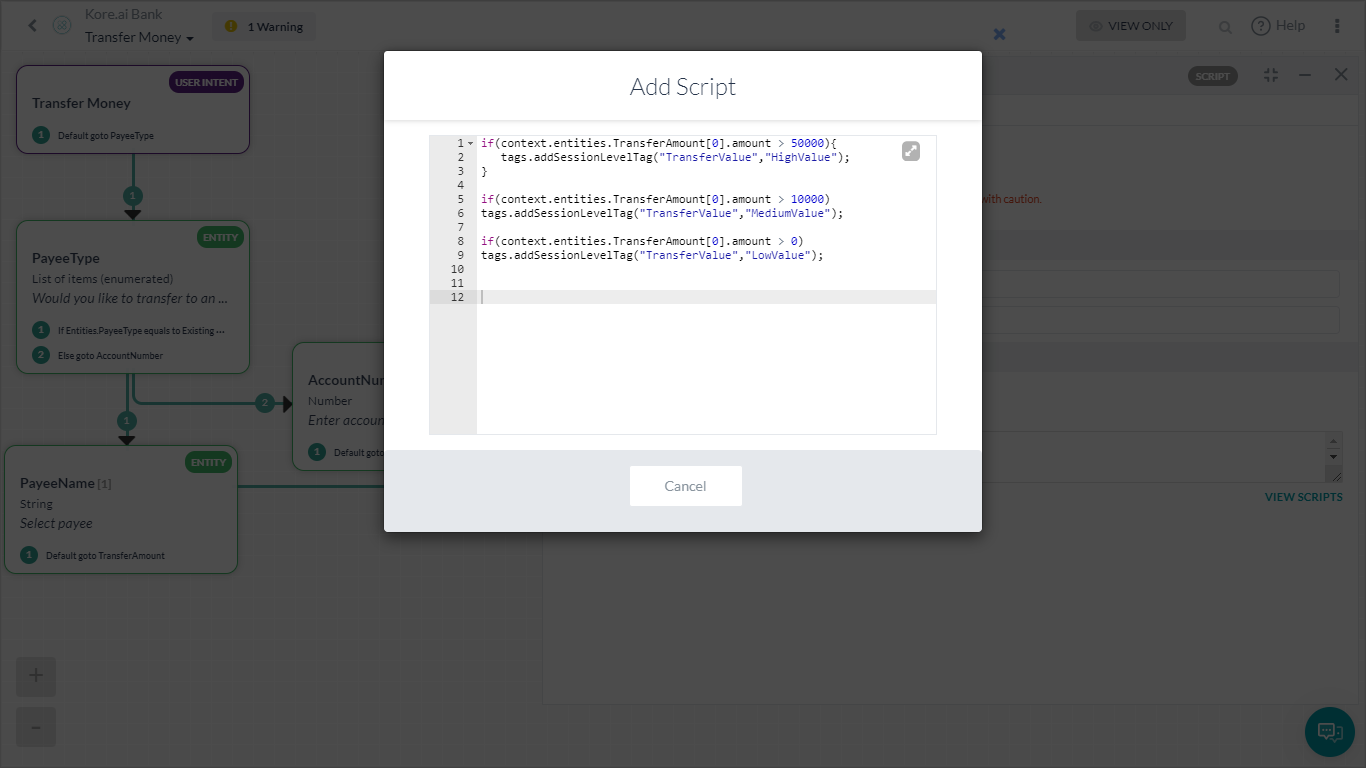
    • 資金の移動 – ユーザーに資金移動ステップを一通り説明するダイアログタスク。このダイアログには、振替額に基づきカスタムメタタグ、TransferValueを追加するスクリプトノードを含めました。以下のスクリプトが使用されました。
      if(context.entities.TransferAmount[0].amount > 50000){ tags.addSessionLevelTag("TransferValue","HighValue"); } if(context.entities.TransferAmount[0].amount > 10000) tags.addSessionLevelTag("TransferValue","MediumValue"); if(context.entities.TransferAmount[0].amount > 0) tags.addSessionLevelTag("TransferValue","LowValue");

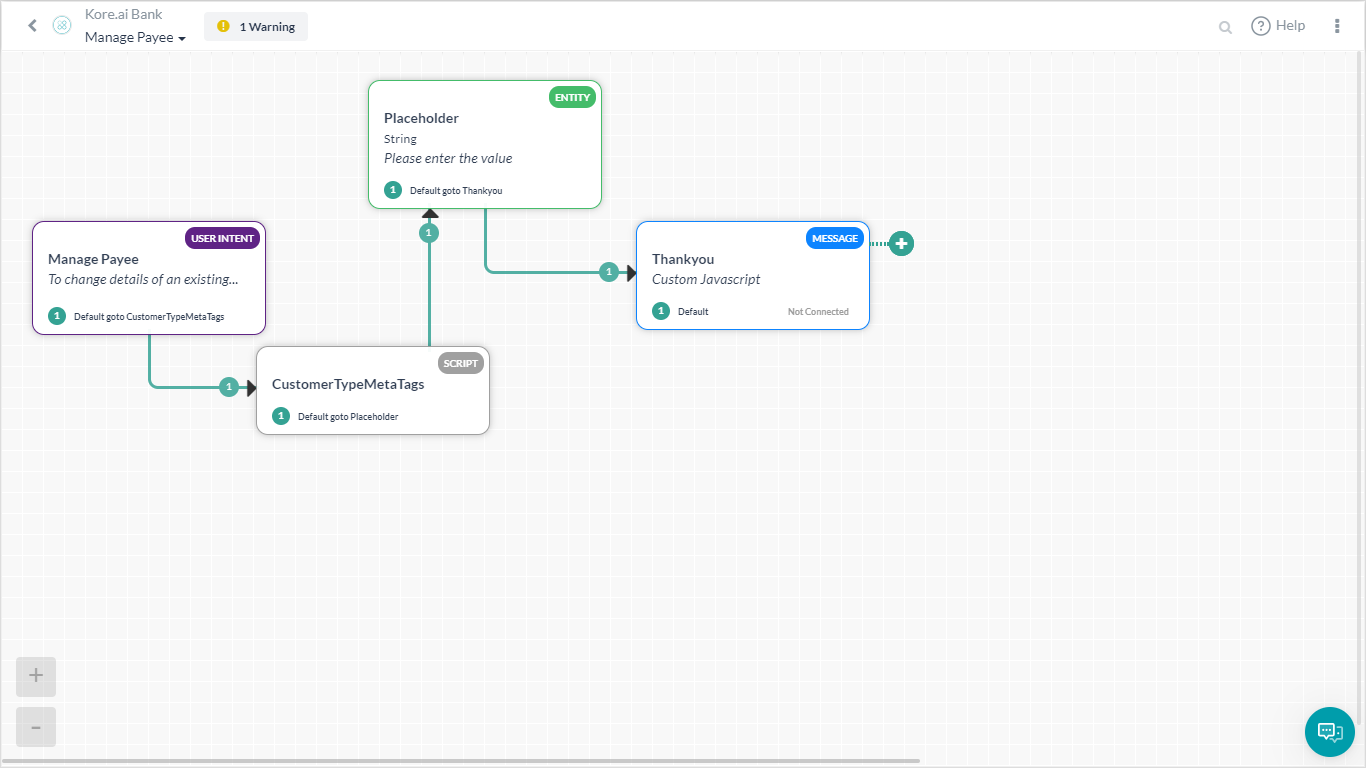
    • 支払先管理 – 支払先リストを管理するユーザー用。 以下は、customerTypeメタ タグを割り当てるスクリプトです。
      if(context.custType == 3){ tags.addUserLevelTag("CustomerType","Premium"); } if(context.custType == 2){ tags.addUserLevelTag("CustomerType","Gold"); }; if(context.custType == 1){ tags.addUserLevelTag("CustomerType","Regular"); };

導入

例題で述べた各測定を、カスタムダッシュボードからのウィジェットを使用して実装できる方法を考えてみましょう。

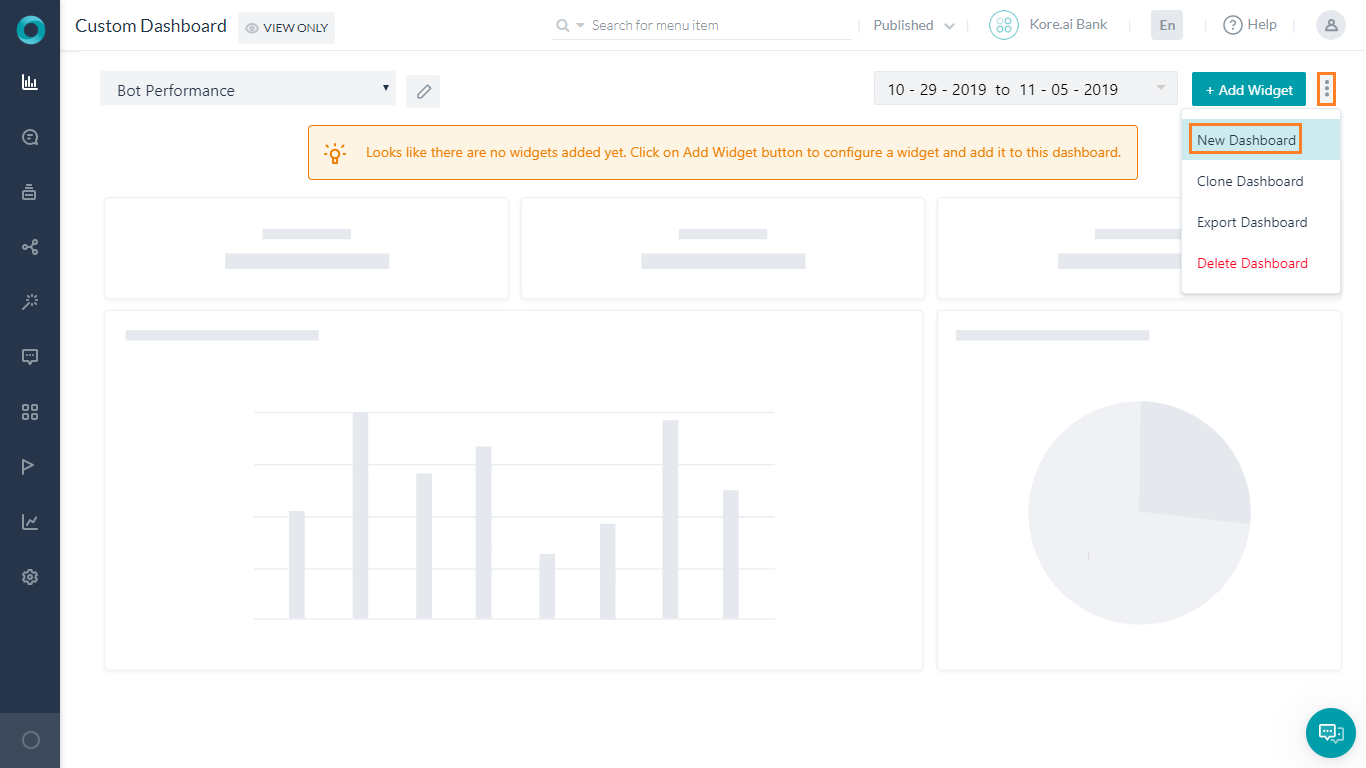
  1. 左のナビゲーション パネルから、ダッシュボードカスタムダッシュボードをクリックします。
  2. 新しいダッシュボードを作成します
  3. ウィジェットを追加ボタンを使用して、上記の各シナリオのウィジェットを追加します。
  4. 以下のセクションでは、各ウィジェットの詳細を説明します。

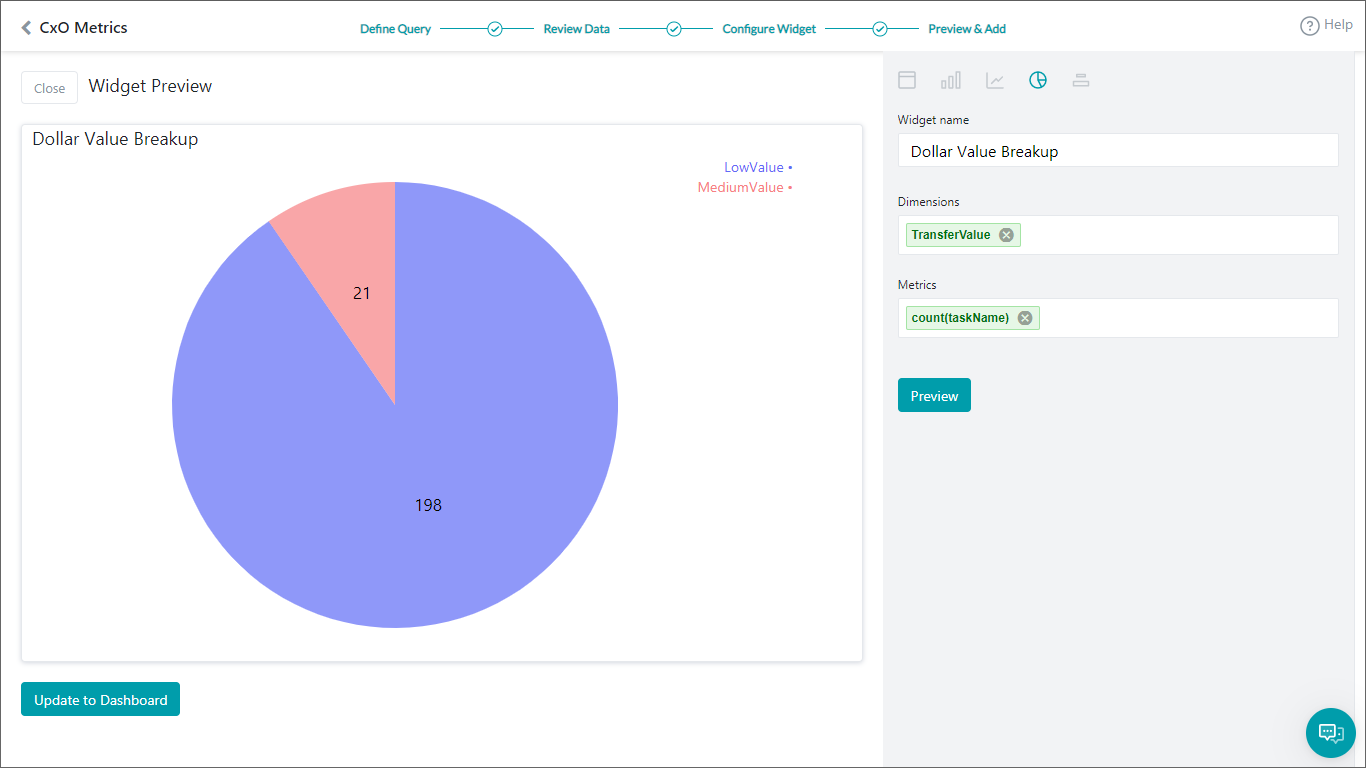
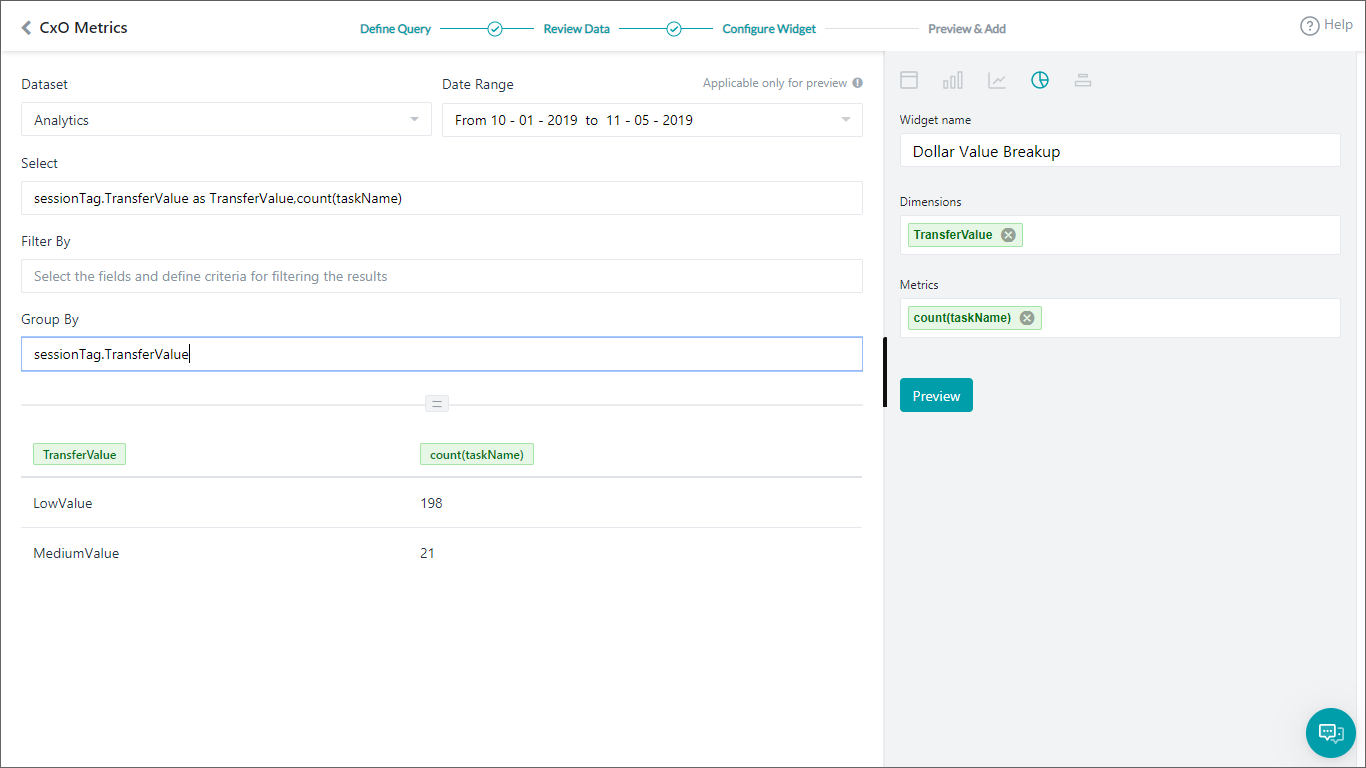
ドル価値分割

  1. ウィジェットを追加
  2. クエリのセットアップ:
    • データセットAnalytics
    • 選択sessionTag.TransferValue as TransferValue,count(taskName)これでプラットフォームにフェッチするデータを知らせます。ここでは、実行したタスクの合計数に対して送金金額タスクに追加したセッションタグ値を使用しています。
    • グループ別sessionTag.TransferValue
    • 実行して、上のクエリから結果を表示します。
  3. ウィジェットのセットアップ
    1. 円グラフを選択
    2. ディメンジョンをTransferValueに設定
    3. 測定 をcount(taskName)に設定

  4. プレビューおよびダッシュボードを更新を参照してください。

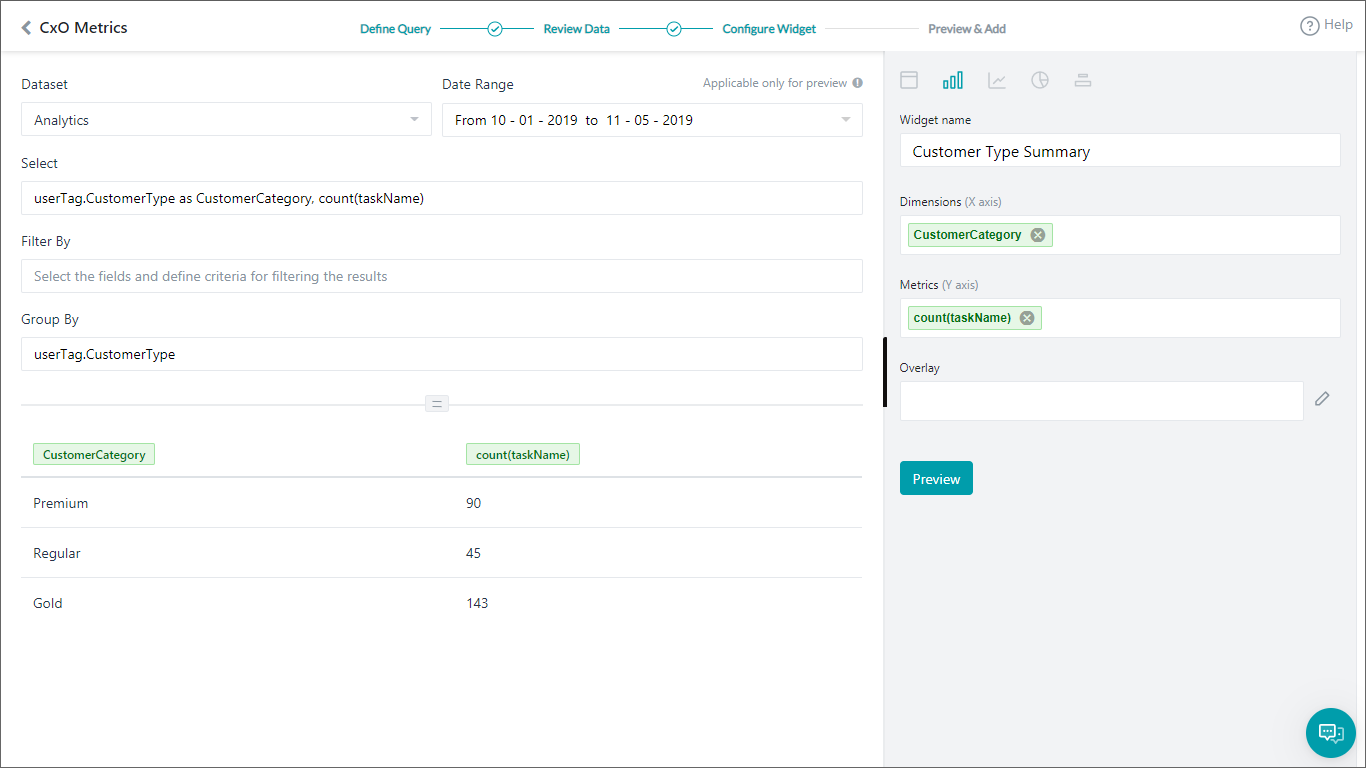
顧客タイプのサマリ

上記のステップを、以下の詳細で繰り返します。

  1. ウィジェットを追加
  2. クエリのセットアップ:
    • データセットAnalytics
    • 選択userTag.CustomerType as CustomerCategory, count(taskName)
    • グループ別userTag.CustomerType
    • 実行して、上のクエリから結果を表示します。
  3. ウィジェットのセットアップ
    1. 棒グラフを選択
    2. ディメンジョンCustomerCategory に設定
    3. 測定count(taskName) に設定

  4. プレビューおよびダッシュボードの更新を参照してください。

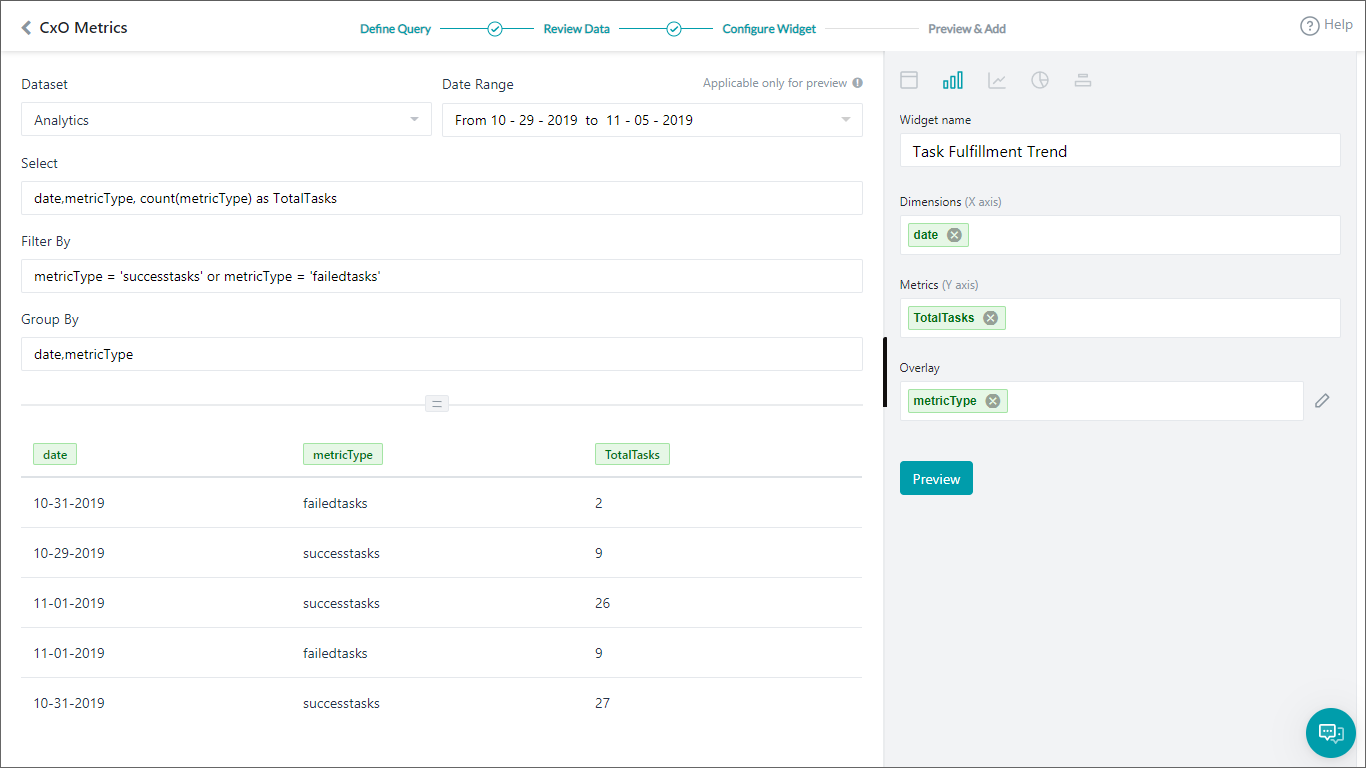
タスク履行トレンド

上記のステップを、以下の詳細で繰り返します。

  1. ウィジェットを追加
  2. クエリのセットアップ:
    • データセットAnalytics
    • 選択date,metricType, count(metricType) as TotalTasks
    • フィルタ別metricType = 'successtasks' or metricType = 'failedtasks' 成功または失敗タスクのみを表示
    • グループ別date、metricType
    • 実行して、上のクエリから結果を表示します。
  3. ウィジェットのセットアップ
    1. 棒グラフを選択
    2. ディメンジョンdateに設定
    3. 測定TotalTasks に設定
    4. オーバーレイmetricType に設定

  4. プレビューおよびダッシュボードの更新を参照してください。

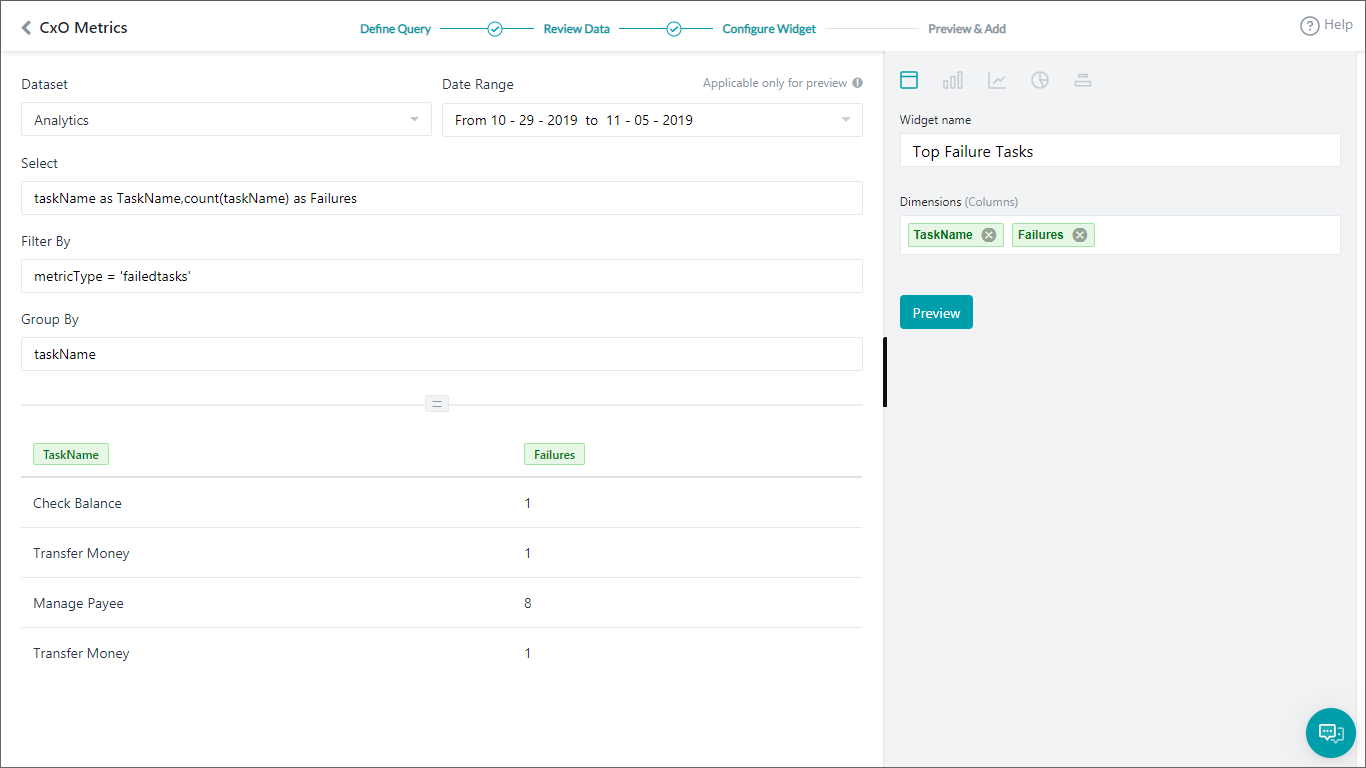
上位失敗タスク

上記のステップを、以下の詳細で繰り返します。

  1. ウィジェットを追加
  2. クエリのセットアップ:
    • データセットAnalytics
    • 選択taskName as TaskName,count(taskName) as Failures
    • フィルタ別 metricType = 'failedtasks’ 失敗タスクのみを表示
    • グループ別taskName
    • 実行して、上のクエリから結果を表示します。
  3. ウィジェットのセットアップ
    1. テーブルチャートを選択
    2. ディメンジョンTaskNameおよびFailuresに設定

  4. プレビューおよびダッシュボードの更新を参照してください。

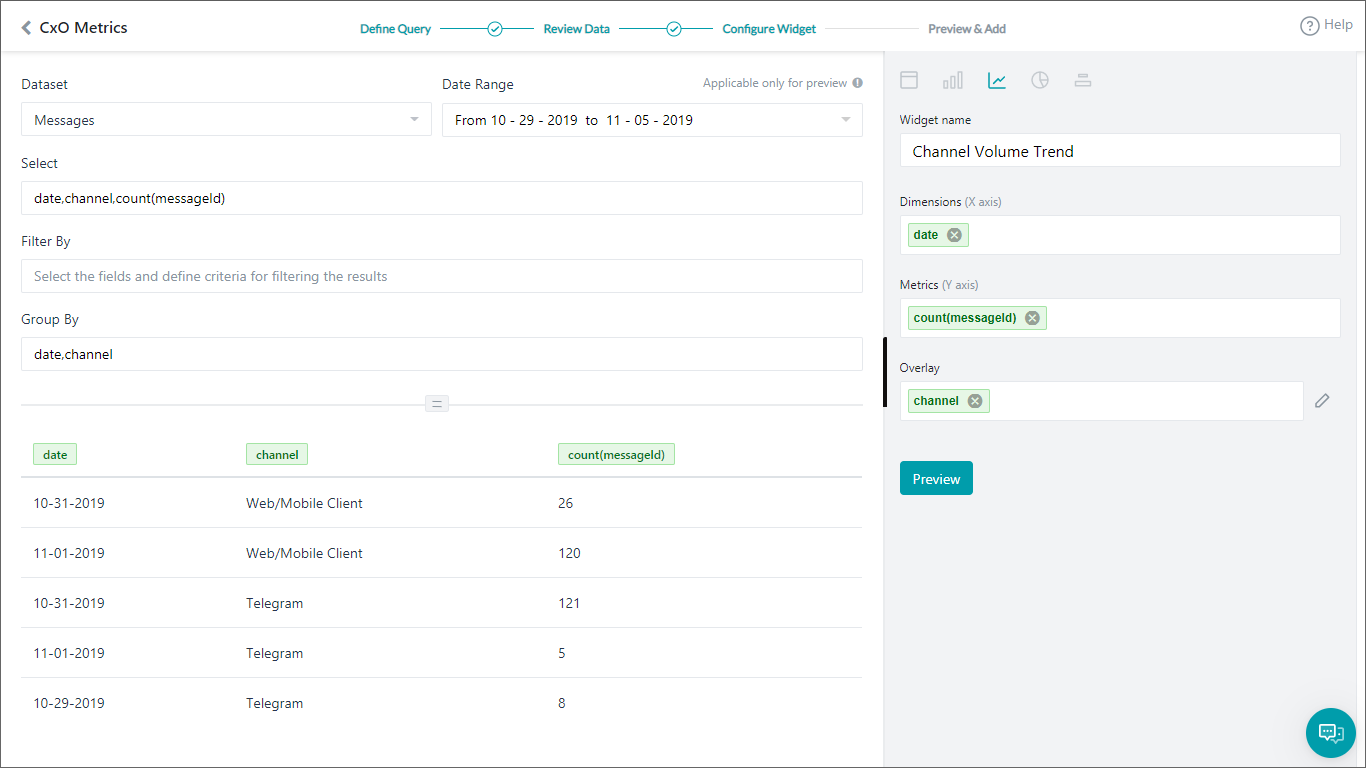
チャネルボリュームのトレンド

上記のステップを、以下の詳細で繰り返します。

  1. ウィジェットを追加
  2. クエリのセットアップ:
    • データセットMesages
    • 選択date,channel,count(messageId)
    • グループ別date,channel
    • 実行して、上のクエリから結果を表示します。
  3. ウィジェットのセットアップ
    1. 折れ線グラフを選択
    2. ディメンジョンdateに設定
    3. 測定count(messageId) に設定
    4. オーバーレイchannelに設定

  4. プレビューおよびダッシュボードの更新を参照してください。

カスタムダッシュボードが準備できました。日付範囲を設定すると、ビジネスシナリオの必須測定が付与されます。

メニュー
Kore.ai Named a Leader in 2022 Gartner® Magic Quadrant™ for Enterprise Conversational AI PlatformsGet the Report