GETTING STARTED
Kore.ai XO Platform
Virtual Assistants Overview
Natural Language Processing (NLP)
Concepts and Terminology
Quick Start Guide
Accessing the Platform
Navigating the Kore.ai XO Platform
Building a Virtual Assistant
Help & Learning Resources
Release Notes
Current Version
Recent Updates
Previous Versions
CONCEPTS
Design
Storyboard
Overview
FAQs
Conversation Designer
Overview
Dialog Tasks
Mock Scenes
Dialog Tasks
Overview
Navigate Dialog Tasks
Build Dialog Tasks
Node Types
Overview
Intent Node
Dialog Node
Dynamic Intent Node
GenAI Node
GenAI Prompt
Entity Node
Form Node
Confirmation Node
Message Nodes
Logic Node
Bot Action Node
Service Node
Webhook Node
Script Node
Process Node
Agent Transfer
Node Connections
Node Connections Setup
Sub-Intent Scoping
Entity Types
Entity Rules
User Prompts or Messages
Voice Call Properties
Knowledge AI
Introduction
Knowledge Graph
Introduction
Terminology
Build a Knowledge Graph
Manage FAQs
Knowledge Extraction
Import or Export Knowledge Graph
Prepare Data for Import
Importing Knowledge Graph
Exporting Knowledge Graph
Auto-Generate Knowledge Graph
Knowledge Graph Analysis
Answer from Documents
Alert Tasks
Small Talk
Digital Skills
Overview
Digital Forms
Digital Views
Introduction
Widgets
Panels
Session and Context Variables
Context Object
Intent Discovery
Train
NLP Optimization
ML Engine
Overview
Model Validation
FM Engine
KG Engine
Traits Engine
Ranking and Resolver
Training Validations
NLP Configurations
NLP Guidelines
LLM and Generative AI
Introduction
LLM Integration
Kore.ai XO GPT Module
Prompts & Requests Library
Co-Pilot Features
Dynamic Conversations Features
Intelligence
Introduction
Event Handlers
Contextual Memory
Contextual Intents
Interruption Management
Multi-intent Detection
Amending Entities
Default Conversations
Conversation Driven Dialog Builder
Sentinment Management
Tone Analysis
Default Standard Responses
Ignore Words & Field Memory
Test & Debug
Overview
Talk to Bot
Utterance Testing
Batch Testing
Conversation Testing
Conversation Testing Overview
Create a Test Suite
Test Editor
Test Case Assertion
Test Case Execution Summary
Glossary
Health and Monitoring
NLP Health
Flow Health
Integrations
Actions
Actions Overview
Asana
Configure
Templates
Azure OpenAI
Configure
Templates
BambooHR
Configure
Templates
Bitly
Configure
Templates
Confluence
Configure
Templates
DHL
Configure
Templates
Freshdesk
Configure
Templates
Freshservice
Configure
Templates
Google Maps
Configure
Templates
Here
Configure
Templates
HubSpot
Configure
Templates
JIRA
Configure
Templates
Microsoft Graph
Configure
Templates
Open AI
Configure
Templates
Salesforce
Configure
Templates
ServiceNow
Configure
Templates
Stripe
Configure
Templates
Shopify
Configure
Templates
Twilio
Configure
Templates
Zendesk
Configure
Templates
Agents
Agent Transfer Overview
Custom (BotKit)
Drift
Genesys
Intercom
NiceInContact
NiceInContact(User Hub)
Salesforce
ServiceNow
Configure Tokyo and Lower versions
Configure Utah and Higher versions
Unblu
External NLU Adapters
Overview
Dialogflow Engine
Test and Debug
Deploy
Channels
Publishing
Versioning
Analyze
Introduction
Dashboard Filters
Overview Dashboard
Conversations Dashboard
Users Dashboard
Performance Dashboard
Custom Dashboards
Introduction
Custom Meta Tags
Create Custom Dashboard
Create Custom Dashboard Filters
LLM and Generative AI Logs
NLP Insights
Task Execution Logs
Conversations History
Conversation Flows
Conversation Insights
Feedback Analytics
Usage Metrics
Containment Metrics
Universal Bots
Introduction
Universal Bot Definition
Universal Bot Creation
Training a Universal Bot
Universal Bot Customizations
Enabling Languages
Store
Manage Assistant
Team Collaboration
Plan & Usage
Overview
Usage Plans
Templates
Support Plans
Invoices
Authorization
Conversation Sessions
Multilingual Virtual Assistants
Get Started
Supported Components & Features
Manage Languages
Manage Translation Services
Multiingual Virtual Assistant Behavior
Feedback Survey
Masking PII Details
Variables
Collections
IVR Settings
General Settings
Assistant Management
Manage Namespace
Data
Overview
Data Table
Table Views
App Definitions
Data as Service
HOW TOs
Build a Travel Planning Assistant
Travel Assistant Overview
Create a Travel Virtual Assistant
Design Conversation Skills
Create an ‘Update Booking’ Task
Create a Change Flight Task
Build a Knowledge Graph
Schedule a Smart Alert
Design Digital Skills
Configure Digital Forms
Configure Digital Views
Train the Assistant
Use Traits
Use Patterns
Manage Context Switching
Deploy the Assistant
Use Bot Functions
Use Content Variables
Use Global Variables
Use Web SDK
Build a Banking Assistant
Design Conversation Skills
Create a Sample Banking Assistant
Create a Transfer Funds Task
Create a Update Balance Task
Create a Knowledge Graph
Set Up a Smart Alert
Design Digital Skills
Configure Digital Forms
Configure Digital Views
Add Data to Data Tables
Update Data in Data Tables
Add Data from Digital Forms
Train the Assistant
Composite Entities
Use Traits
Use Patterns for Intents & Entities
Manage Context Switching
Deploy the Assistant
Configure an Agent Transfer
Use Assistant Functions
Use Content Variables
Use Global Variables
Intent Scoping using Group Node
Analyze the Assistant
Create a Custom Dashboard
Use Custom Meta Tags in Filters
Migrate External Bots
Google Dialogflow Bot
APIs & SDKs
API Reference
API Introduction
Rate Limits
API List
koreUtil Libraries
SDK Reference
SDK Introduction
Web SDK
How the Web SDK Works
SDK Security
SDK Registration
Web Socket Connect and RTM
Tutorials
Widget SDK Tutorial
Web SDK Tutorial
BotKit SDK
BotKit SDK Deployment Guide
Installing the BotKit SDK
Using the BotKit SDK
SDK Events
SDK Functions
Tutorials
BotKit - Blue Prism
BotKit - Flight Search Sample VA
BotKit - Agent Transfer
  1. Docs
  2. Virtual Assistants
  3. Channel Enablement
  4. Cisco Tropo 채널 추가

Cisco Tropo 채널 추가

중요: Tropo는 서비스 중단을 발표했습니다. 라이브 Tropo 계정이 있는 경우에만 채널 설정을 진행하세요. click here하여 Tropo 계정의 상태를 확인할 수 있습니다.

Kore.ai 봇에 Cisco Tropo 채널을 추가하는 것은 봇의 최종 사용자가 사용자의 Tropo 계정을 사용하여 상호 작용할 수 있도록 하는 3단계 과정입니다. 봇에 Cisco Tropo 채널을 추가하려면, 다음을 수행해야 합니다.

  1. Create a Tropo AppTropo에서 새 앱을 생성 및 설정 후 Kore.ai 봇 빌더에 Tropo 앱 데이터를 복사합니다.
  2. Access using API KeyTropo에 웹 API 상세 정보를 추가하고 Tropo에서 생성된 API 키를 봇 빌더 Cisco Tropo 채널 Access API Key 탭에 복사합니다.
  3. Enable the Channel – 봇 빌더에서 채널 설정을 저장합니다.

Cisco Tropo 채널을 봇에 추가하는 경우, 봇의 최종 사용자는 Tropo 클라이언트를 사용하여 봇과 상호작용할 수 있습니다. 이 절차를 완료하려면, Tropo 계정이 이미 있어야 하며 Tropo 팀의 회원이어야 합니다. Cisco Tropo 채널을 봇에 추가하려면 다음 단계를 따르세요.

  1. Bots 섹션 아래의 봇 빌더에서, Cisco Tropo 채널을 추가하려는 봇을 클릭하세요.
  2. Channels 탭에서, Cisco Tropo 섹션의 Expand 아이콘을 클릭합니다. Cisco Tropo 채널 페이지가 표시됩니다.
  3. 새 브라우저 탭에서, Tropo 계정에 로그인한 후 https://www.tropo.com/login/으로 이동합니다.
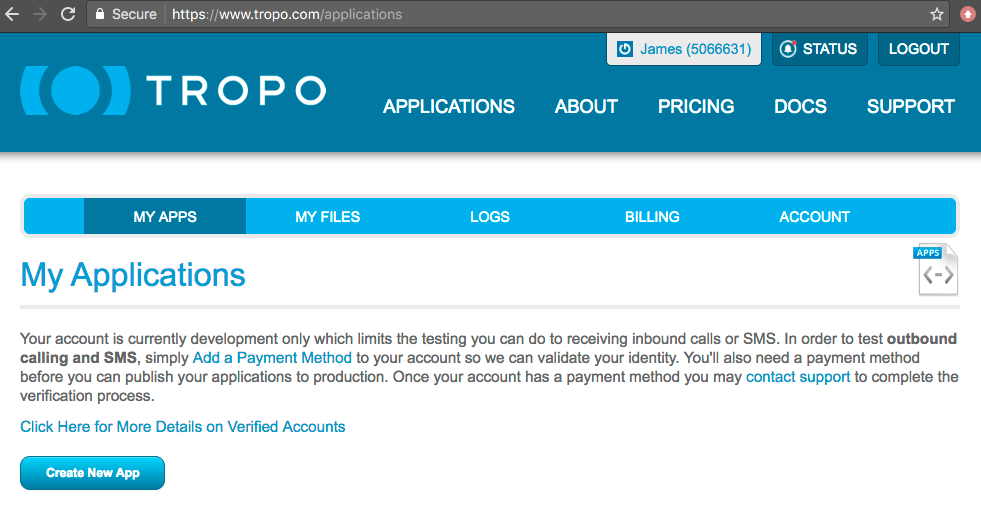
  4. My Apps 페이지에서, 다음 이미지에서 보이는 것과 같이 Create New App을 클릭합니다. Cisco Tropo 채널 - My Apps 페이지
  5. 봇 빌더에서 Create your new app 페이지에서 Basic Information 섹션 아래에 앱 이름을 입력합니다. 예:,내 Kore.ai 앱.
  6. Type of Application 섹션에서, Web (HTTP) API를 선택하고 Tropo의 Web (HTTP) API 필드의 Access API Key 탭에 봇 빌더 Cisco Tropo Channel 페이지 Callback URL을 복사합니다.
  7. TropoPhone Number 섹션에서, 첫 필드에서 국가를 선택하고 Standard를 선택합니다. 다음 필드의 Voice and SMS, 세 번째 필드의 phone number location을 선택적으로 변경합니다.
  8. Create App을 클릭합니다. <Your App Name> 페이지가 표시됩니다.
  9. TropoNumber 섹션의 Numbers를 복사합니다. 예를 들어, Create Tropo App 탭에서 봇 빌더의 Phone Number 필드에 307-555-1212를 입력하고 국가 코드를 선택합니다.
  10. TropoAPI Keys 섹션에서 messaging키를 봇 빌더의 API 키 필드에 복사하고 Next을 클릭합니다. Enable Channel 탭이 표시됩니다.
  11. Save를 클릭합니다.

Successfully added Cisco Tropo channel 메시지는 봇 빌더 Home 페이지의 상단에 표시됩니다. Tropo에서, Tropo 앱 디렉토리에 앱을 제출하는 것은 선택 사항입니다.

Cisco Tropo 채널 편집

Cisco Tropo 채널을 편집하려면 다음 단계를 따르세요.

  1. 수정하려면 채널로 마우스를 이동한 후 Settings 아이콘을 클릭하여 다음 이미지에 보이는 것과 같이 명령 메뉴를 표시합니다. Channels 탭 - Cisco Tropo - Edit 채널을 수정하려면 다음과 같은 명령 중 하나를 선택하세요.
  • Edit – 클릭하여 Cisco Tropo Channel 설정 페이지를 엽니다.
  • Disable/EnableDisable을 클릭하여 봇의 Cisco Tropo 채널 사용을 일시적으로 Enable하세요 채널이 사용 안 함으로 설정된 경우, Cisco Tropo 채널 사용을 활성화하려면, 사용함을 클릭하세요.
  • DeleteDelete를 클릭하세요. Delete Confirmation 대화 상자에서, OK을 클릭하여 봇 채널 설정을 영구적으로 삭제합니다.

    경고: 이 작업은 영구적이므로 취소할 수 없습니다.

메뉴