OVERVIEW
Virtual Assistants
Kore.ai Platform
Key Concepts
Natural Language Processing (NLP)
Accessing Platform
VIRTUAL ASSISTANTS
Virtual Assistant Builder
Virtual Assistant Types
Getting Started
Creating a Simple Bot
SKILLS
Storyboard
Dialog Task
Introduction
Dialog Builder (New)
Dialog Builder (Legacy)
User Intent Node
Dialog Node
Entity Node
Supported Entity Types
Composite Entities
Supported Colors
Supported Company Names
Form Node
Logic Node
Message Nodes
Confirmation Nodes
Bot Action Node
Service Node
Custom Authentication
2-way SSL for Service nodes
Script Node
Agent Transfer Node
WebHook Node
Grouping Nodes
Connections & Transitions
Manage Dialogs
User Prompts
Knowledge Graph
Terminology
Building
Generation
Importing and Exporting
Analysis
Knowledge Extraction
Build
Alert Tasks
Introduction
Ignore Words and Field Memory
How to Schedule a Smart Alert
Small Talk
Digital Views
Overview
Configuring Digital Views
Digital Forms
Overview
How to Configure Digital Forms
NATURAL LANGUAGE
Overview
Machine Learning
Introduction
Model Validation
Fundamental Meaning
Introduction
NLP Guidelines
Knowledge Graph
Traits
Introduction
How to Use Traits
Ranking and Resolver
Advanced NLP Configurations
INTELLIGENCE
Overview
Context Management
Overview
Session and Context Variables
Context Object
How to Manage Context Switching
Manage Interruptions
Dialog Management
Sub-Intents & Follow-up Intents
Amend Entity
Multi-Intent Detection
Sentiment Management
Tone Analysis
Sentiment Management
Event Based Bot Actions
Default Conversations
Default Standard Responses
TEST & DEBUG
Talk to Bot
Utterance Testing
Batch Testing
Record Conversations
CHANNELS
PUBLISH
ANALYZE
Overview
Dashboard
Custom Dashboard
Overview
How to Create Custom Dashboard
Conversation Flows
NLP Metrics
ADVANCED TOPICS
Universal Bots
Overview
Defining
Creating
Training
Customizing
Enabling Languages
Store
Smart Bots
Defining
koreUtil Libraries
SETTINGS
Authorization
Language Management
PII Settings
Variables
Functions
IVR Integration
General Settings
Management
Import & Export
Delete
Versioning
Collaborative Development
Plan Management
API GUIDE
API Overview
API List
API Collection
SDKs
SDK Overview
SDK Security
SDK App Registration
Web SDK Tutorial
Message Formatting and Templates
Mobile SDK Push Notification
Widget SDK Tutorial
Widget SDK – Message Formatting and Templates
Web Socket Connect & RTM
Using the BotKit SDK
Installing
Configuring
Events
Functions
BotKit SDK Tutorial – Agent Transfer
BotKit SDK Tutorial – Flight Search Sample Bot
Using an External NLP Engine
ADMINISTRATION
HOW TOs
Creating a Simple Bot
Creating a Banking Bot
Context Switching
Using Traits
Schedule a Smart Alert
Configure UI Forms
Add Form Data into Data Tables
Configuring Digital Views
Add Data to Data Tables
Update Data in Data Tables
Custom Dashboard
Custom Tags to filter Bot Metrics
Patterns for Intents & Entities
Build Knowledge Graph
Global Variables
Content Variables
Using Bot Functions
Configure Agent Transfer
Update Balance Task
Transfer Funds Task
RELEASE NOTES
  1. Home
  2. Docs
  3. Virtual Assistants
  4. How Tos
  5. How to use Content Variables

How to use Content Variables

Kore.ai bots platform provides a way to declare and use variables within the bot. These variables can be used to capture values that are commonly used by different tasks, nodes, and other bot elements

In this How-To, we will explore a scenario in a Banking Bot, where Bot Variables can be used. We will see how Content Variables can be used to pass language-specific messages.

For details on what Bot Variables are and how they are implemented in the Kore.ai Bots platform, refer here. For a use case with Global Variables, refer here.

Problem Statement

In our Banking Bot, we welcome users when they connect to the Bot. The bot is multilingual and we want the messages to be in the appropriate user language.

In this document, we will see how Content Variable can be used to store the message in multiple languages.

Pre-requisites

  • Bot building knowledge
  • A Banking Bot with the on Connect event configured as below:
    • Select the Build tab from the top menu
    • From Intelligence select Events
    • Click the On Connect event and configure to Show Message

  • Enable the Spanish language for the bot
    • From Configurations, select Language
    • Click Add Language and Configure the Spanish language

Implementation

Declaring a Content Variable to hold the On Connect message will ensure it is not missed in the language translation.

  1. Open the Banking Bot.
  2. Select the Build tab from the top menu
  3. From Configurations select Content Variables section.
  4. Click Add Variable to open the corresponding window.
  5. Enter Variable Name and Variable Value. For this use case, were are calling the Variable connectMessage, and for the value, we are entering the “Welcome to the Banking Portal – your one-stop for all banking needs”.
  6. Save.
  7. Now switch the language to Spanish and for the same connectMessage variable using the edit icon enter the text in Spanish – “Bienvenido al portal bancario: su única parada para todas las necesidades bancarias“.
  8. Return to the On Connect Event Handler and replace the text with reference to the content variable using the following code:
    {{content.connectMessage}}
  9. Save the changes.

Testing

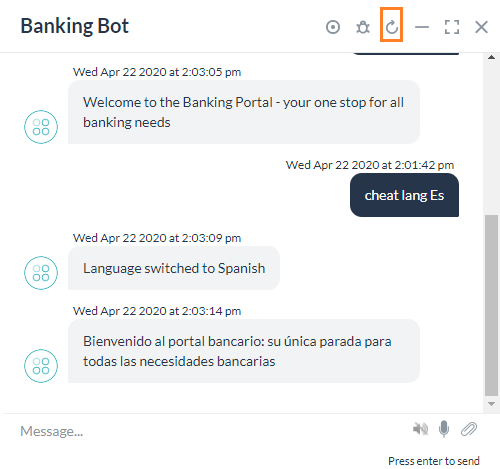
Use Talk to Bot to test the changes.

  1. Open Talk to Bot.
  2. The message will appear in English.
  3. Use the cheat command to switch the language:
    cheat lang Es.
  4. Reconnect to the bot and see the message in Spanish.
Menu