
This feature was released with v7.3 of the platform and is in ![]() (beta) state.
(beta) state.
Kore.ai takes care of your data needs, without having to depend on external services for it. Data offering lets you define Data Tables, Table Views, and manipulate them from your Virtual Assistant.
Data Tables allow you to persist custom data and retrieve it whenever needed. These can be used as data points collection for ‘feedback’ or ‘survey’ tasks, collecting user inputs that can be retrieved at a later point, etc.
Highlights
- Create custom Data Tables for any business needs
- Joining two or more tables to create custom Data Views.
- Support for secure fields, indexing, and references.
- Built-in integration with bot builder’s Service Node of Dialog Tasks for all read, write, update requirements.
- APIs to read, write, update, and delete data.
- Ability to scope tables and views to specific bots and apps.
In this document, we discuss the features and implementation of Data Tables in the Kore.ai Bots platform. To jump to a use case example for a step-by-step implementation of Data Tables click here.
Overview
Data Table offering on Kore.ai Bots platform is split into two parts:
- Data Definition which includes:
- Defining Data Tables and Views.
- Granting access to the bots for manipulating data from these Tables and Views.
- Defining Apps for securely exporting and importing definitions and for querying the data from views or data tables.
- Data Manipulation which allows performing CRUD operations on data from any of the data tables either:
- from Bot using service node within a dialog task, or
- by making API calls.
In the document, we will be elaborating on each of these aspects. A brief knowledge of RDBMS is essential for working with this feature. You can refer to the glossary, listed below, to refresh your concepts.
Data Definition
For Data Definition, you need to access the Data tab of the Bot Builder Landing Page.
From here you can:
- Create Data Tables;
- Define Table Views; and
- Create Apps for access.
![]()
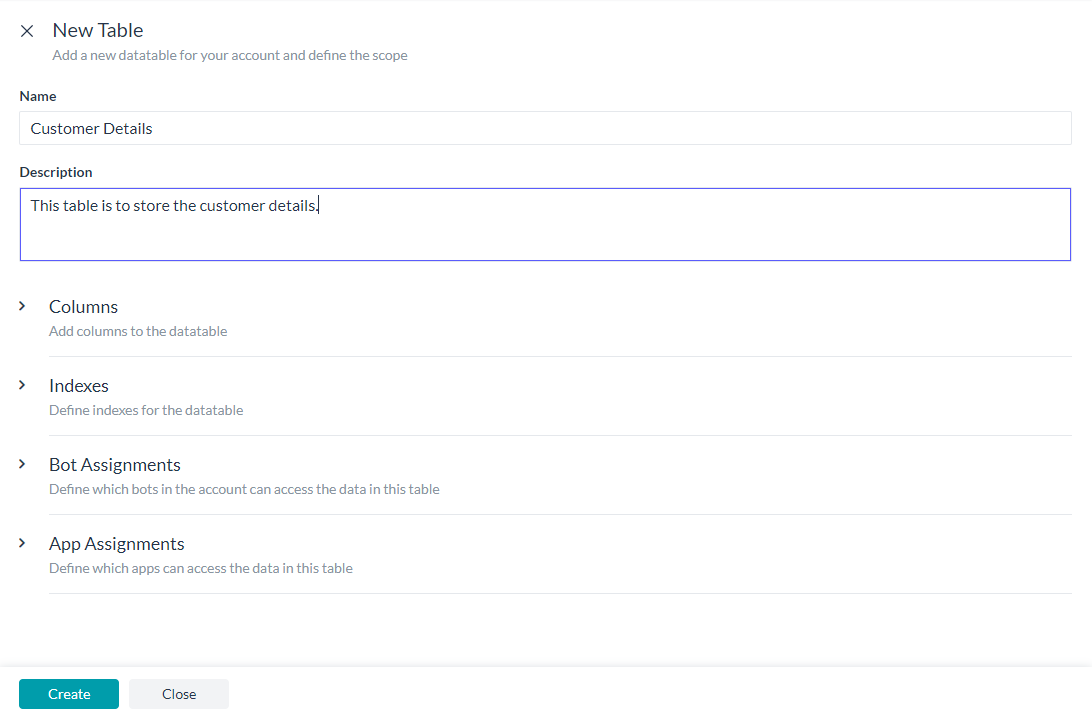
Data table creation
Create Data Table would open New Table page where you have to enter the following details:
- Name of the Data Table;
- Description of the Data Table;
- Columns to be included in the Table;
- Indexes for the Table;
- Bot Assignment for accessing the data in this table;
- App Assignment for accessing the data in this table.
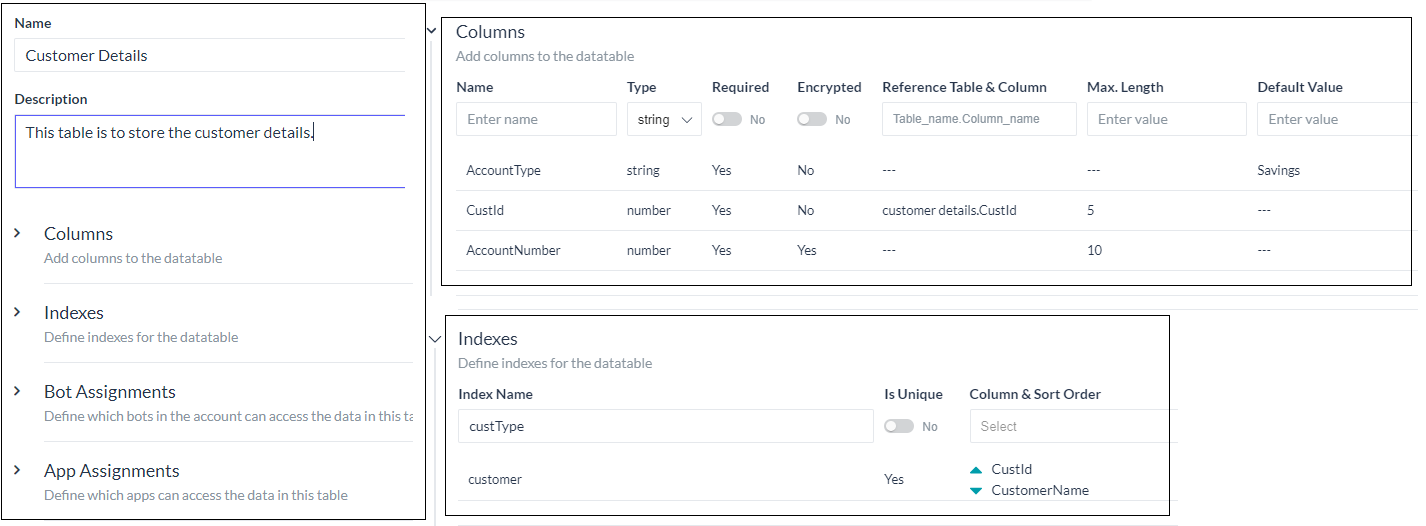
Column Addition
The second step in defining a Data Table would be to add columns that make up the table. Column definition includes:

- Name of the column (see here for reserve words which cannot be used as the name of a column);
- Type of the data that can be stored in this column. It can be:
- string;
- date; or
- number.
- Required flag to mark the column as mandatory.
- Encrypted flag to secure the data in this column.
- Reference Column to create a dependency with a column from another table ie to add a foreign key constraint. This would ensure that the value entered for this column exists in the referenced table column.
- Max Length to limit the maximum length for the column values.
- Default Values to be taken in case the value is missing while adding a row.
By default the following columns would be defined by the platform:
- sys_Id: A platform generated unique identifier for each row in the table.
- Created_On: Timestamp when this table was created;
- Updated_On: Timestamp when this table was updated;
- Created_By: User id of the developer who created this table;
- Updated_By: User id of the developer who last updated this table.
Index Definition
For an improved performance during Data search and retrieval, you can define Indices for your Data Table.
This includes:
- Index Name for reference;
- Is Unique flag to define if the index is expected to contain unique values;
- Column & Sort Order – List of columns to be included in the index; you can select multiple columns and specify the sort order (ascending or descending) for each of the selected columns.

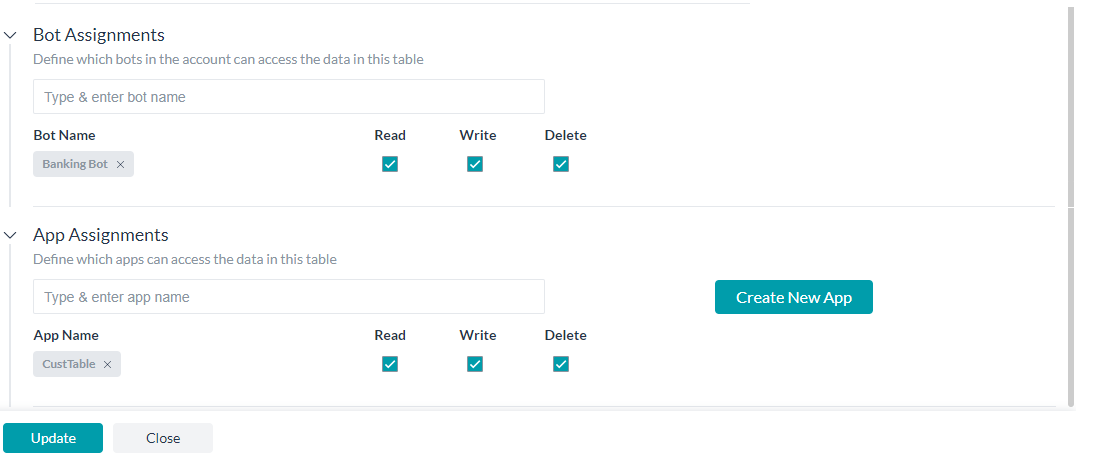
Assignments
You can define the assignments for each of the data tables as follows:
- Assign bots:
- Assign bots with Read, Write, and Delete permissions. You can select the bots from the list presented, these will be the list of bots owned by you and shared with you.
- Only the assigned bots will be allowed to access the data from the data table using the Service Nodes in the Dialog Tasks of that bot.
- Assign apps:
- Assign apps with Read, Write, and Delete permissions.
- You can select from the list or create a new app.
- The data table CRUD APIs will be restricted to access only the tables that are assigned to the app.
Import & Export
Data Table definition can be exported and imported as JSON format files.
To Export:
- Hover over the table definition that you want to Export
- Click the more (ellipses) icon and select Export Definition
- JSON file would be generated and downloaded.

To Import:
- Click the down arrow next to the New Table button.
- Select the Import Table Definition option.
- Enter a Table Name and select the JSON file containing the table definition.
- Click Import.

Sample Data Definition JSON file
{"name":"customertable",
 "description":"Table containing customer details",
 "indexes":[],
 "schemaDef":[{"name":"CustEmail",
               "type":"string",
               "isRequired":false,
               "isEncrypted":false,
               "reference":{},
               "maxLength":"",
               "default":""},
	      {"name":"CustType",
               "type":"string",
               "isRequired":false,
               "isEncrypted":false,
               "reference":{},
               "maxLength":"",
               "default":"Preferred"},
	      {"name":"Address",
               "type":"string",
               "isRequired":false,
               "isEncrypted":false,
               "reference":{},
               "maxLength":"",
               "default":""},
	      {"name":"CustName",
               "type":"string",
               "isRequired":true,
               "isEncrypted":false,
               "reference":{},
               "maxLength":"",
               "default":""},
	      {"name":"CustId",
               "type":"number",
               "isRequired":true,
               "isEncrypted":true,
               "reference":{},
               "maxLength":"5",
               "default":""},
	      {"name":"sys_Id","type":"string","isRequired":true,"readOnly":true},
	      {"name":"Created_On","type":"date","isRequired":true,"readOnly":true},
	      {"name":"Updated_On","type":"date","isRequired":true,"readOnly":true},
	      {"name":"Created_By","type":"string","isRequired":true,"readOnly":true},
	      {"name":"Updated_By","type":"string","isRequired":true,"readOnly":true}]}
Table View Definitions
Table Views let you create custom datasets by joining one or more Data Tables. These definitions get converted to queries to extract data from one or more data tables by using the required joins.
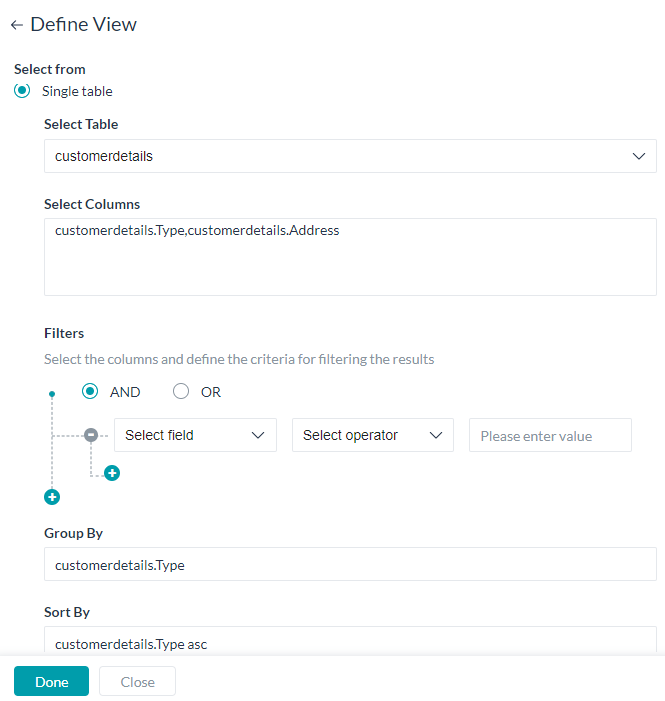
View definition includes:
- Name for the view.
- Description of the view
- Assignment of Bot and Apps to access the View

- A View can be built from a Single Table or Multiple Tables.
- For both types, you need to
- select the table;
- select the columns to be included in the view, you can use aggregation functions like
sum, avg, min, max and count. Usage example:count(<table_name>.<column_name>) - the criteria for filtering the results using
- column name – select from the drop-down list;
- comparison operator – select from =, !=, < or >
- comparison value
- you can have multiple filter criteria connected by AND/OR operators
- the Group By columns for arranging the identical data into groups as
<table_name>.<column_name>, and - the Sort By columns to order the results as
<table_name>.<column_name> asc/desc
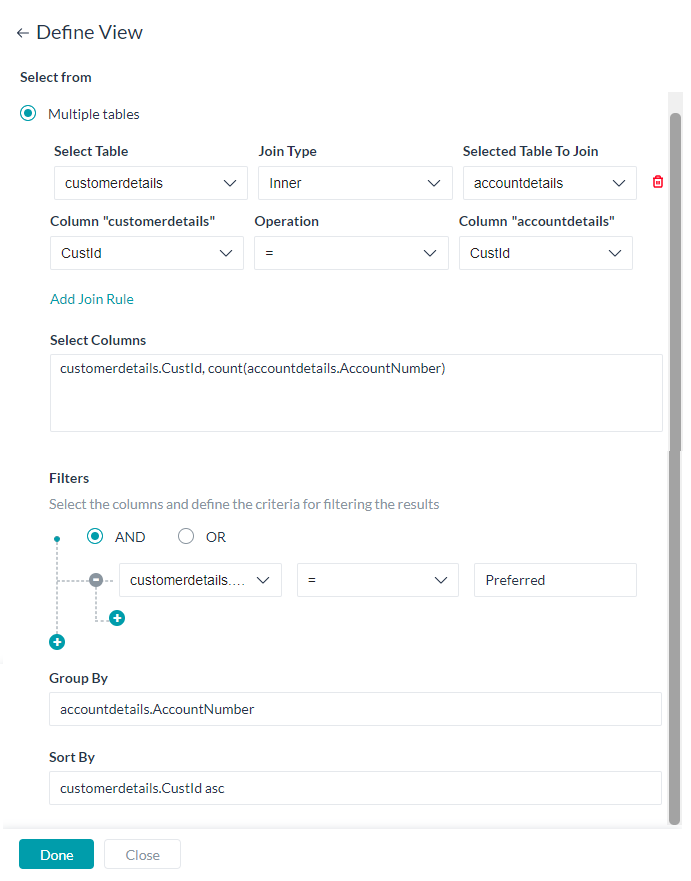
- In addition, for multiple tables view, you need to specify the Join criteria by configuring
- Table to be joined;
- the type of join– inner, right outer or left outer;
- the join columns – pick from the drop-down list and
- specify the join criteria using the operation =, !=, > or < operators.
- You can have multiple Join Rules. You can have up to 4 join rules.
- For both types, you need to
App Definition
You can define apps to securely access the data from data tables and data views. These apps can be used for:
- Accessing the data tables and views over public APIs;
- Accessing the export and import API for the definition of data table and views.
App definition includes entering the App Name

Data Manipulation
You can add, update, and delete the data present in the data tables in the following ways:
- Bot Definition – Service call;
- Public API Access.
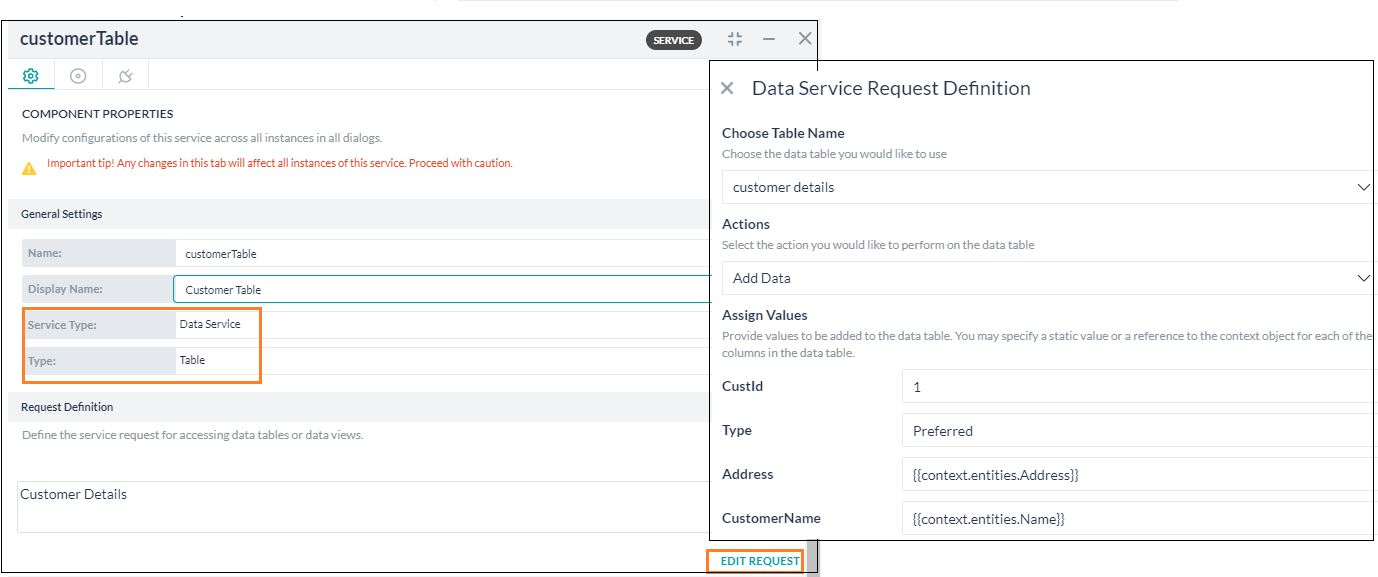
Service Call – Table
From the assigned bots for any given data table/table view, you can query and manipulate the data using the Service Node in the Dialog Tasks.
Steps to configure the Service node:
- Open the Bot and the Dialog Task where you want to access the data.
- Add a Service Node at the appropriate location in the process flow.
- Click here for details on Service Node. Here we will be listing the configurations for Data Table integration.
- Component Properties configuration
- General Settings section
- Name – enter a name for the node;
- Display Name – enter a display name for the node;
- Service Type – choose Data Service;
- Type – select Table.
- General Settings section
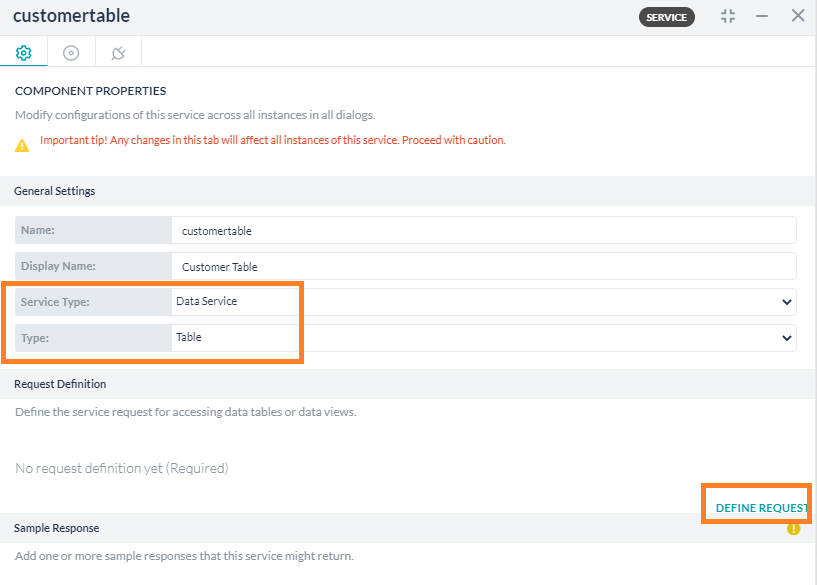
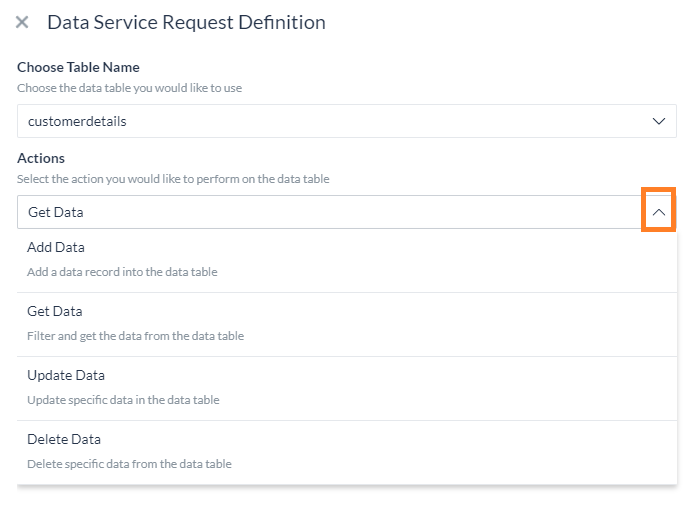
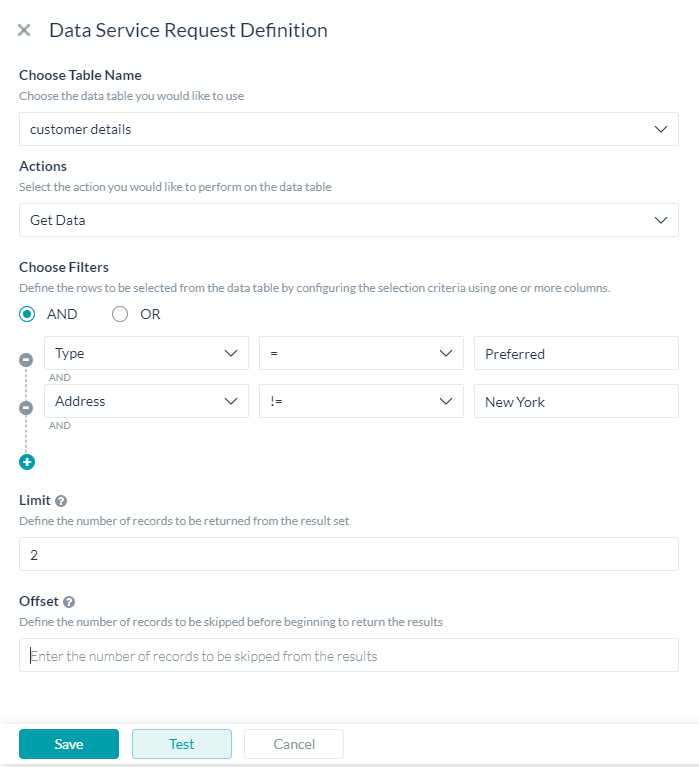
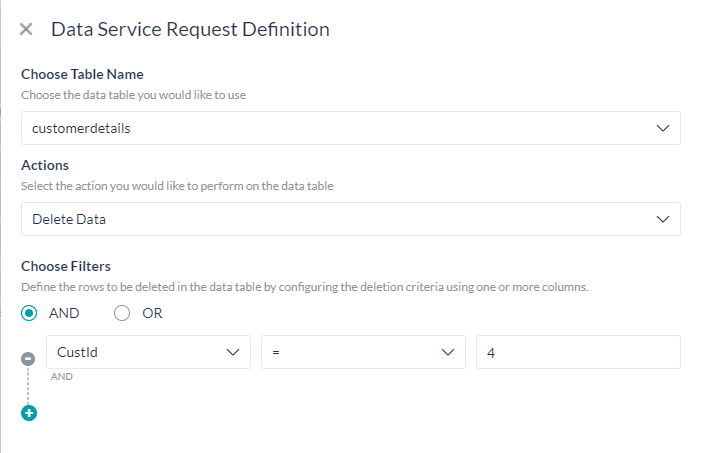
Request Definition – define the service request by clicking the Define Request link. In the slide-out page configure the following:
- Choose a Data Table – You can choose from the list, these are the data tables assigned to this bot.
- Actions – Select the action you would like to perform:
- Add Data – to add data (see below for details);
- Get Data – to fetch data from the table (see below for details;
- Update Data – to modify existing data (see below for details);
- Delete data – to delete rows from the data table (see below for details).
- You can Test the service request. Remember testing with context reference will fail as they will be evaluated at run time and the data will not be available till then.
- Save the service request definition
- You can set the Instance and Connections properties as per your bot requirements.
- The data returned from the data table can be accessed from the context object and used in your task as per your need.
Add Data
To add data, you need to:
- provide values for each column in the data table;
- these values can be static or a reference to a context object for example
{{context.entities.<entity-name>}}

- The response from this call would be:
  "stringTable": {
    "response": {
      "body": {
        "CustId": 1,
        "Type": "Preferred",
        "Address": "New York",
        "CustomerName": "John Smith",
        "Updated_On": 1593687904111,
        "Created_On": 1593687904111,
        "Updated_By": "st-b1376ff2-1111-1111-aa34-973ef73212f5",
        "Created_By": "st-b1376ff2-1111-1111-aa34-973ef73212f5",
        "sys_Id": "sys-5c46e351-ee51-5c27-80cf-c6c1e8f8f066",
        "_id": "5efdbf602de5bb5f3f54f728"
      }
    }
  }
Get Data
To filter and fetch data from the table, you can:
- Choose Filters to define filter criteria using:
- the column names – pick from the drop-down list;
- an operator – choose from the list;
- comparison value – these values can be static or a reference to a context object for example
{{context.entities.<entity-name>}}. - Multiple filter criteria can be defined using AND/OR connectors.
- In the absence of filter criteria, all rows are fetched limited by the limit and offset values mentioned below.
- Limit property can be used to set a limit on the number of records to be fetched. If not specified then 10 records would be fetched by default;
- Offset property can be used to specify the records to be skipped from the result data set.
- Data values can be accessed using:
{{context.<service_node_name>.response.body.queryResult[<index>].<column_name>}} - The response from this service call would be:
"customerdetails": {
    "response": {
      "body": {
	"hasMore": true,
	"total": 4,
	"metaInfo": [
          {
            "name": "City",
            "type": "string"
          },
          {
            "name": "Name",
            "type": "string"
          },
          {
            "name": "sys_Id",
            "type": "string"
          },
          {
            "name": "Created_On",
            "type": "date"
          },
          {
            "name": "Updated_On",
            "type": "date"
          },
          {
            "name": "Created_By",
            "type": "string"
          },
          {
            "name": "Updated_By",
            "type": "string"
          }
        ],
        "queryResult": [
          {
            "CustId": 1,
            "Type": "Preferred",
            "Address": "New York",
            "CustomerName": "John Smith",
            "sys_Id": "sys-b088ab59-7640-5a8f-8999-61a265dd2bee",
            "Created_On": 1593152119161,
            "Updated_On": 1593152119161,
            "Created_By": "st-b1376ff2-2384-5541-aa34-973ef73212f5",
            "Updated_By": "st-b1376ff2-2384-5541-aa34-973ef73212f5"
          },
          {
            "CustId": 2,
            "Type": "Privileged",
            "Address": "Chicago",
            "CustomerName": "Jane Doe",
            "sys_Id": "sys-632c69ef-f6dd-5d83-ab32-f7837c8b63f9",
            "Created_On": 1593152443035,
            "Updated_On": 1593152443035,
            "Created_By": "st-b1376ff2-2384-5541-aa34-973ef73212f5",
            "Updated_By": "st-b1376ff2-2384-5541-aa34-973ef73212f5"
          }
	 ]
      }
    }
  }
Update Data
To modify existing you can:
- Assign Values against each column to be updated.
If any value is left blank, then the corresponding column original values will NOT be retained but will be set as empty. - These values can be static or a reference to a context object.
- Choose Filters to define the filter criteria to specify the rows to be updated using
- the column names,
- an operator and
- filter value – these values can be static or a reference to a context object for example
{{context.entities.<entity-name>}}. - Multiple filter criteria can be defined using AND/OR connectors.

- The response from this service call would be:
  "customerdetails": {
    "response": {
      "body": {
        "records": []
      }
    }
  }
Delete data
To delete rows from the data table you need
- to define filter criteria to specify the rows to be deleted using
- the column names,
- an operator and
- filter value, these values can be static or a reference to a context object for example
{{context.entities.<entity-name>}}. Multiple filter criteria can be defined using AND/OR connectors.
- The response from this service request would be:
  "customerdetails": {
    "response": {
      "body": {
        "nDeleted": 1
      }
    }
  }
Service Call – View
From the assigned bots for any given data table/table view, you can query and manipulate the data using the Service Node in the Dialog Tasks.
Steps to configure the Service node:
- Open the Bot and the Dialog Task where you want to access the data.
- Add a Service Node at the appropriate location in the process flow.
- Click here for details on Service Node. Here we will be listing the configurations for Data Table integration.
- Component Properties configuration
- General Settings section
- Name – enter a name for the node;
- Display Name – enter a display name for the node;
- Service Type – choose Data Service;
- Type – select View.
- Request Definition – define the service request by clicking the Define Request link.
- In the slide-out page configure the following:
- Choose a Table View – You can choose from the list, these are the table views assigned to this bot.
- Filter the results – you can further define filter criteria using
- the column names,
- an operator and
- filter value – these values can be static or a reference to a context object for example
{{context.entities.<entity-name>}}.
- Multiple filter criteria can be defined using AND/OR connectors.
- In the absence of filter criteria, all rows are fetched limited by the limit and offset values mentioned below.
- You can set a limit on the number of records fetched and
- You can choose to skip a few records from the result data set by specifying the offset value.
- You can Test the service request. Remember testing with context reference will fail as they will be evaluated at run time and the data will not be available till then.
- Save the service request definition
- General Settings section
- You can set the Instance and Connections properties as per your bot requirements.
- The data returned from the data table can be accessed from the context object and used in your task as per your need, using:
{{context.<service_node_name>.response.body.queryResult[<index>].<column_name>}} - The response from this service call would be:
  "CustomerView": {
    "response": {
      "body": {
        "hasMore": true,
        "total": 4,
        "metaInfo": [
          {
            "name": "type",
            "type": "string"
          },
          {
            "name": "address",
            "type": "string"
          }
        ],
        "queryResult": [
          {
            "type": "Gold",
            "address": "New York"
          },
          {
            "type": "Gold",
            "address": "Chicago"
          },
          {
            "type": "Gold",
            "address": "Chicago"
          }
        ]
      }
    }
  }
API Access
APIs to access the data in the data tables and data views are as follows:
- Data Insert API – See here for more
- Data Update API – See here for more
- Data Delete API – See here for more
- Query Data from Table – See here for more
- Query Data from View – See here for more
Reserve Words
Following is the list of words that are reserved and cannot be used as the names for a column:
- ACCESS
- ADD
- ALL
- ALTER
- AND
- ANY
- AS
- ASC
- AUDIT
- BETWEEN
- BY
- CHAR\
- CHECK
- CLUSTER
- COLUMN
- COMMENT
- COMPRESS
- CONNECT
- CREATE
- CURRENT
- DATE
- DECIMAL
- DEFAULT
- DELETE
- DESC
- DISTINCT
- DROP
- ELSE
- EXCLUSIVE
- EXISTS
- FILE
- FLOAT
- FOR
- FROM
- GRANT
- GROUP
- HAVING
- IDENTIFIED
- IMMEDIATE
- IN
- INCREMENT
- INDEX
- INITIAL
- INSERT
- INTEGER
- INTERSECT
- INTO
- IS
- LEVEL
- LIKE
- LOCK
- LONG
- MAXEXTENTS
- MINUS
- MLSLABEL
- MODE
- MODIFY
- NOAUDIT
- NOCOMPRESS
- NOT
- NOWAIT
- NULL
- NUMBER
- OF
- ONLINE
- ON
- OFFLINE
- OPTION
- ON
- ORDER
- PCTFREE
- PRIOR
- PRIVILEGES
- PUBLIC
- RAW
- RENAME
- RESOURCE
- REVOKE
- ROW
- ROWID
- RONUM
- ROWS
- SELECT
- SESSION
- SET
- SHARE
- SIZE
- SMALLINT
- START
- SUCCESSFUL
- SYNONYM
- SYSDATE
- TABLE
- THEN
- TO
- TRIGGER
- UID
- UNION
- UNIQUE
- UPDATE
- USER
- VALIDATE
- VALUES
- VARCHAR
- VARCHAR2
- VIEW
- WHENEVER
- WHERE
- WITH
Glossary
Following are the terms and their definitions as used by the platform
| Term | Definition |
|---|---|
| Data Definition | Data Definition deals with defining how the data gets stored in terms of tables, columns, views, etc.. |
| Data Manipulation | Data Manipulation refers to the basic CRUD operations that can be performed against the date ie. retrieve, update, and delete the data. |
| Data Table | Data storage wherein the data can be accessed in a tabular form, with rows and/or columns named. |
| Columns | The column name refers to the individual field value that is stored in the table. |
| Reference Table and Column | This represents the domain for the columns that reference it, ie the values of the referenced column should be contained in the reference table column. |
| Index | An index is a pointer to data in a table and is used to speed up data retrieval. Assing a column which you think best identifies a row in the table. |
| Table View | A virtual table which can be used to access a subset of information from a single table or combine data from two or more table, using joins. |
| Filter Criteria | When defining views, this property can be used to define the resultant data set, ie. the rows to be included in the view based on the values in specified columns. |
| Group By | When defining views, this property can be used to arrange identical data into groups from the resultant data set. |
| Sort By | When defining views, this property can be used to arrange the rows in the resultant data set based on the specified columns. |
| Join | When defining views, join can be used to fetch data from two or more tables and joined to appear as single set of data. |
| Inner Join | This is a simple join in which the result is based on matched data from the two tables as per the equality condition . |
| Right Outer Join | The right outer join returns a result set with the matched data from the two tables and then the remaining rows of the right table and null from the corresponding left table’s columns. |
| Left Outer Join | The left outer join returns a result set with the matched data from the two tables and then the remaining rows of the left table and null from the corresponding right table’s columns. |