Personally identifiable information (PII), or sensitive personal information (SPI), refers to information that can be used on its own or with other information to identify, contact, or locate a single person, or to identify an individual in context. Some examples of PII include Social Security Number, email address, credit card numbers, passport number, home address, and so forth.
Kore.ai allows you to redact any sensitive information that users share with your bots. When you enable redaction for an information type, you can transform its value into a pattern that doesn’t contain comprehensible data. Any end user input that matches the PII pattern gets redacted by the platform in the context object, chat logs and all other places.
There are a few scenarios where the original value can be used to achieve the business needs.
-
- If a PII value is used in Dialog Task transitions, the platform automatically uses the original value for the transition condition evaluation.
- If a PII value is used in the Service Node definition, the platform uses the redacted value by default to make the service calls. You can choose to send the original data using the ‘De-identification of PII data’ configuration of the Service Node. Refer to the Service Node post for more details
- You may use the Redaction of PII Data configuration of the Entity Nodes to present the original values of an redacted entity value to the users. Refer to the Entity Node post for more details.
The platform provides the following three modes to redact specified information types:
| Option | Description | Example |
|---|---|---|
| Redaction | Replaces the data with a unique random alphanumeric value | An email address entered gets replaced with a random value such as jjh4ezb2 |
| Replacement | Replaces the data with a static value that you enter in the PII Redaction settings. | If the static value entered is asdf1234, any email address entered is replaced with asdf1234 |
| Mask with Character | Replaces the first few and last few characters of the data with ‘+’ or ‘#’ symbols. You can select the number of characters to mask as well as the symbol for masking. | If you configure the first four and last four characters to be masked with ‘+’, an email address such as helpdocs@kore.ai gets redacted as ++++docs@kor++++ |
How to Redact
-
-
- Open the bot for which you want to configure the PII settings.
- Select the Build tab from the top menu.
- From the left menu, click Configuration -> PII Settings.
- The PII Redaction page opens.
- If PII Redaction isn’t enabled for the bot, toggle the switch to Yes. The page now shows a list of information types whose redaction settings are configured by default.
- To activate the redaction of any of these out-of-the-box information types, toggle the switch next to them to Enable. To edit their redaction settings, click their name.
- To configure redaction settings for any other information types, click Add New on the top-right side of the PII Redaction page.
-

Configuration Fields
| Field | Description |
|---|---|
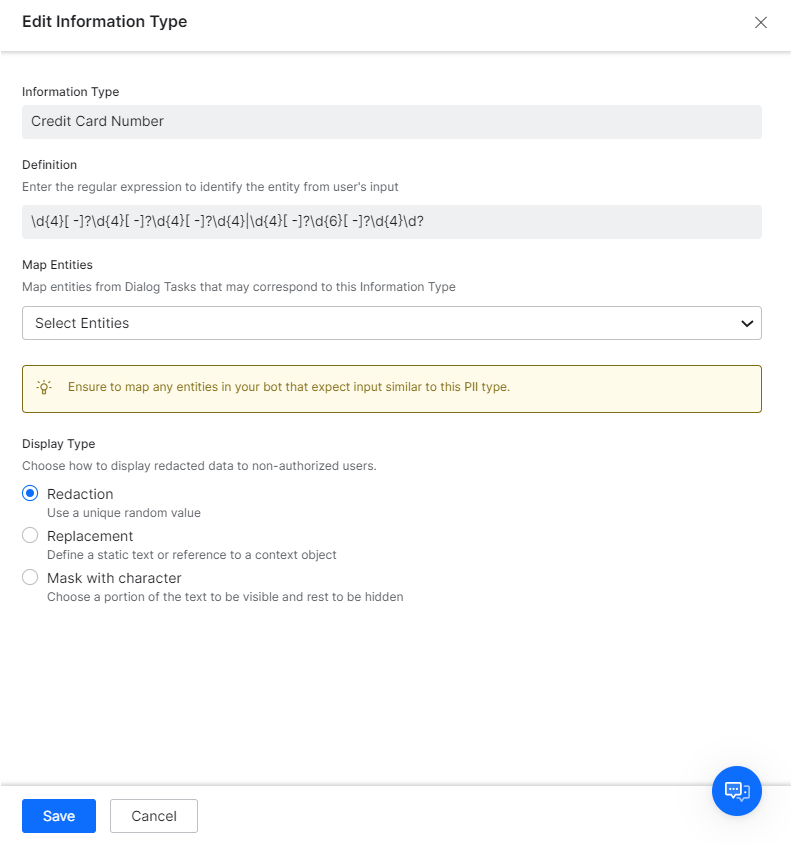
| Information Type | Enter a name for the information type you want to secure, for example, Credit Card Number. |
| Definition | Enter a regular expression for recognizing the information type from user entries. For example, a regex value for a Visa credit card could be similar to ^4[0-9]{12}(?:[0-9]{3})?$ |
| Map Entities | Map all the entities in the bot’s Dialog tasks that correspond to the information type. Note: If you do not map entities corresponding to redacted information types, even valid user entries for those entities cause errors in the dialog tasks. For example, let’s say you have enabled redaction for email information type. When a user enters an email address for a bot entity, the platform immediately redacts the information even before the entity node captures it, as emails are set up for redaction. The entity node then receives redacted data, and since the entity is not mapped in the redaction settings, it assumes the redacted value as an invalid email entry. Whereas, if you map the entity in the redaction settings, the entity recognizes the data redacted and accepts it. |
| Display Type | Select one of these modes to display the redacted data anywhere in the platform: Redaction, Replacement, Mask with Character.
Note: The value displayed would be prefixed with a platform generated random unique identifier. This is the key used internally to retrieve the original value in case of conditional transitions etc.. |
Configure Contextual Sensitive Data
The Kore.ai XO platform allows you to secure sensitive data input during the conversation. Enabling the redaction of sensitive data and utilizing custom regex patterns to identify and secure sensitive information is an effective approach.
You can enable the Sensitive Entity settings at the Entity Node to secure any sensitive user input. For example, PIN or OTP, usually, these are 4 to 6-digit numbers. Due to their sensitivity, these values must not be stored in plain text as part of the conversation logs and chat history because PINs or OTPs must be secured with the necessary privacy measures. Redacting or masking these values at the entity node level helps prevent them from being stored in plain text in conversation logs or chat history, reducing the risk of unauthorized access or misuse.
Use of custom regex patterns to define sensitive data allows the Virtual Assistant to identify and handle sensitive information appropriately based on the conversation context. This approach helps strike a balance between maintaining conversational functionality and safeguarding sensitive data.
Sensitive Data Use Case Scenarios
Scenario 1: The string patterns for sensitive data conflict or overlap in different contexts. For example, a password is 6~8 digits, and the phone number (TPN) is 9 to 12 digits long. In TPN cases, it’s very likely that the user misses typing a digit or two. However, due to the password PII pattern of 6~8 digits, the TPN gets masked as if it’s a password, and TPN entity recognition fails. In this scenario, you can enable the Sensitive Entity setting to redact and replace contextually sensitive data.
Scenario 2: A customer tries to change the password by interacting with the virtual assistant. Passwords being sensitive, you must secure them at all places. However, defining a PII pattern for passwords will potentially mask/redact any other input that matches the pattern.
The use of the Sensitive Entity (contextual) and the Personally Identifiable Information (PII) feature serve different purposes in handling sensitive data within the Kore.ai XO platform.
- Personally Identifiable Information: Allows you to identify and redact or mask sensitive data that falls under common PII categories, such as social security numbers, email addresses, or credit card numbers. It provides a broad, predefined set of sensitive data patterns that can be automatically detected and handled uniformly across the entire conversation.
- Sensitive Entity: Provides more fine-grained control and customization of redaction or replacement actions based on specific sensitive data contextual conditions. The Sensitive Entity option enables you to define rules or conditions that are specific to your use case, where the same sensitive data pattern might have different meanings or handling requirements depending on the context.
The need for sensitive nodes arises when you have overlapping or conflicting string patterns for sensitive data that require different treatment in different contexts. By configuring sensitive nodes, you can ensure that the platform correctly recognizes and handles sensitive data even when it matches multiple patterns.
For example, consider the scenario mentioned earlier, where a phone number (TPN) could be mistaken for a password due to overlapping string patterns. By using the sensitive entity option, you can define a context-specific rule that identifies TPNs and applies the appropriate redaction or replacement action, even if the same pattern matches a password in a different context.
The Sensitive Entity option provides flexibility in managing the handling of sensitive data within specific conversation flows, allowing you to tailor the behavior according to the requirements of your use case.
Both the PII and Sensitive Entity complement each other in providing comprehensive protection for sensitive data. While the PII feature offers broad coverage for common PII patterns, sensitive nodes enable you to handle sensitive data in a more granular and contextually aware manner, addressing specific challenges and custom use cases.
It’s recommended to leverage both features in combination to ensure comprehensive protection of sensitive data throughout your conversations. For more information, see the Entity Node article.