After you have signed up with the Kore.ai Bots platform, the next step is to create a bot. Before you create a bot, it is recommended to go through the basics of bot-building from this link.
You can follow the steps given in this document to build the bot at your own pace or use the Guided Help for the step-by-step bot creation process.
To access the Guided Help, follow the below steps:
- Log in to your Kore.ai bot’s platform with valid credentials.
- On the landing page, click the help icon on the top right.
- On the Page Help window, click Guided Help next to Build a ‘Hello world’ bot with guided help.

- A list of use cases is displayed. Click Get Started to proceed with a use case.
- This document helps you with the Dialog Task Bot (Flight Status Bot).

Bot Overview
This Bot gives you the flight status arriving/departing from Los Angeles International Airport depending upon the user selection.
This Bot can:
- Ask the user if they want to know about the arrivals or departures.
- Make a service call to an API to fetch the details of flights arriving and departing out of the airport.
- Display the flight numbers based on the user preference of Arrival or Departure.
- Request the user to select a flight number.
- Display the status details of the selected flight.
- Handle any errors.
Build the Bot
You can create a Standard Bot. To create, follow the below steps:
- Log in to your Kore.ai Bots platform account.
- On the Bots landing page, click New Bot on the top-right and select the Start from Scratch option.

- On the Create New Bot window, enter the Bot details:
- Bot Name – Give a name to your Bot. For example, Airport Bot. If the name is already used, try something else.
- Select English from the Default Bot Language drop-down list and Standard Bot from the Bot Type drop-down list.
- Click Create.

Create a Dialog Task
After the Bot creation, you are directed to the Bot Summary page. The first step is to add an Intent Dialog. Intent Dialog is the first step in the user-bot conversation flow.
- On the Tasks widget, click + New Task and select Dialog Task.

- On the Create Dialog page, enter the following details:
- Intent Name – Enter the Intent name, this is the phrase that triggers the dialog. The intent name must be simple and not more than 3-4 words. For example, Get flight status.
- Under More Options, you can add a description and other dialog-related details. Let us retain the default settings.
- Click Proceed.

- You will be prompted to Upgrade to Conversation Driven Dialog Builder, select to Upgrade.
For instructions with the older Dialog Builder, refer here - On the User Intent window, by default, the Conversation Builder panel is displayed.
- Close the Conversation Builder window. We will build the dialog task using the dialog builder directly.
Create a User Preference Entity Node
An Entity node is typically used to gather information from the user. Let us use it to capture the user preference of arrival or departure details.
- Click the + icon next to the User Intent node.
- Select Entity > + New Entity.

- You can also drag and drop Entity from the node panel on the left.
- Click the newly added Entity node to open the Entity window.
- By default, the Component Properties tab is selected.
- Under the General Settings section, enter the following details:
- Name: Preference
- Display Name: Preference
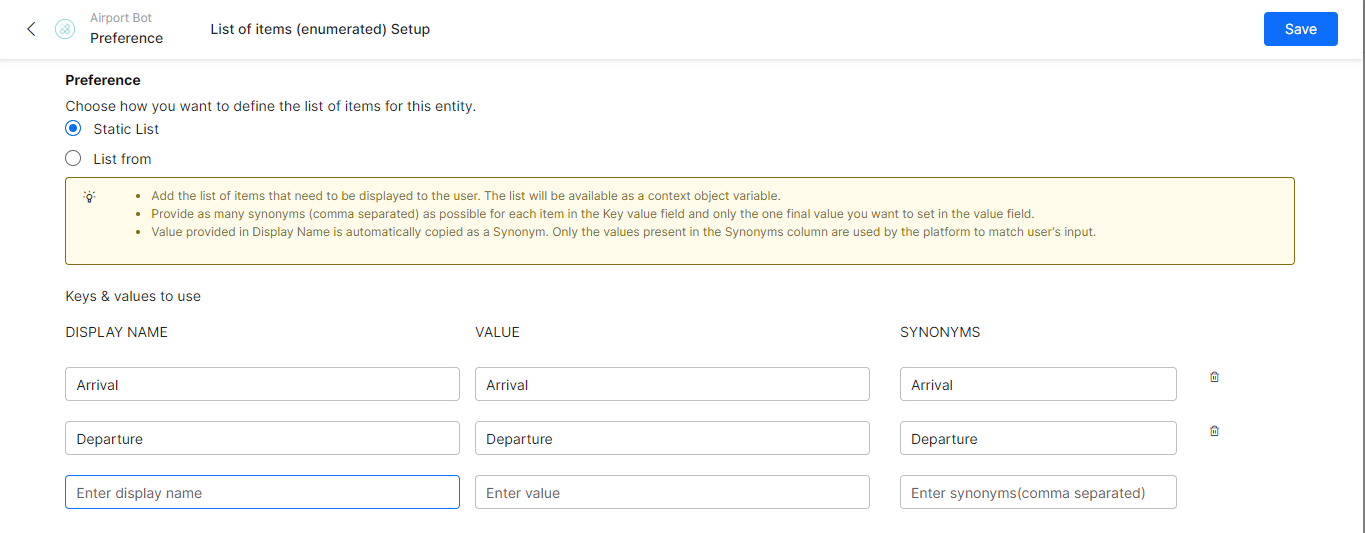
- Type: Select List of Items (enumerated) from the drop-down list. You can provide a list of values that the user can select. To add a list of values,
- Click the Settings icon next to the field.

- Select the Static List option.
- Under the Keys & Values To Use section, enter the Display Name as Arrival and Departure in separate rows. Value and Synonyms columns auto-populates, leave them as is.
- Click Save.
- Go back to the Entity window.
- Click the Settings icon next to the field.
- Under the User Prompts section, enter the following text:
Hello {{context.session.UserContext.firstName}}! Welcome to *Los Angeles International Airport*. I can help you with flight Arrival/Departure information. Please select your preference.
Note: The context variable retrieves the user’s first name. Also, markdown is used for the airport name to appear in bold. - Under the Display List of Values section, select Yes, use channel-specific standard formatting for default messages and show the available list of values to the end-user option. This displays the list of values as a button template in supported channels.

- Under the General Settings section, enter the following details:
- Close the Entity window.
Create a Service Node
A Service Bot Action node allows you to make a backend API call. Here the service node is used to call an API to get flight information for flights From and To LAX airport. In this tutorial, a dummy API setup is used.
- Click the + icon next to the Preference Entity node.
- Select Bot Action > + New Bot Action.
- Under the General Settings section, enter the following details:
- Name: FlightDetails
- Display Name: Flight Details
- Click the + next to the Bot Action node to expand the Bot Action.
- From within the bot action node click +
- Select Service > + New service.
- The service node is used to make a backend API call to get flight information for flights From and To LAX airport.
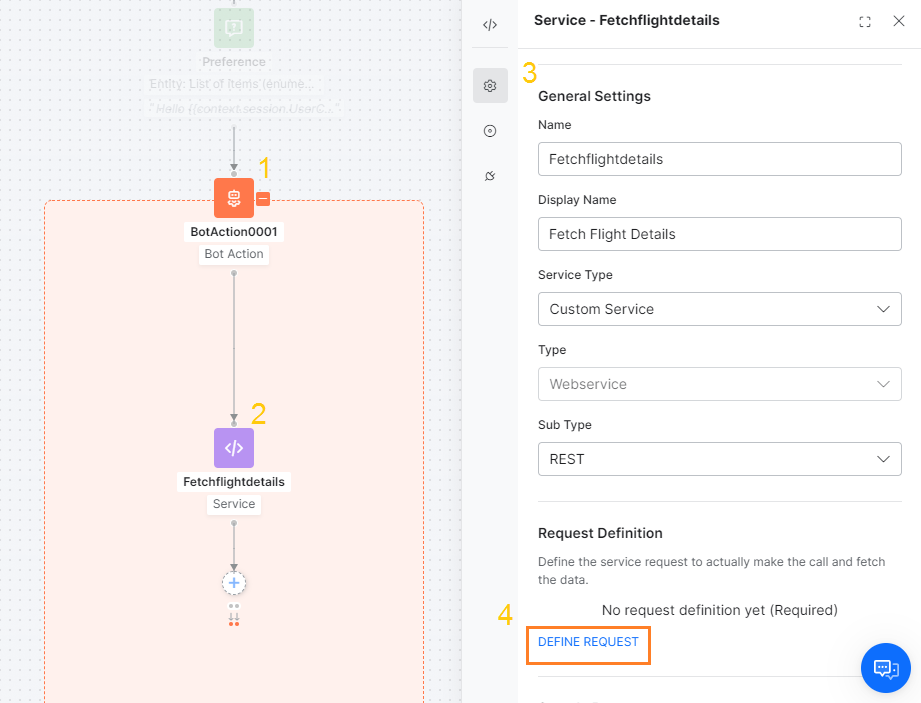
- Click the Service node to open the Service window, by default, the Component Properties tab is selected.
- Under the General Settings section, enter the following details:
- Name: Fetchflightdetails
- Display Name: Fetch Flight Details
- Service Type: Custom Service
- Type: Webservice
- Sub Type: REST
- Under the Request Definition section, Click DEFINE REQUEST.
- On the Define Request page, enter the following details:
- Request Type – GET
- Request URL –
http://5e85a56644467600161c6579.mockapi.io/FlightDetails
This API does not require any Auth or Header Parameters. - Click the Test Request tab.
- Click Test on the top-right.
- Wait for the test to complete and you get a Status Code 200.
- Click Save as Sample Response.
- Click Save.

- Return to the dialog builder
- Under the Connections section, set the Default Connection Rule to End of Bot Action
- Close the Service window.
- Collapse the Bot Action node.
Create a Flight Selection Entity Node
This Entity node is to capture the Flight Number for which the user wants the status details.
- Click the + icon next to the Flight Details Bot Action node.
- Select Entity > New entity node +.
- The Entity node is required to capture the flight number selected by the user.
- On the Entity window, by default, the Component Properties tab is selected.
- Under the General Settings section, enter the following details:
- Name: SelectFlight
- Display Name: Select Flight
- Type: String (users can write a custom script to convert the API string output to a list of values in the following steps, this is the requirement of the dummy API used)
- Under the User Prompts section, enter the following text:
Please provide the flight number.- Manage: Users can define a specific prompt for the Web SDK channel.
- Click MANAGE.

- Click ADD PROMPT MESSAGE.
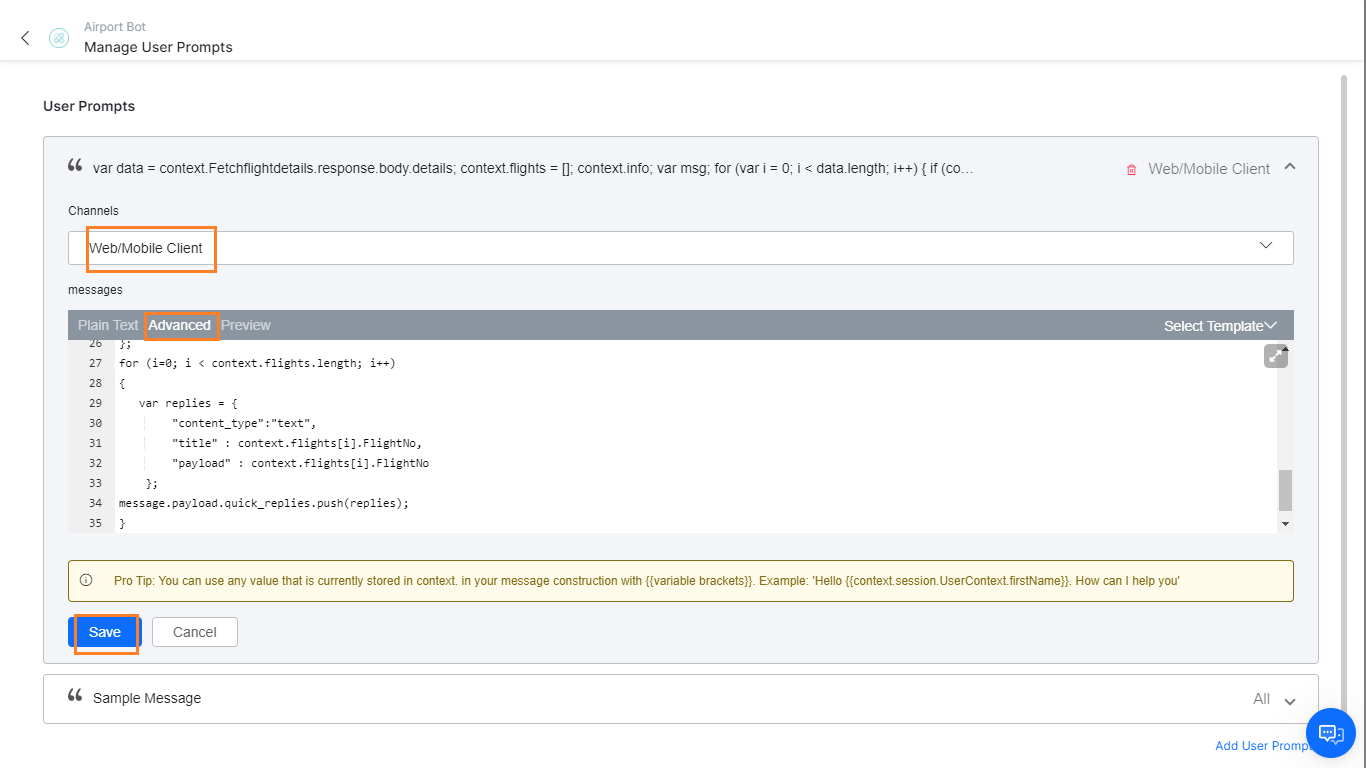
- On the New Prompt Message window, select Web/Mobile client from the Channel drop-down list.
- Under the Message section, click the JavaScript tab.
- Enter the following JavaScript. The JavaScript extracts flight numbers matching user preference from the string output from API call and displays them in the Quick Reply format.
var data = context.Fetchflightdetails.response.body.details;
context.flights = [];
context.info;
var msg;
for (var i = 0; i < data.length; i++)
{
    if (context.entities.Preference == data[i].Type)
    {
        var details = {
            "Airlines" : data[i].Airlines,
            "FlightNo" : data[i].FlightNo,
            "Airport" : data[i].Airport,
            "AirportName" : data[i].AirportName,
            "Time" : data[i].Time
        };
        context.flights.push(details);
    }
}
var message = {
    "type" : "template",
    "payload" : {
       "template_type" : "quick_replies",
       "text" : "Here are the flights " + context.entities.Preference + " details for Los Angeles International Airport today. Please select the flight number to see details",
       "quick_replies" : []
    }
};
for (i=0; i < context.flights.length; i++)
{
   var replies = {
        "content_type":"text",
        "title" : context.flights[i].FlightNo,
        "payload" : context.flights[i].FlightNo
    };
message.payload.quick_replies.push(replies);
}
return JSON.stringify(message);
- Click Save.
- Go back to Dialog Builder and close the Entity window.
Create a Script Node
A Script node is used to write custom JavaScript in the Dialog task. Here, users can use the script to extract the selected flight details. Later, users can add more functionality to this script.
- Click the + icon next to the Select Flight Entity node.
- Select Bot Action > + New Bot Action.
- Under the General Settings section, enter the following details:
- Name: Flight Validation
- Display Name: Flight Validation
- Click the + next to the Bot Action node to expand the Bot Action.
- From within the bot action node click +
- Select Script > New script node +.
- On the Script window, by default, the Component Properties tab is selected.
- Under the General Settings section, enter the following details:
- Name: ValidateFlight
- Display Name: Validate Flight
- Under the Script Definition section, click Define Script.
- On the Add Script dialog box, copy the following JavaScript. This code extracts the details of the selected flight number.
context.details; var x = context.flights.length; for (var l = 0; l < x; l++) { if (context.entities.SelectFlight == context.flights[l].FlightNo) { context.details = { "Airlines" : context.flights[l].Airlines, "FlightNo" : context.flights[l].FlightNo, "Airport" : context.flights[l].Airport, "AirportName" : context.flights[l].AirportName, "Time" :context.flights[l].Time }; break; } } - Click Save.
- Under the Connections section, set the Default Connection Rule to End of Bot Action
- Close the Script window.
- Collapse the Bot Action node.
Create a Message Node
A Message node is used to display a message from the Bot to the user. Here, users can use the Message node to show appropriate flight details, based on user preference.
- Click the + icon next to the Validate Flight Script node.
- Select Message > New message node +.
- On the Message window, by default, the Component Properties tab is selected.
- Under the General Settings section, enter the following details:
- Name: FlightDetails
- Display Name: Flight Details
- Under the Bot Responses section, enter the following text:
Here are your flight details. - Click Enter to save.
- Manage Prompts: Users can define a specific prompt for the Web SDK channel.
- Click Manage.
- On the Manage Bot Responses page, click ADD BOT RESPONSE.
- Select Web/Mobile client from the Channel drop-down list.
- Under the Message section, click the JavaScript tab.
- Copy the following JavaScript. The JavaScript is written to display the flight details in the Table format.
var message = {
 "type": "template",
 "payload": {
 "template_type": "mini_table",
 "layout": "horizontal",
 "text":"Flight " + context.entities.Preference + " Information" ,
 "elements": [
 {
 "primary":[["Flight No"], [context.details.FlightNo, "right"]],
 "additional":[["Airlines", context.details.Airlines],["From",context.details.Airport],["Time",context.details.Time],["Remarks","On Time"]]
 }
 ]
}
};
print(JSON.stringify(message));
-
- Click Save.
- Go back to the Message window.
- On the Message window, click the Connections tab.
- From the drop-down list, change the default connection from Not Connected to End of Dialog.
- Click Save.
- Close the Message window.
Test the Bot
To test the Dialog task, you can use the Talk to bot option at the bottom right.
- Enter the utterance (intent name) Get me the flight status.
- Follow the Bot instructions:
- Select Arrival/Departure
- Select Flight No
- See the flight details displayed in a tabular format.

Add Events
Currently, the Bot is waiting for user input on the start. Also, the Bot can guide the user at the start of the conversation. For this, you can add an Event Handler to initiate this task every time a new connection is established from the Web/Mobile SDK.
- Close the Dialog Builder and go to the Bot Tasks page.
- From the Left Navigation pane, and select Intelligence > Events.
- From the events list, click Configure against the On Connect event.
- On the On Connect window, by default, the Initiate Task option is selected; retain it.
- From the drop-down list, select the Get Flight Status task.
- Click Save and Enable.

Test the Bot
To test the Dialog task, you can use the Talk to bot option at the bottom right. Since the onConnect event is configured, the dialog is automatically initiated.
Follow the Bot instructions:
- Select Arrival/Departure
- Instead of selecting Flight No, manually enter a number that does not exist on the list.
- You can see a generic message like I am sorry, something went wrong and I had to discard your task. Please retry”.
In the next steps, you can see how to rectify this.
Modify Script Node
As the String type is used in the Select Flight entity, you can handle the scenario that the user, instead of selecting from the list, has manually entered an incorrect flight number. You can do this by displaying an appropriate message based on Connections.
In this step, you can modify the script that you saved earlier to add verification of the user entry.
- Open the Dialog Builder page. You can do this either
- From the Left Navigation pane, click Conversational Skills -> Dialog Tasks and select the Get Flight Status task.
- From the Left Navigation pane, click Summary select the Get Flight Status task.
- Select ValidateFlight Script node.
- On the Validate Flight Script window, under the Script Definition section, click Edit Script.
- On the Add Script dialog box, copy the following JavaScript and replace the existing code. You can add a valid tag to be set when the flight number entered by the user matches an entry returned by the API service call.
context.valid = false; context.details; var x = context.flights.length; for (var l = 0; l < x; l++) { if (context.entities.SelectFlight == context.flights[l].FlightNo) { context.valid = true; context.details = { "Airlines" : context.flights[l].Airlines, "FlightNo" : context.flights[l].FlightNo, "Airport" : context.flights[l].Airport, "AirportName" : context.flights[l].AirportName, "Time" :context.flights[l].Time }; break; } } if (context.valid === false) { delete context.entities.SelectFlight; } - Close the Validate Flight Script window.
Create Conditional Flow
The following are the steps to add the conditional flow from the Validate Flight Script node. A new connection from this Script node to a new Message node is established. This is to display an error message from the Bot to the user and redirect to select the flight number again.
Create Error Message
- Hover over the connection between Flight Validation bot action node and Flight Details message node.
- You can see Add Node button, click the same.
- Create a new Bot message node.
- Select Message > New message node +.
- On the Message window, by default, the Component Properties tab is selected.
- Under the General Settings section, enter the following details:
- Name: ErrorMessage
- Display Name: Error Message
- Under the Bot Responses section, enter the following text:
The Flight number entered is incorrect. Let us start again.- Click Enter to save.
- Click Enter to save.
- Click the Connections tab.
- From the drop-down list, change the default connection from Not Connected to SelectFlight.
- Click Save.
- Close the Error Message window.
ValidateFlight Script Connections
- Click the Flight Validation bot action node.
- On the Flight Validation bot action window, click the Connections tab.
- Click + ADD IF.
- Under the IF section,
- Select Context
- For If Condition, enter the text as valid.
- Select the operator as equals.
- Enter the value as true.
- If this condition is true, then the dialog goes to FlightDetails.
- Under the ELSE section,
- If this condition is false, then the dialog goes to ErrorMessage.
- Click Save.
- Close the Validate Flight Script window.

Test the Bot
To test the Dialog task, you can use the Talk to bot option at the bottom right. Since the onConnect event is configured, the dialog is automatically initiated. Alternately, you can always try the following utterance (intent name) Get me the flight status.
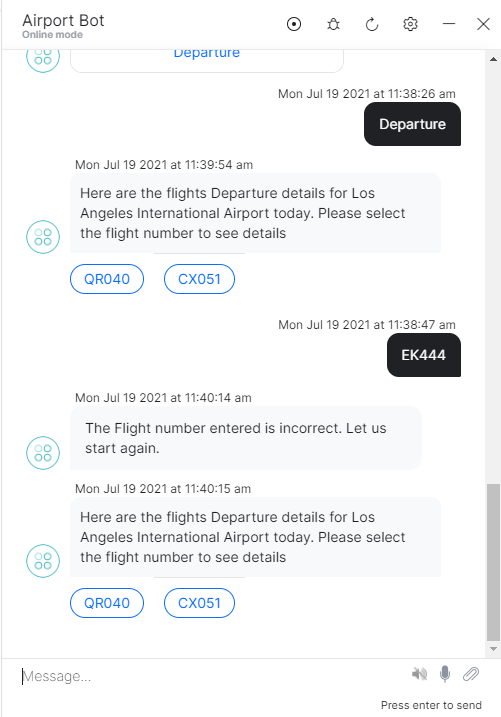
Follow the Bot instructions:
- Select Arrival/Departure
- Enter an invalid flight number.
- You can see the appropriate error message and be prompted to enter the flight number again.
- Select a flight number.
- You can see the flight details in a tabular format.
You have successfully created and tested your first Bot.
The next steps are to:
- Train your Bot to respond to various user utterances like I want to know the status of a flight, What is the status of QR040? You can achieve this by training your Bot.
- Enable a channel and publish your Bot for user access. See here for more.